Actions for Email Automation#
In Mailytica, actions are a series of automated tasks applied to incoming messages, such as labelling them and forwarding them to other recipients. Actions are defined individually for each email Topic.
More specifically, Mailytica gives you the power to automatically tag, forward, or sort incoming messages according to personal criteria, such as:
Criteria
Intention: Automatically sort incoming messages into different folders according to the type of request.
Prioritization: Messages can be classified as urgent, important, or low priority and automatically tagged accordingly.
Sentiment: Sort messages into positive, neutral, and negative categories according to the sentiment expressed in their content.
Segment: Automatically sort messages into different folders by customer type or product category.
You can set up criteria such as these by creating a classification model based on the topics of your email messages.
Warning
Mailytica can only perform these actions on your behalf if you link your email account to a specific project. To do this, please follow the steps outlined in Linked Accounts.
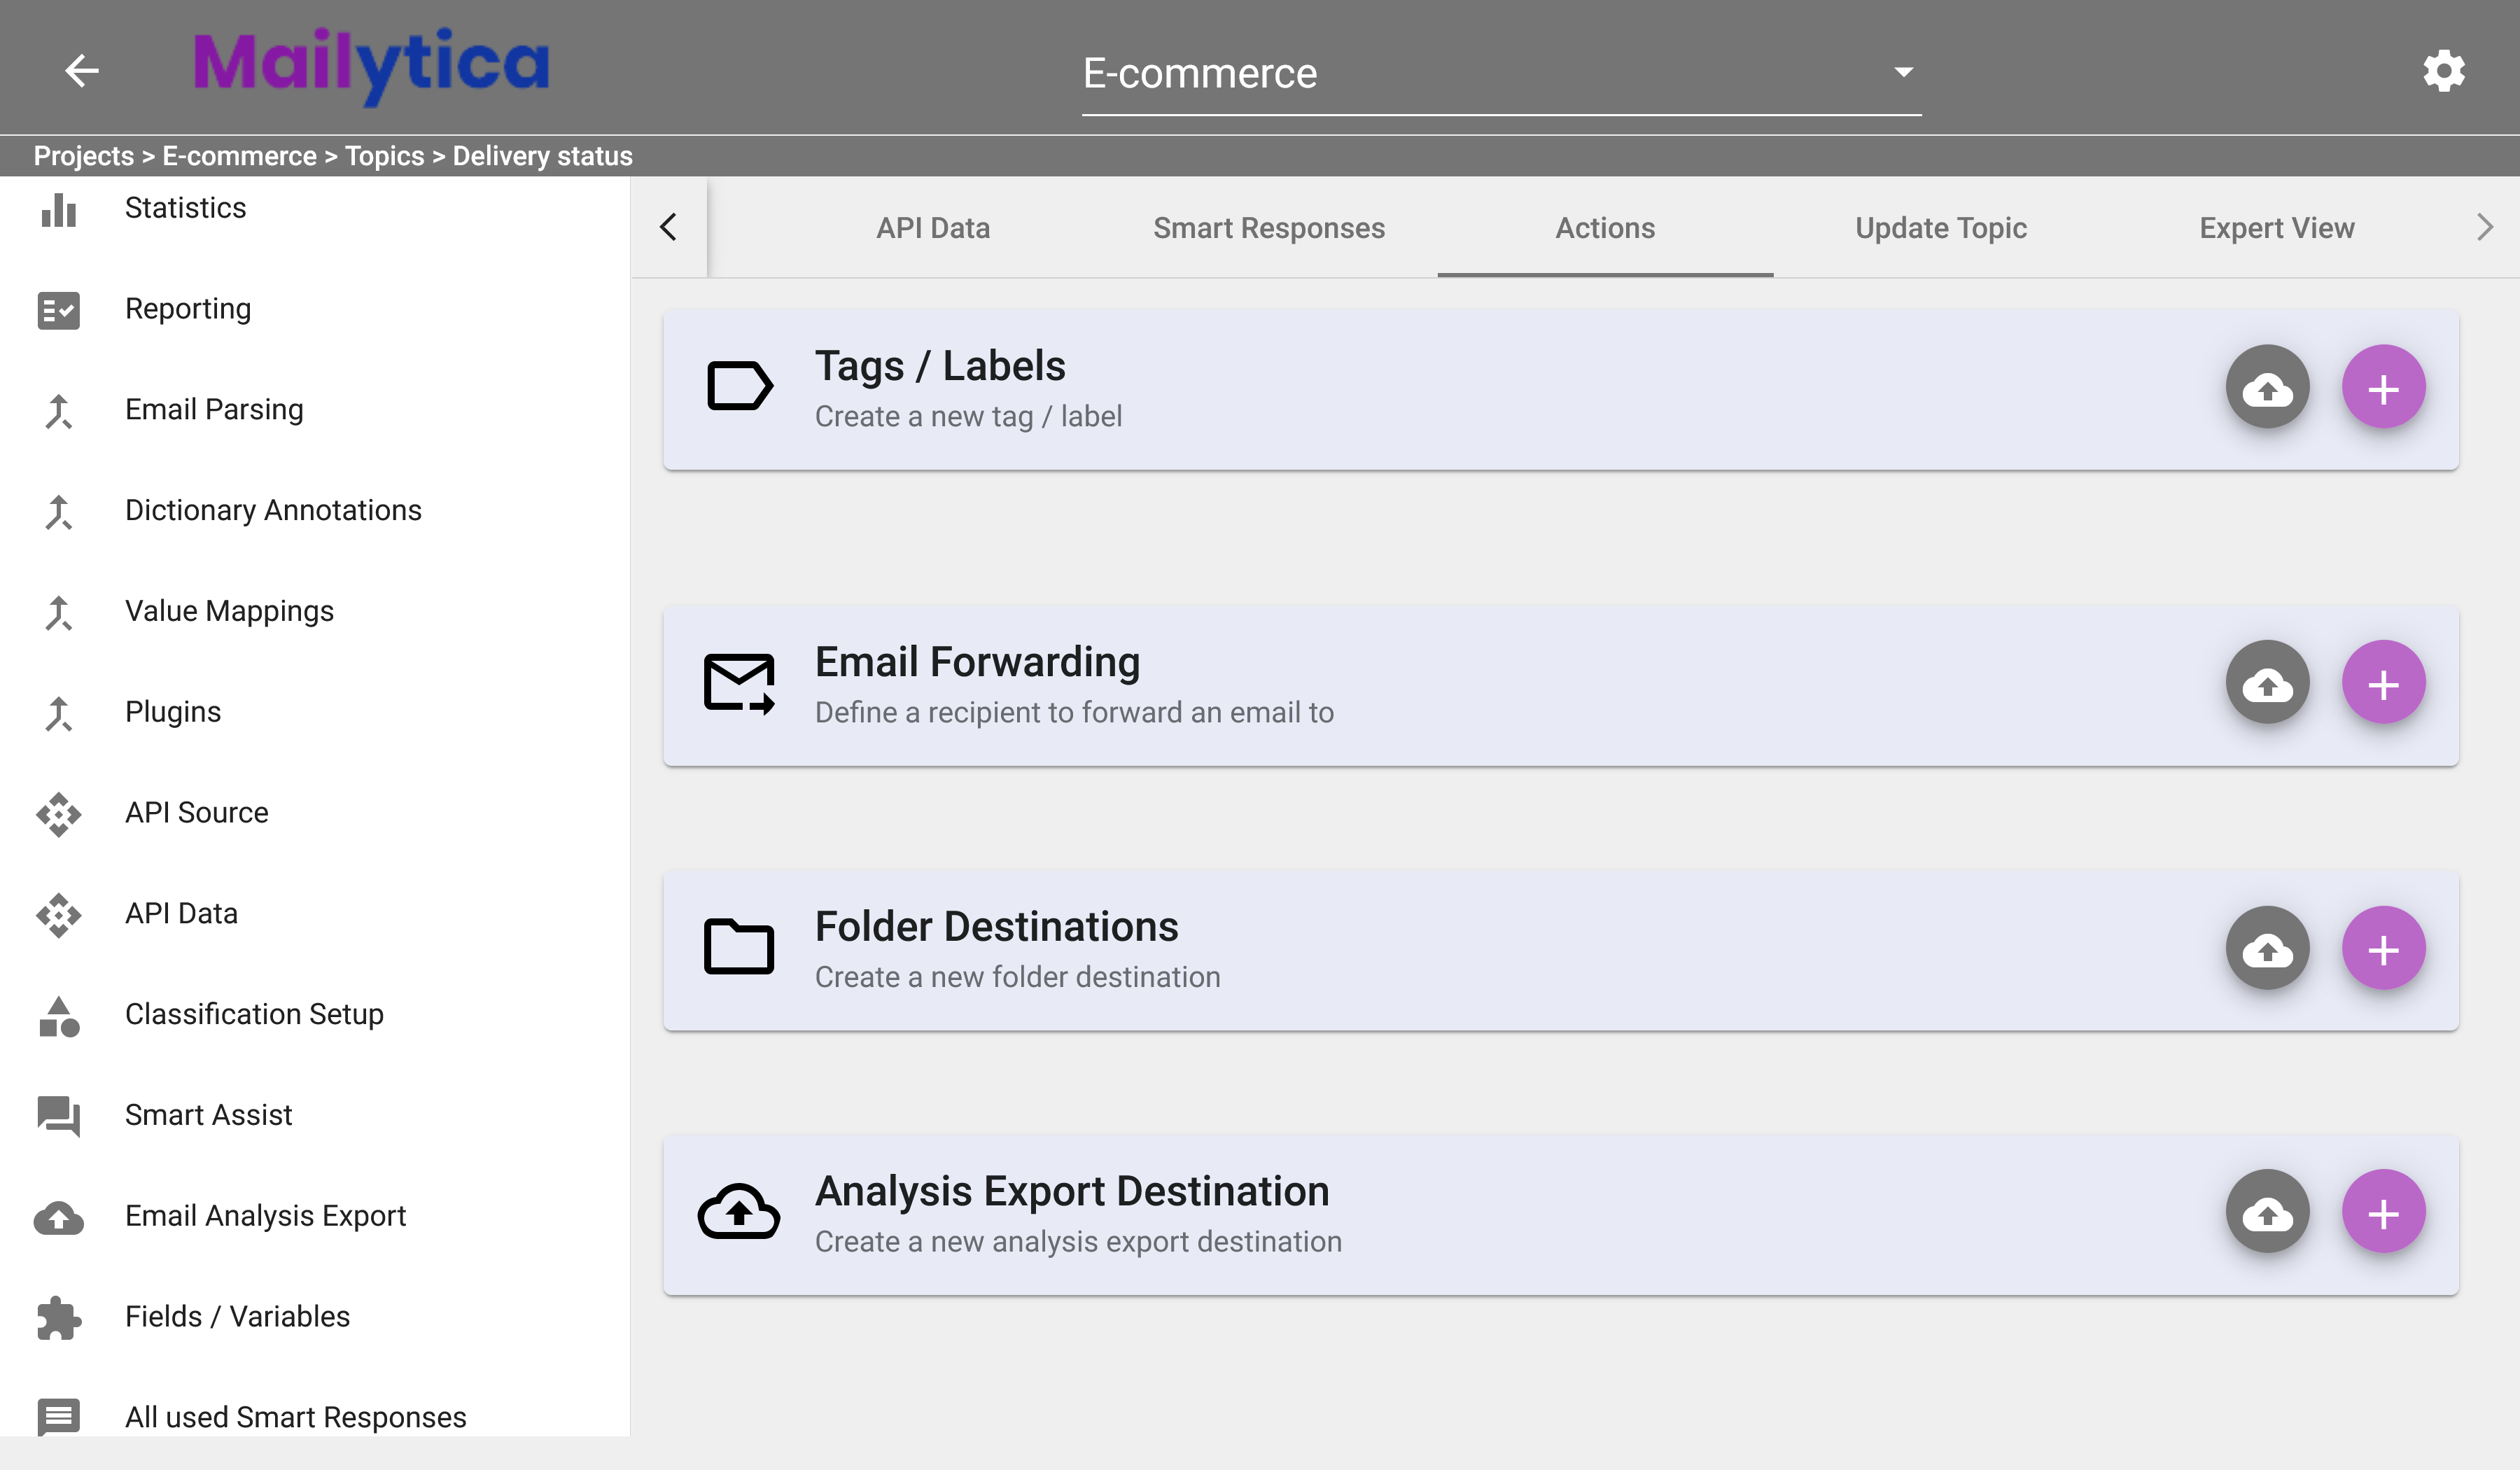
Tags / Labels#
Email labels are a way of organizing your messages, so you can easily search, filter, and find what you’re looking for. Mailytica can automatically assign labels to incoming emails according to their Topic.
For example, you can train Mailytica to recognize urgent messages and then label them as Important.
You can have as many labels as you need, and each label applies to a specific Topic.
Requirements
Before setting up Labels, you must make sure the following requirements are met:
You have created a Topic (Topics).
You have properly configured at least one Classification Model (Classification Setup).
You have linked one email account, and the Assign Topic Labels option is Active (Linked Accounts).
Labels work in the following way: Once Mailytica classifies an incoming message with the Topic you’ve created, it will automatically assign the label inside your email client. For instance, if Mailytica detects an incoming message about deliveries—say from a client asking if their order has shipped—it will also add the label Deliveries to that email in your inbox.
In addition, Mailytica’s labels are customizable. You can choose the color of the label as it will appear in your email client.
Note
Mailytica can automatically label email messages in any client or account (Outlook, Gmail, etc.)—except for IMAP clients that don’t support labels.
To add a new label, complete these steps:
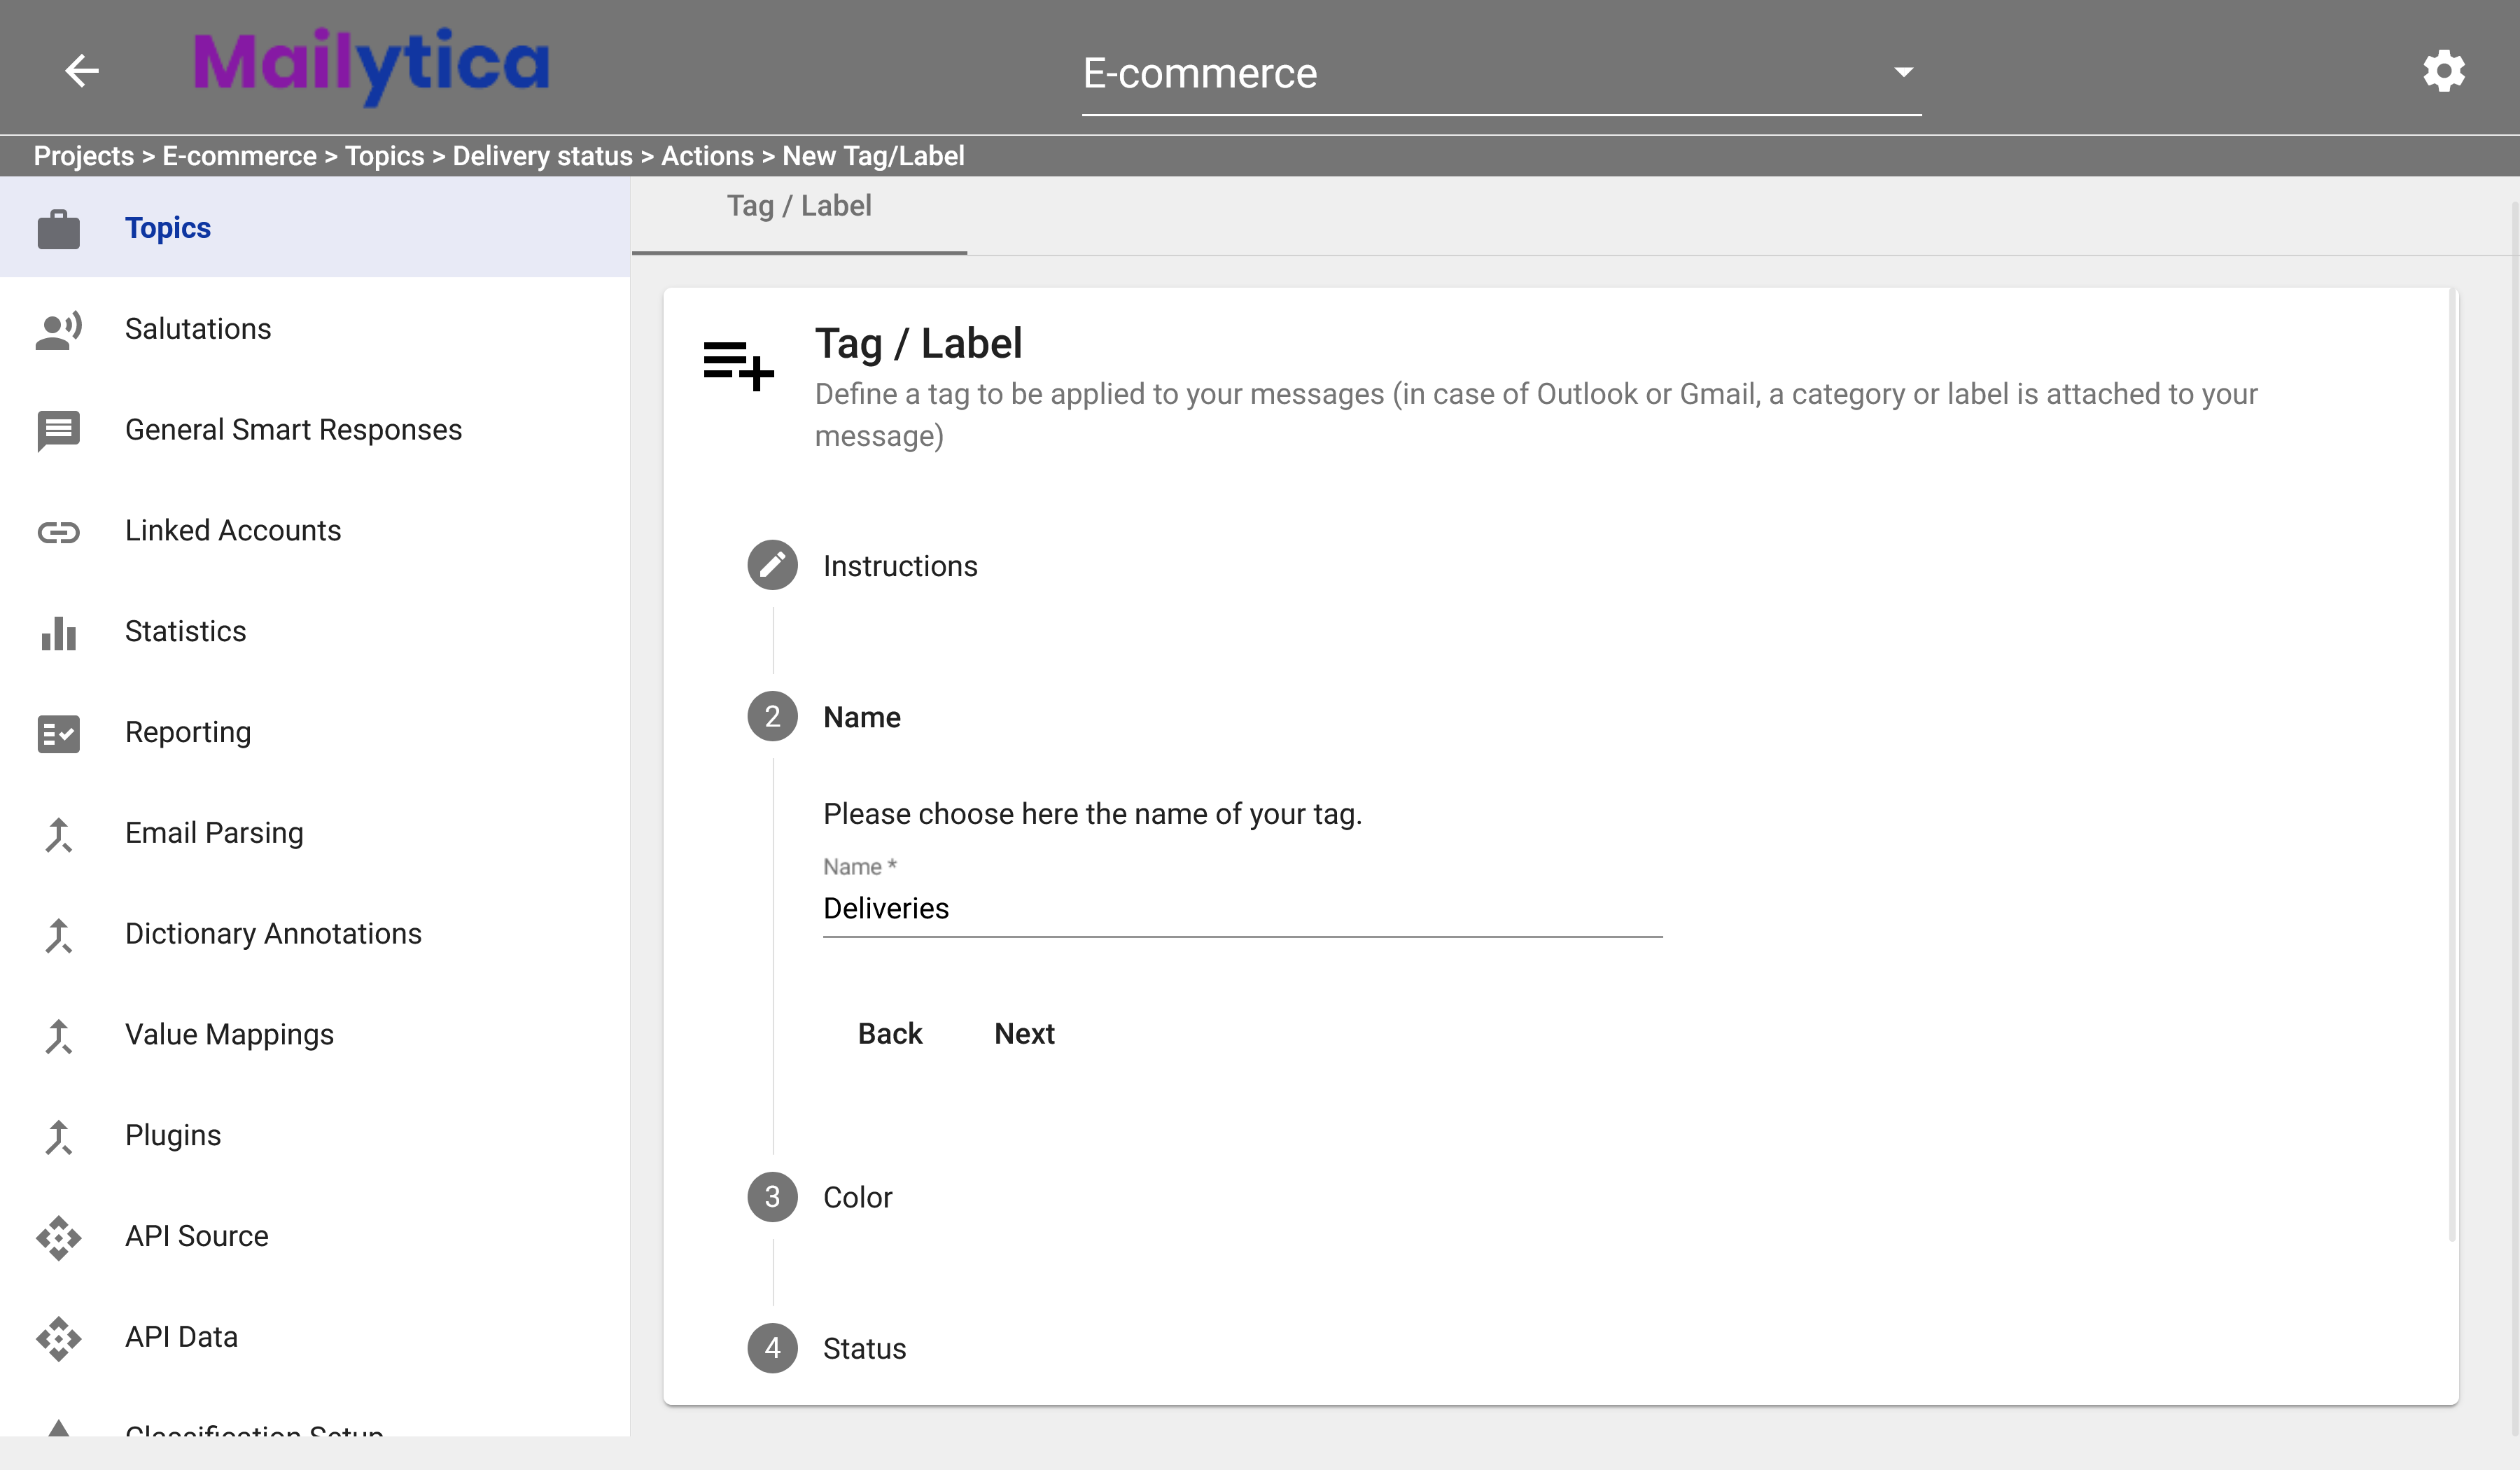
To get started, you need to have already created a topic as explained in the Add a New Topic section. Then, in the Edit section of your topic, select Actions from the top tab bar. Click on the button in the Tags / Labels card. The Tags / Labels section will show you the instructions on how to create new labels. Click Next.
Under Name write the name of your labels as you would like it to appear in your email client. For example, we’ll type Deliveries into this field.
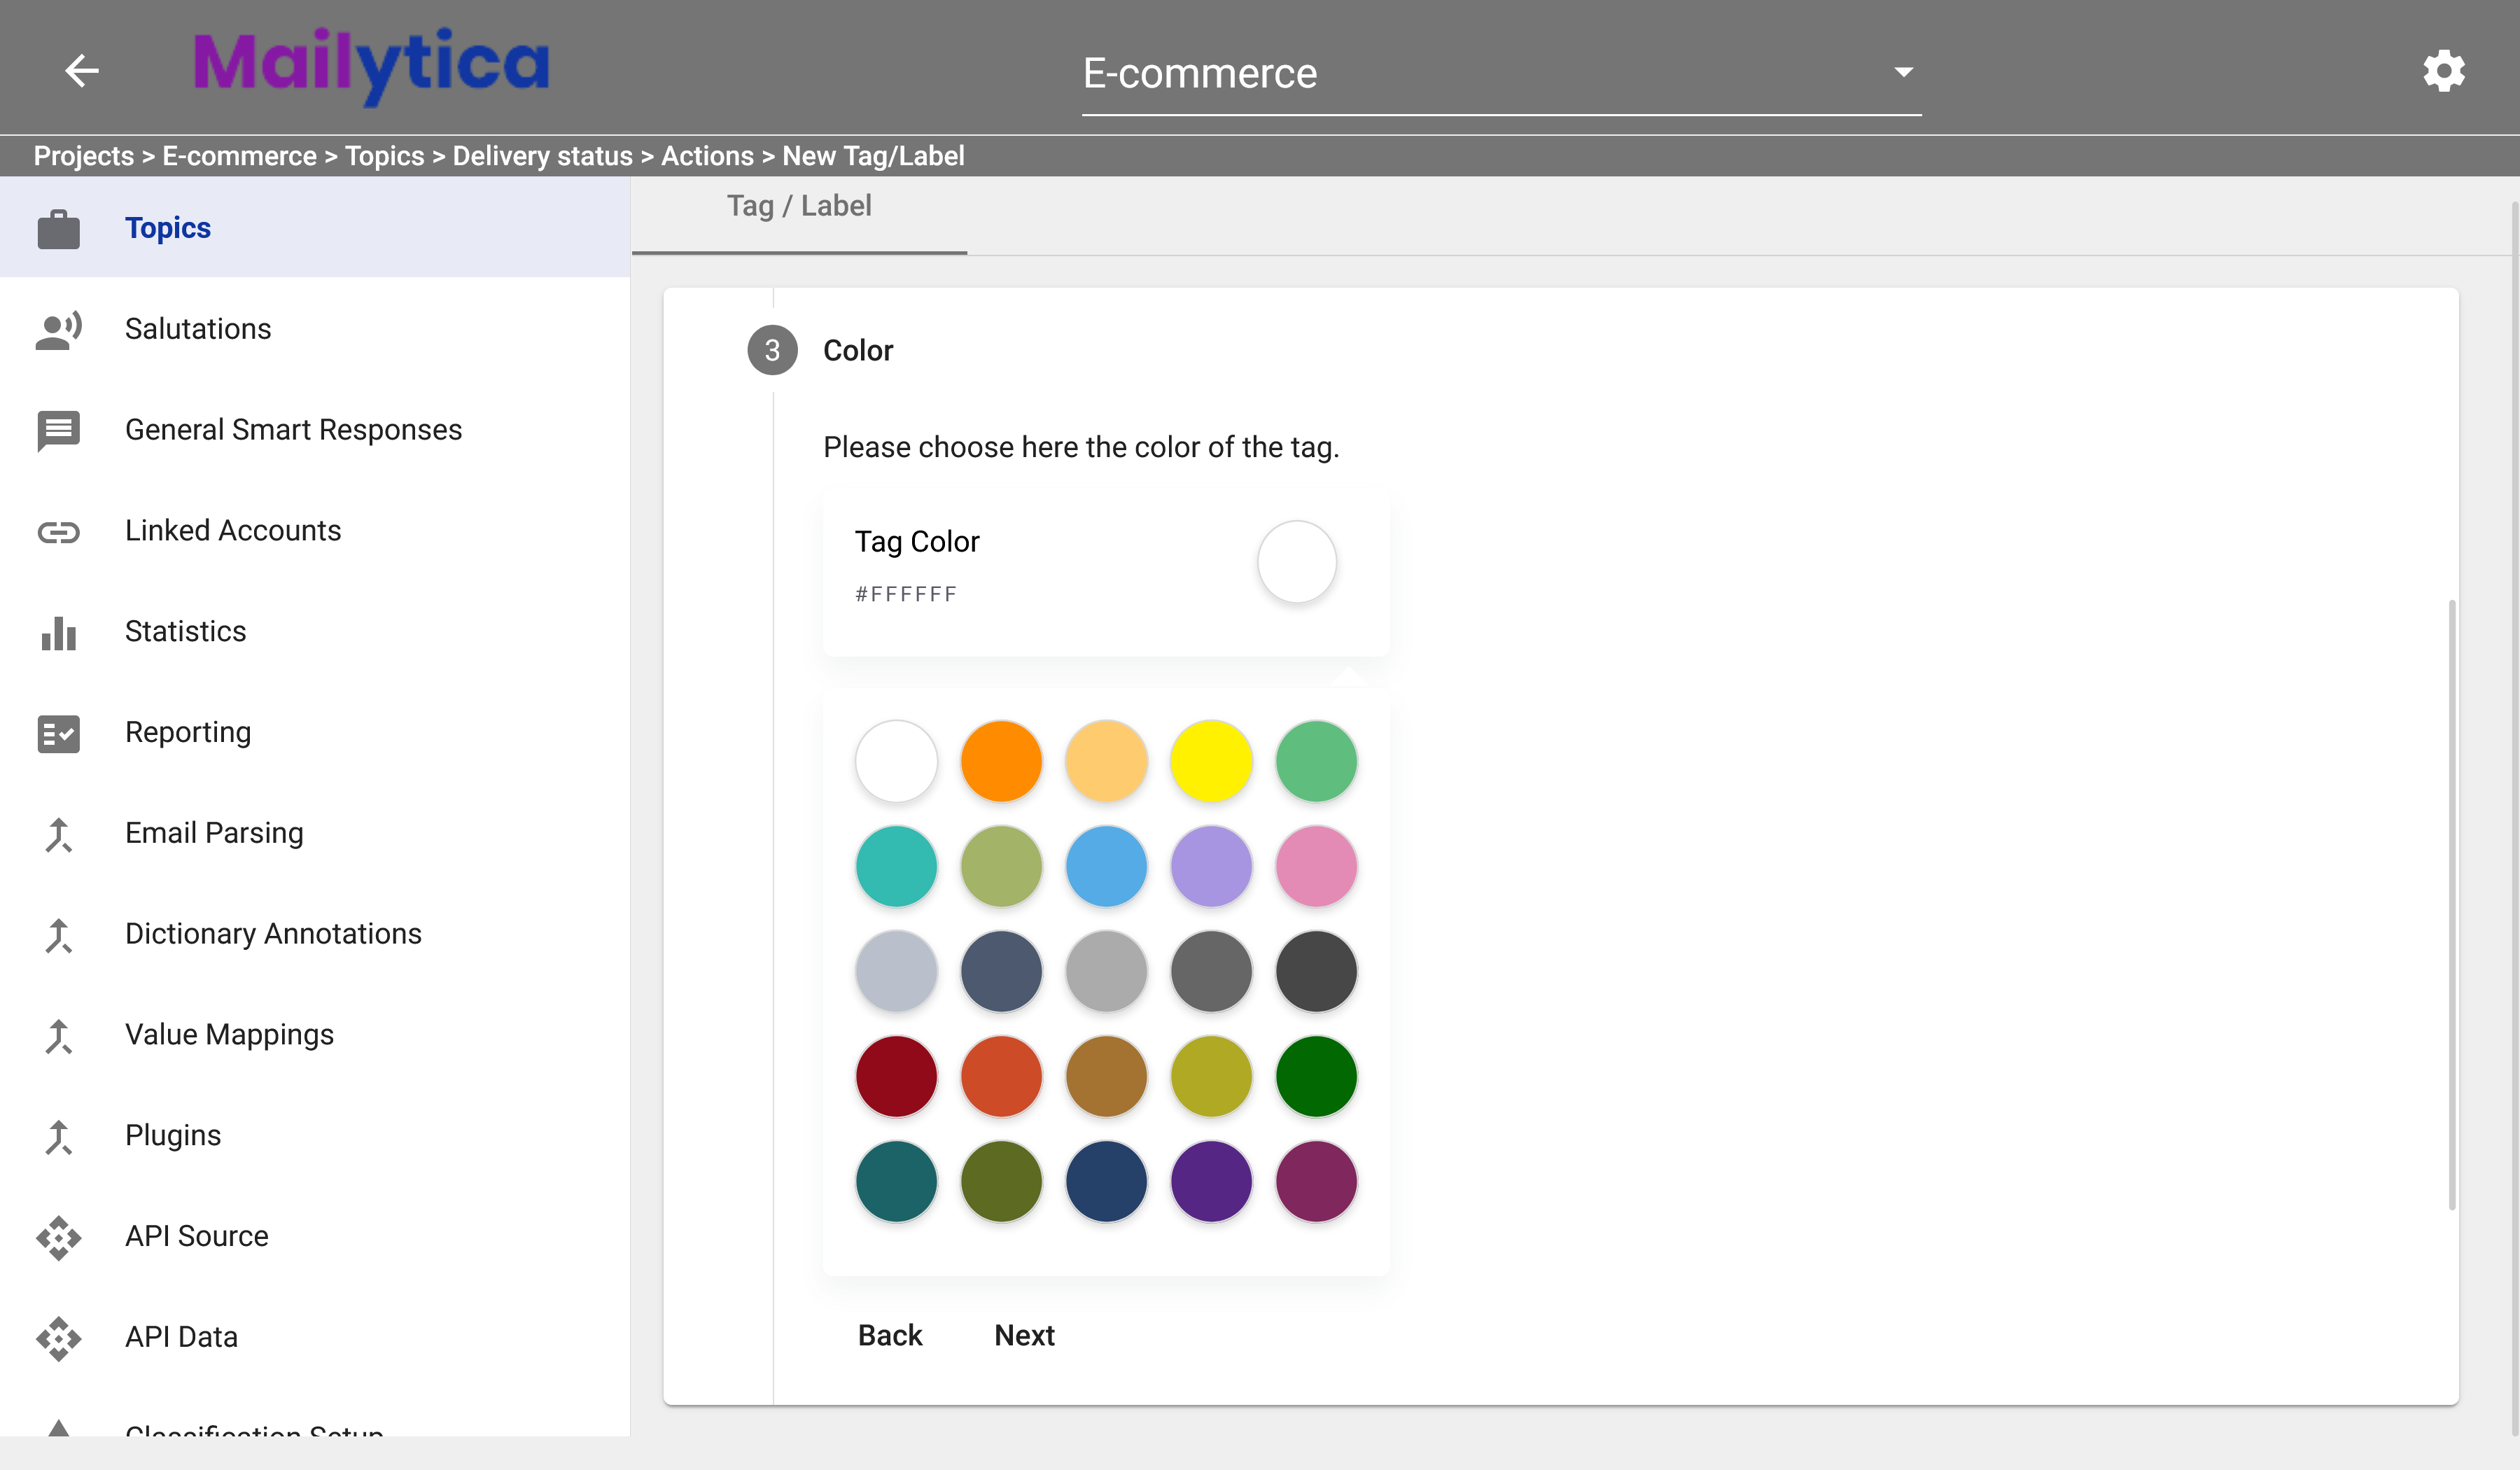
Next, select a Color to be used in your email client when displaying the label. To do this, click on Tag Color and then select a color from the list. In this example, we’re going to set the label’s color to green so that it will be displayed as Deliveries.
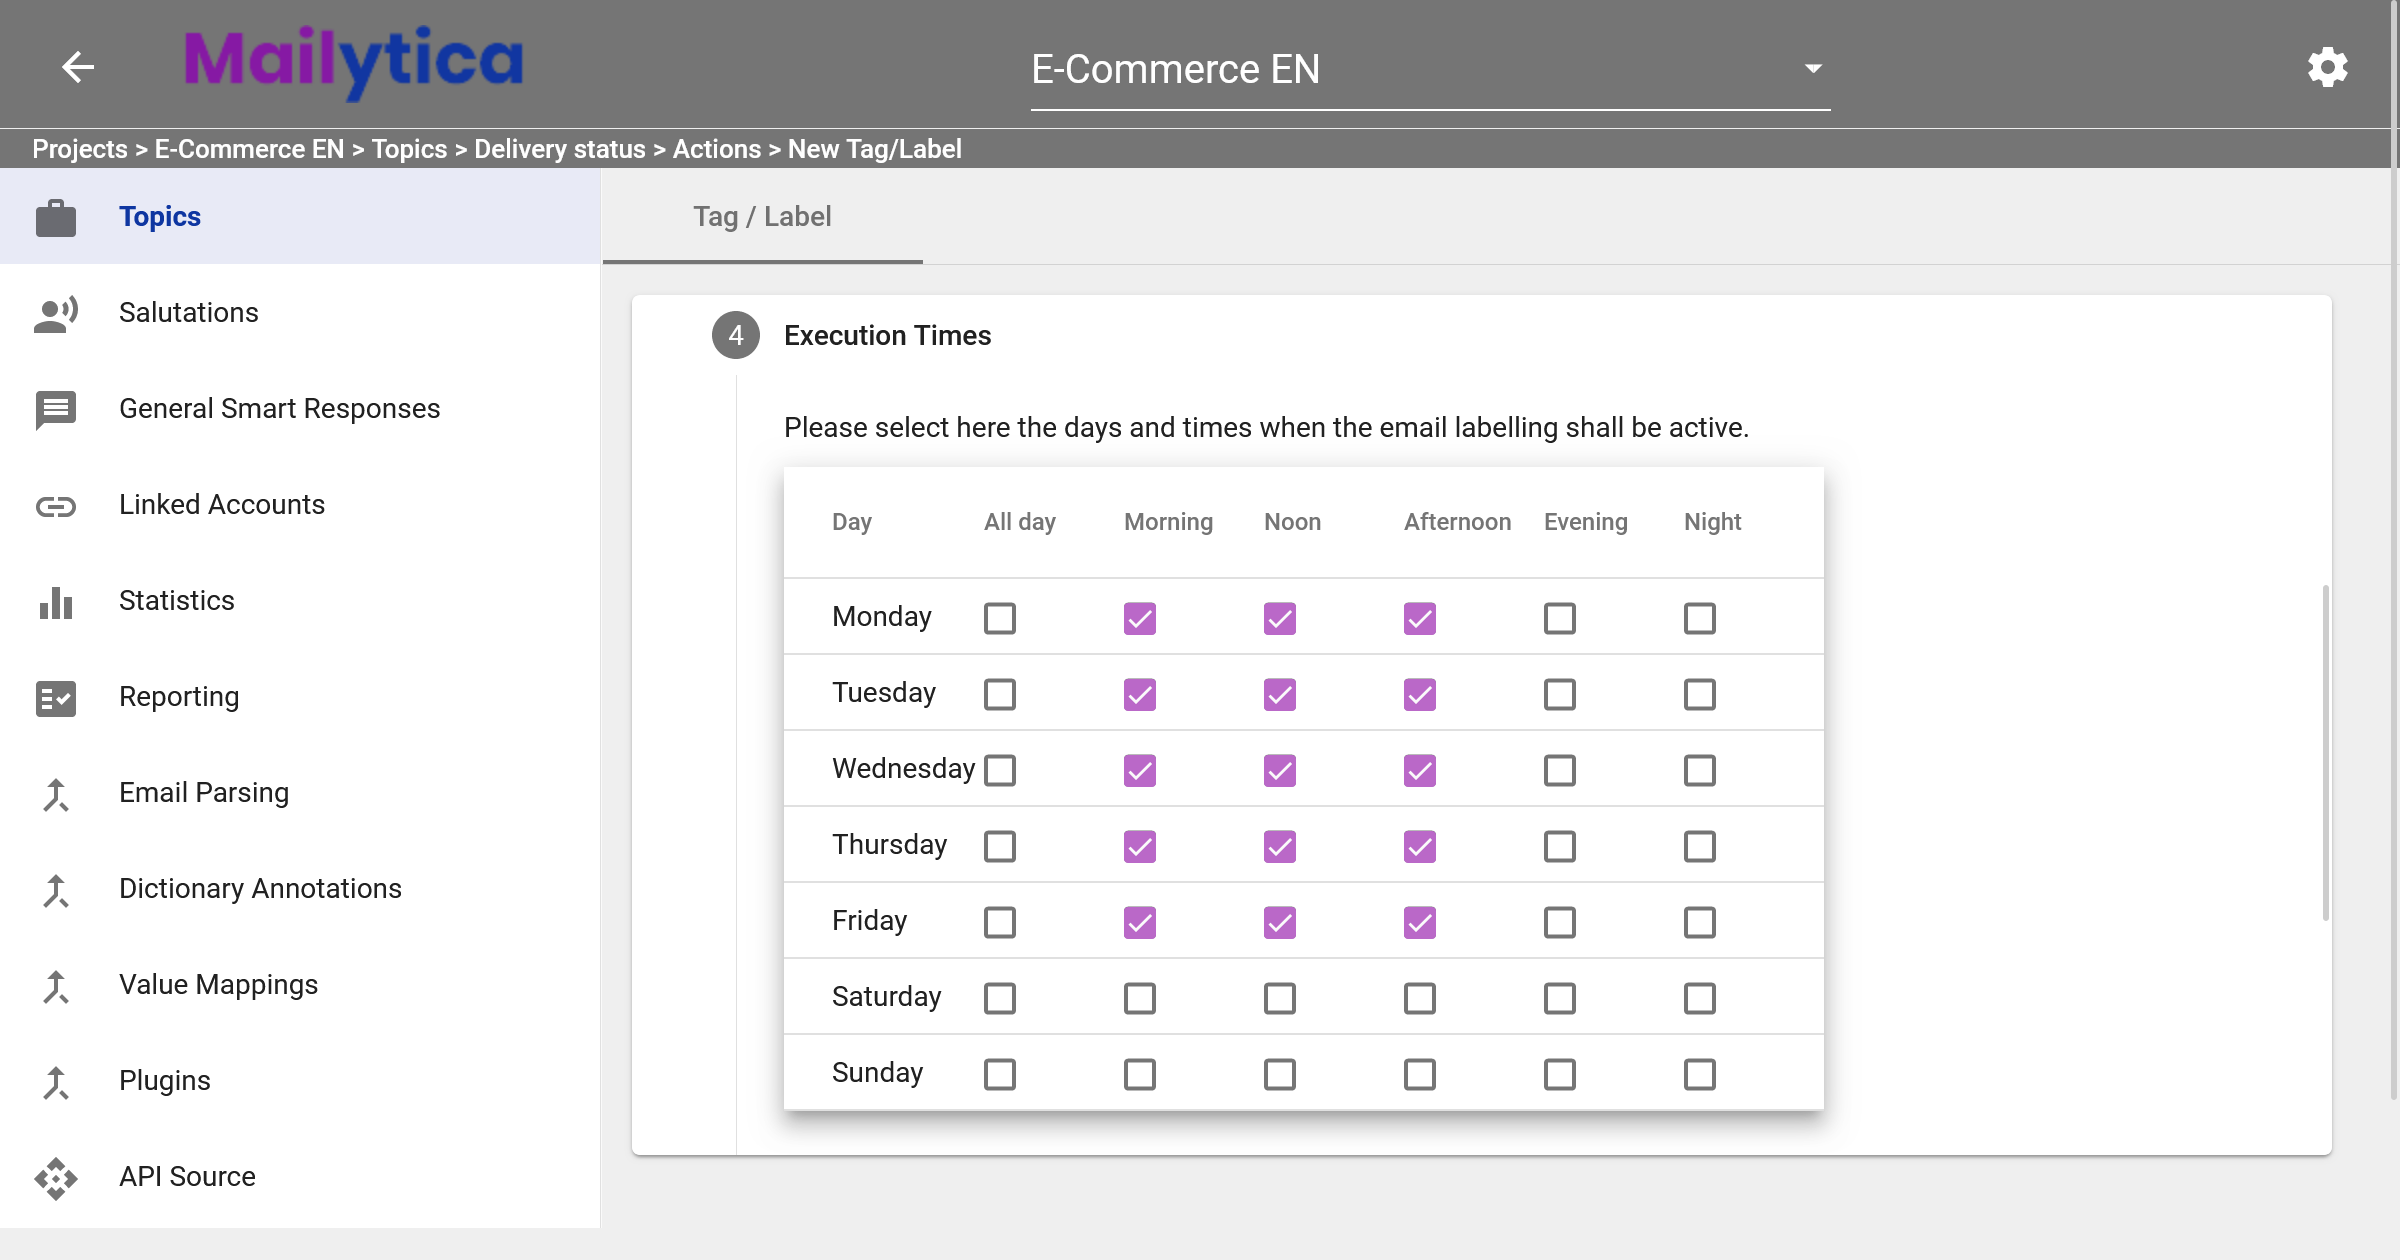
Then in Execution Times, you can select the days of the week and the times during which the automatic labelling functionality should be active. This feature is particularly useful if want to ensure that automatic labelling is only carried out during working days and/or hours.
Similarly, in the Execution Conditions section, you can define conditions based on metadata fields extracted from incoming emails. You might use Mailytica’s default data (such as sender address, email subject, as seen in Mailytica’s Email Data), or custom user-defined variables (as explained in Fields / Variables). For example, you could configure the tag Urgent to be applied only if the subject contains the word urgent or if the email is from a specified high-priority client.
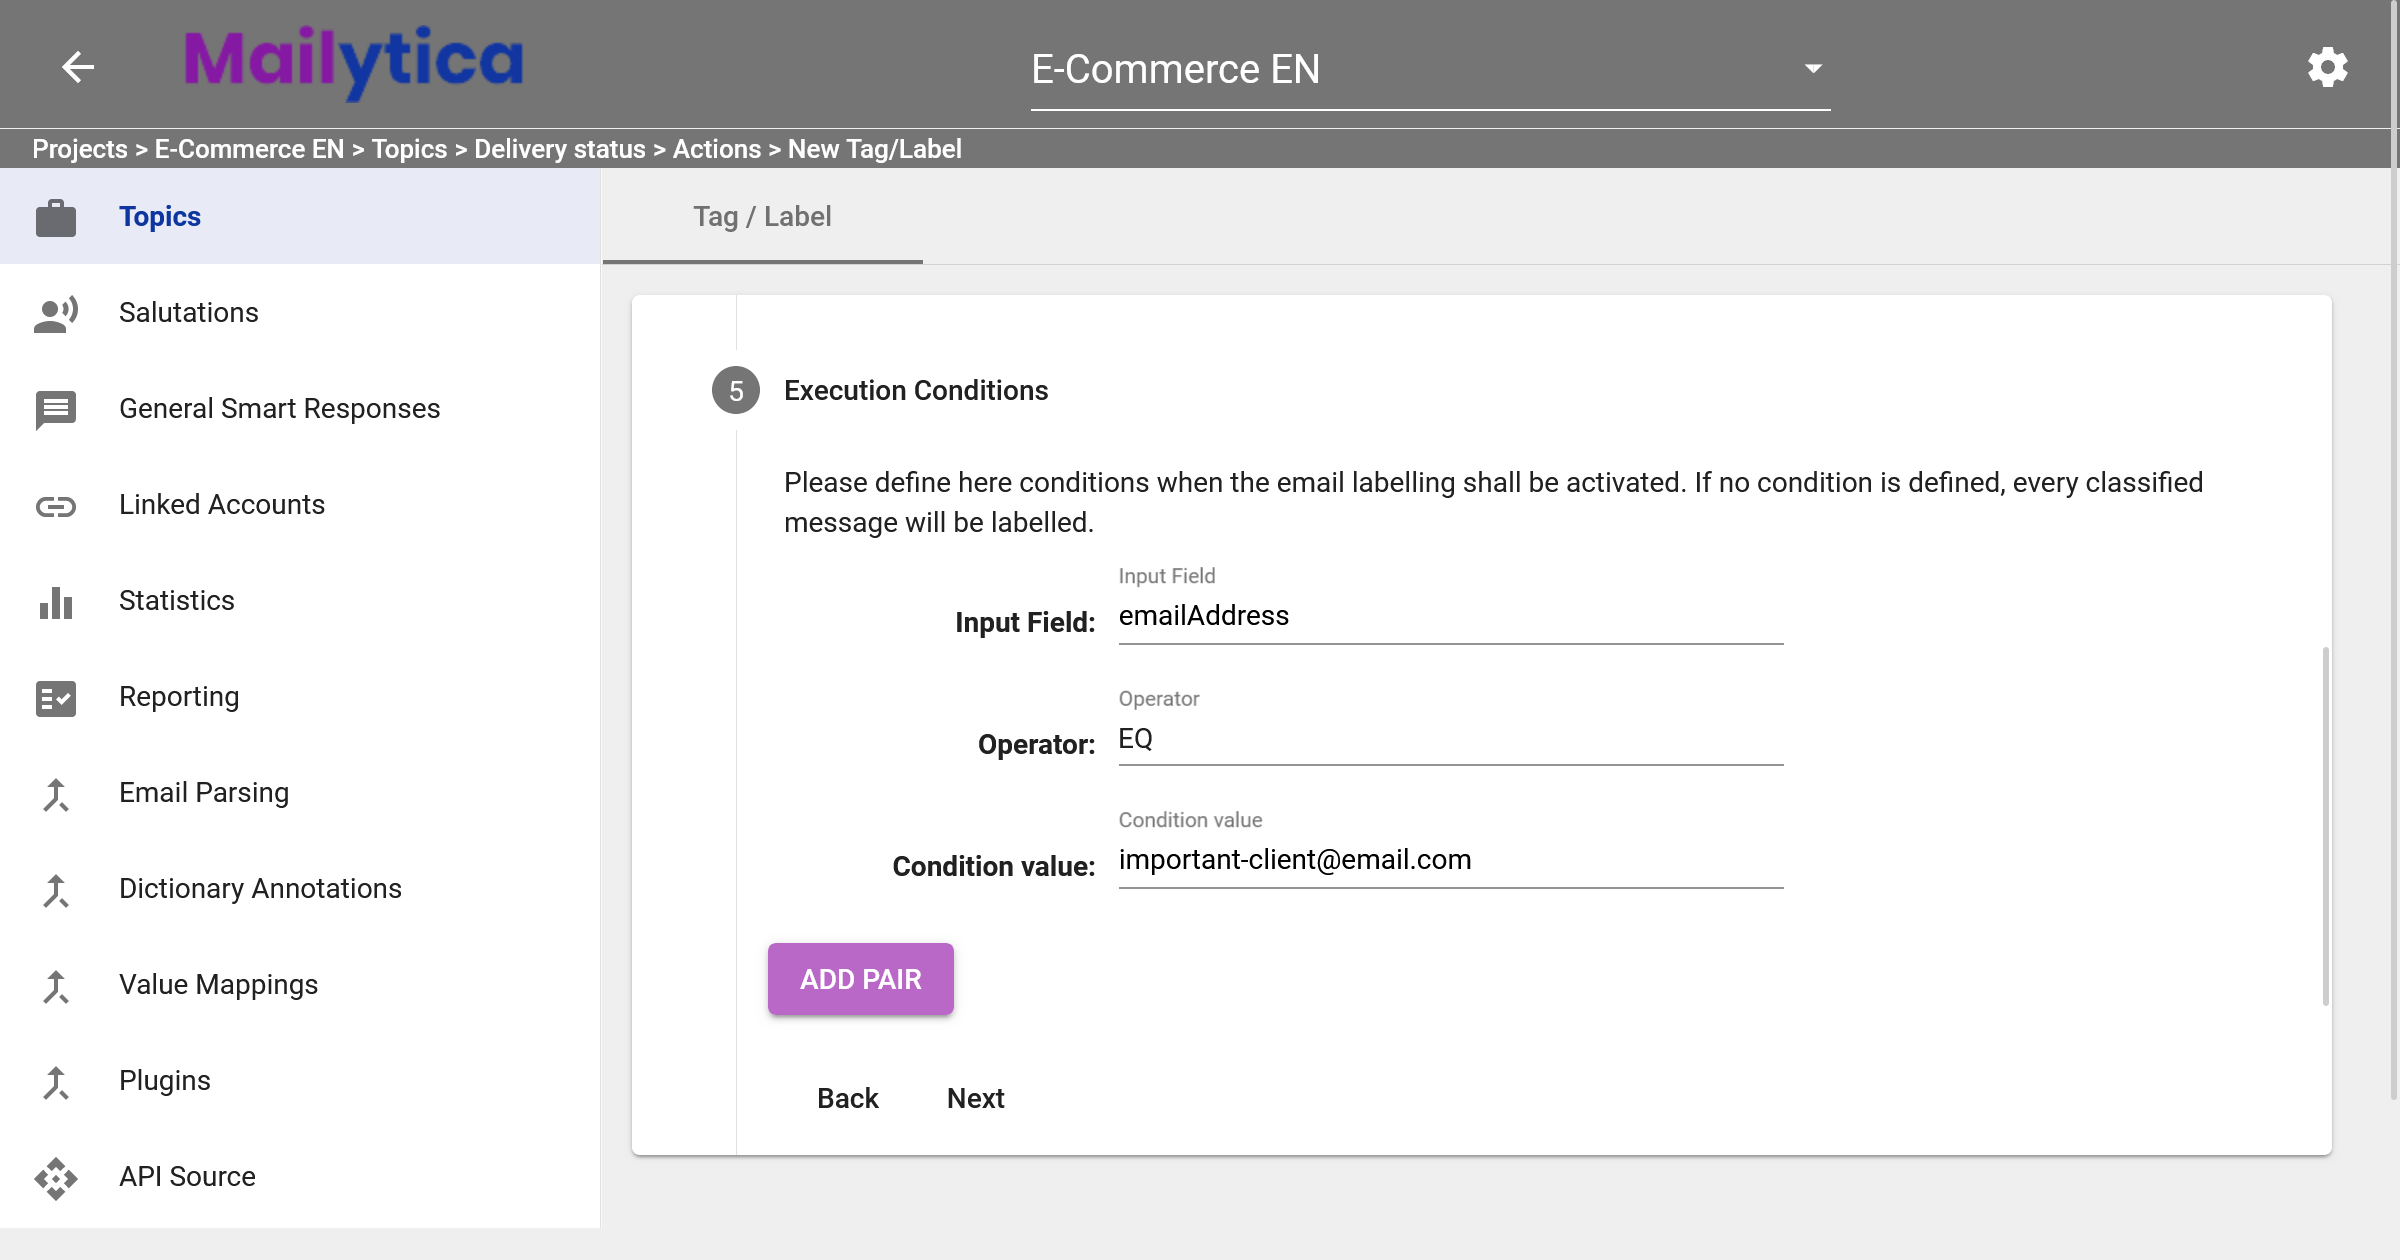
Execution Conditions Operators
EQ: Equal to. Checks if two numerical values or two strings are equal.
EQ_IGNORE_CASE: Equal to, ignoring case sensitivity. Compares two string values for equality, without considering case sensitivity (e.g., Urgent is considered equal to urgent).
LT: Less than. Determines if one numerical value is less than another.
LTE: Less than or equal to. Determines if one numerical value is less than or equal to another.
GT: Greater than. Checks if one numerical value is greater than another.
GTE: Greater than or equal to. Checks if one numerical value is greater than or equal to another.
NON_EQ: Not equal to. Determines if two string values are not equal.
CONTAINS: Checks if a string contains a specified sequence of characters.
NOT_CONTAINS: Opposite of CONTAINS. Checks if a string does not contain a specified sequence of characters.
STARTS_WITH: Determines if a string starts with a specified sequence of characters.
ENDS_WITH: Checks if a string ends with a specified sequence of characters.
Finally, in Status, toggle the Active button and then click Add. Your new label should now be activated and saved. If you don’t want Mailytica to automatically apply this label to your messages, you can set the Status option to Inactive.
Tip
In addition, you can also import and export tags / labels between Mailytica accounts.
Export: To export tags / labels, navigate to your tags / labels list. Expand the title box of the tags / labels you want to export, then click on the Export button. The tags / labels data will be immediately downloaded to your local computer as a .zip file.
Import: When you want to import the previously exported tags / labels, return to your list and click on the button at the top of the page next to Tags / Labels. Locate and select the .zip file you exported earlier. The Mailytica tags / labels data, along with all its contents, will be imported into your new account. This feature makes it easy to transfer tags / labels between accounts and collaborate with team members.

_
_
Email Forwarding#
Mailytica’s Email Forwarding feature allows you to automatically forward messages based on criteria that you define with classification models (e.g. the message’s intention, its priority, its overall sentiment, etc.)
This is useful if you need to forward messages from a general account, such as contact@company.com, to the appropriate departments within your company.
Requirements
Before setting up Email Forwarding rules, you must make sure the following requirements are met:
You have created a Topic (Topics).
You have properly configured at least one Classification Model (Classification Setup).
You have linked one email account, and the Email Forwarding option is Active (Linked Accounts).
To set up Email Forwarding, you need to have already created a topic as explained in the Add a New Topic section. Then, in the Edit section of your topic, select Actions from the top tab bar. Click on the button in the Email Forwarding card. The Email Forwarding section will show you the instructions on how to set forwarding rules. Click Next.
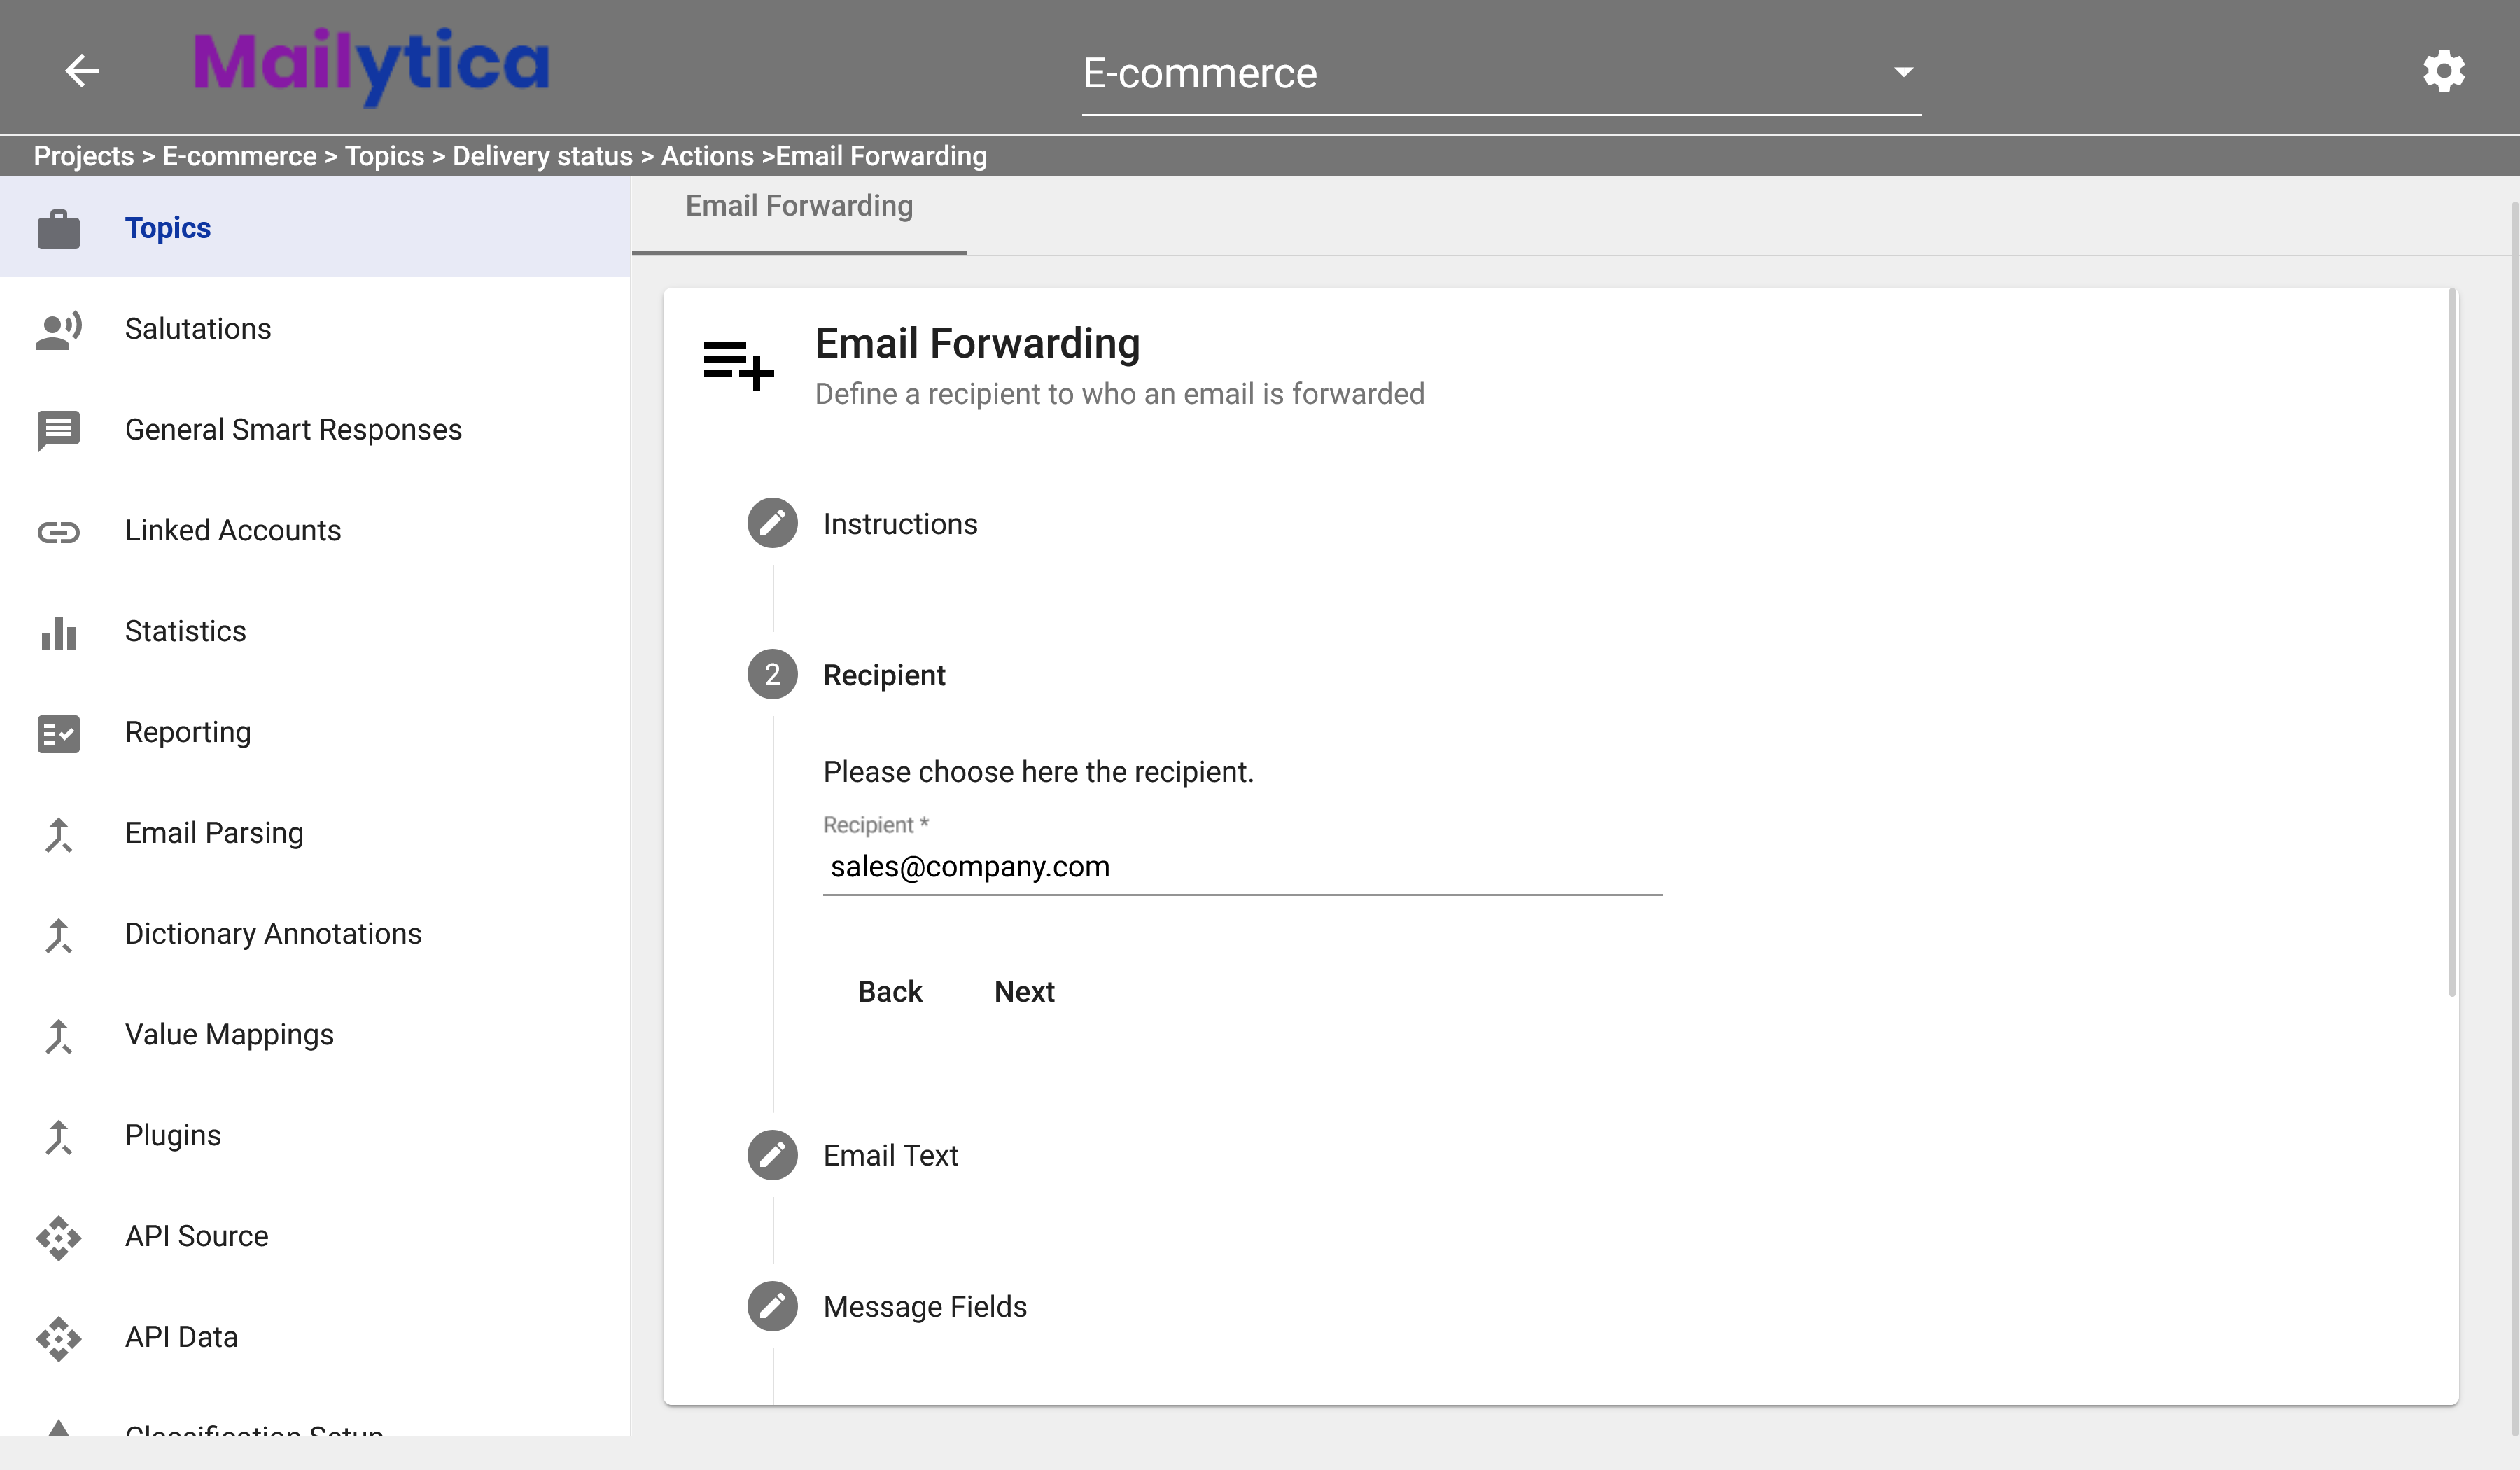
Under Recipient you can enter the email address of the person or department that you want to receive your forwarded messages. For example, if you have configured the contact@company.com account with Mailytica but would like to redirect sales-related emails to an employee on the Sales department, then the Recipient would be sales@company.com.
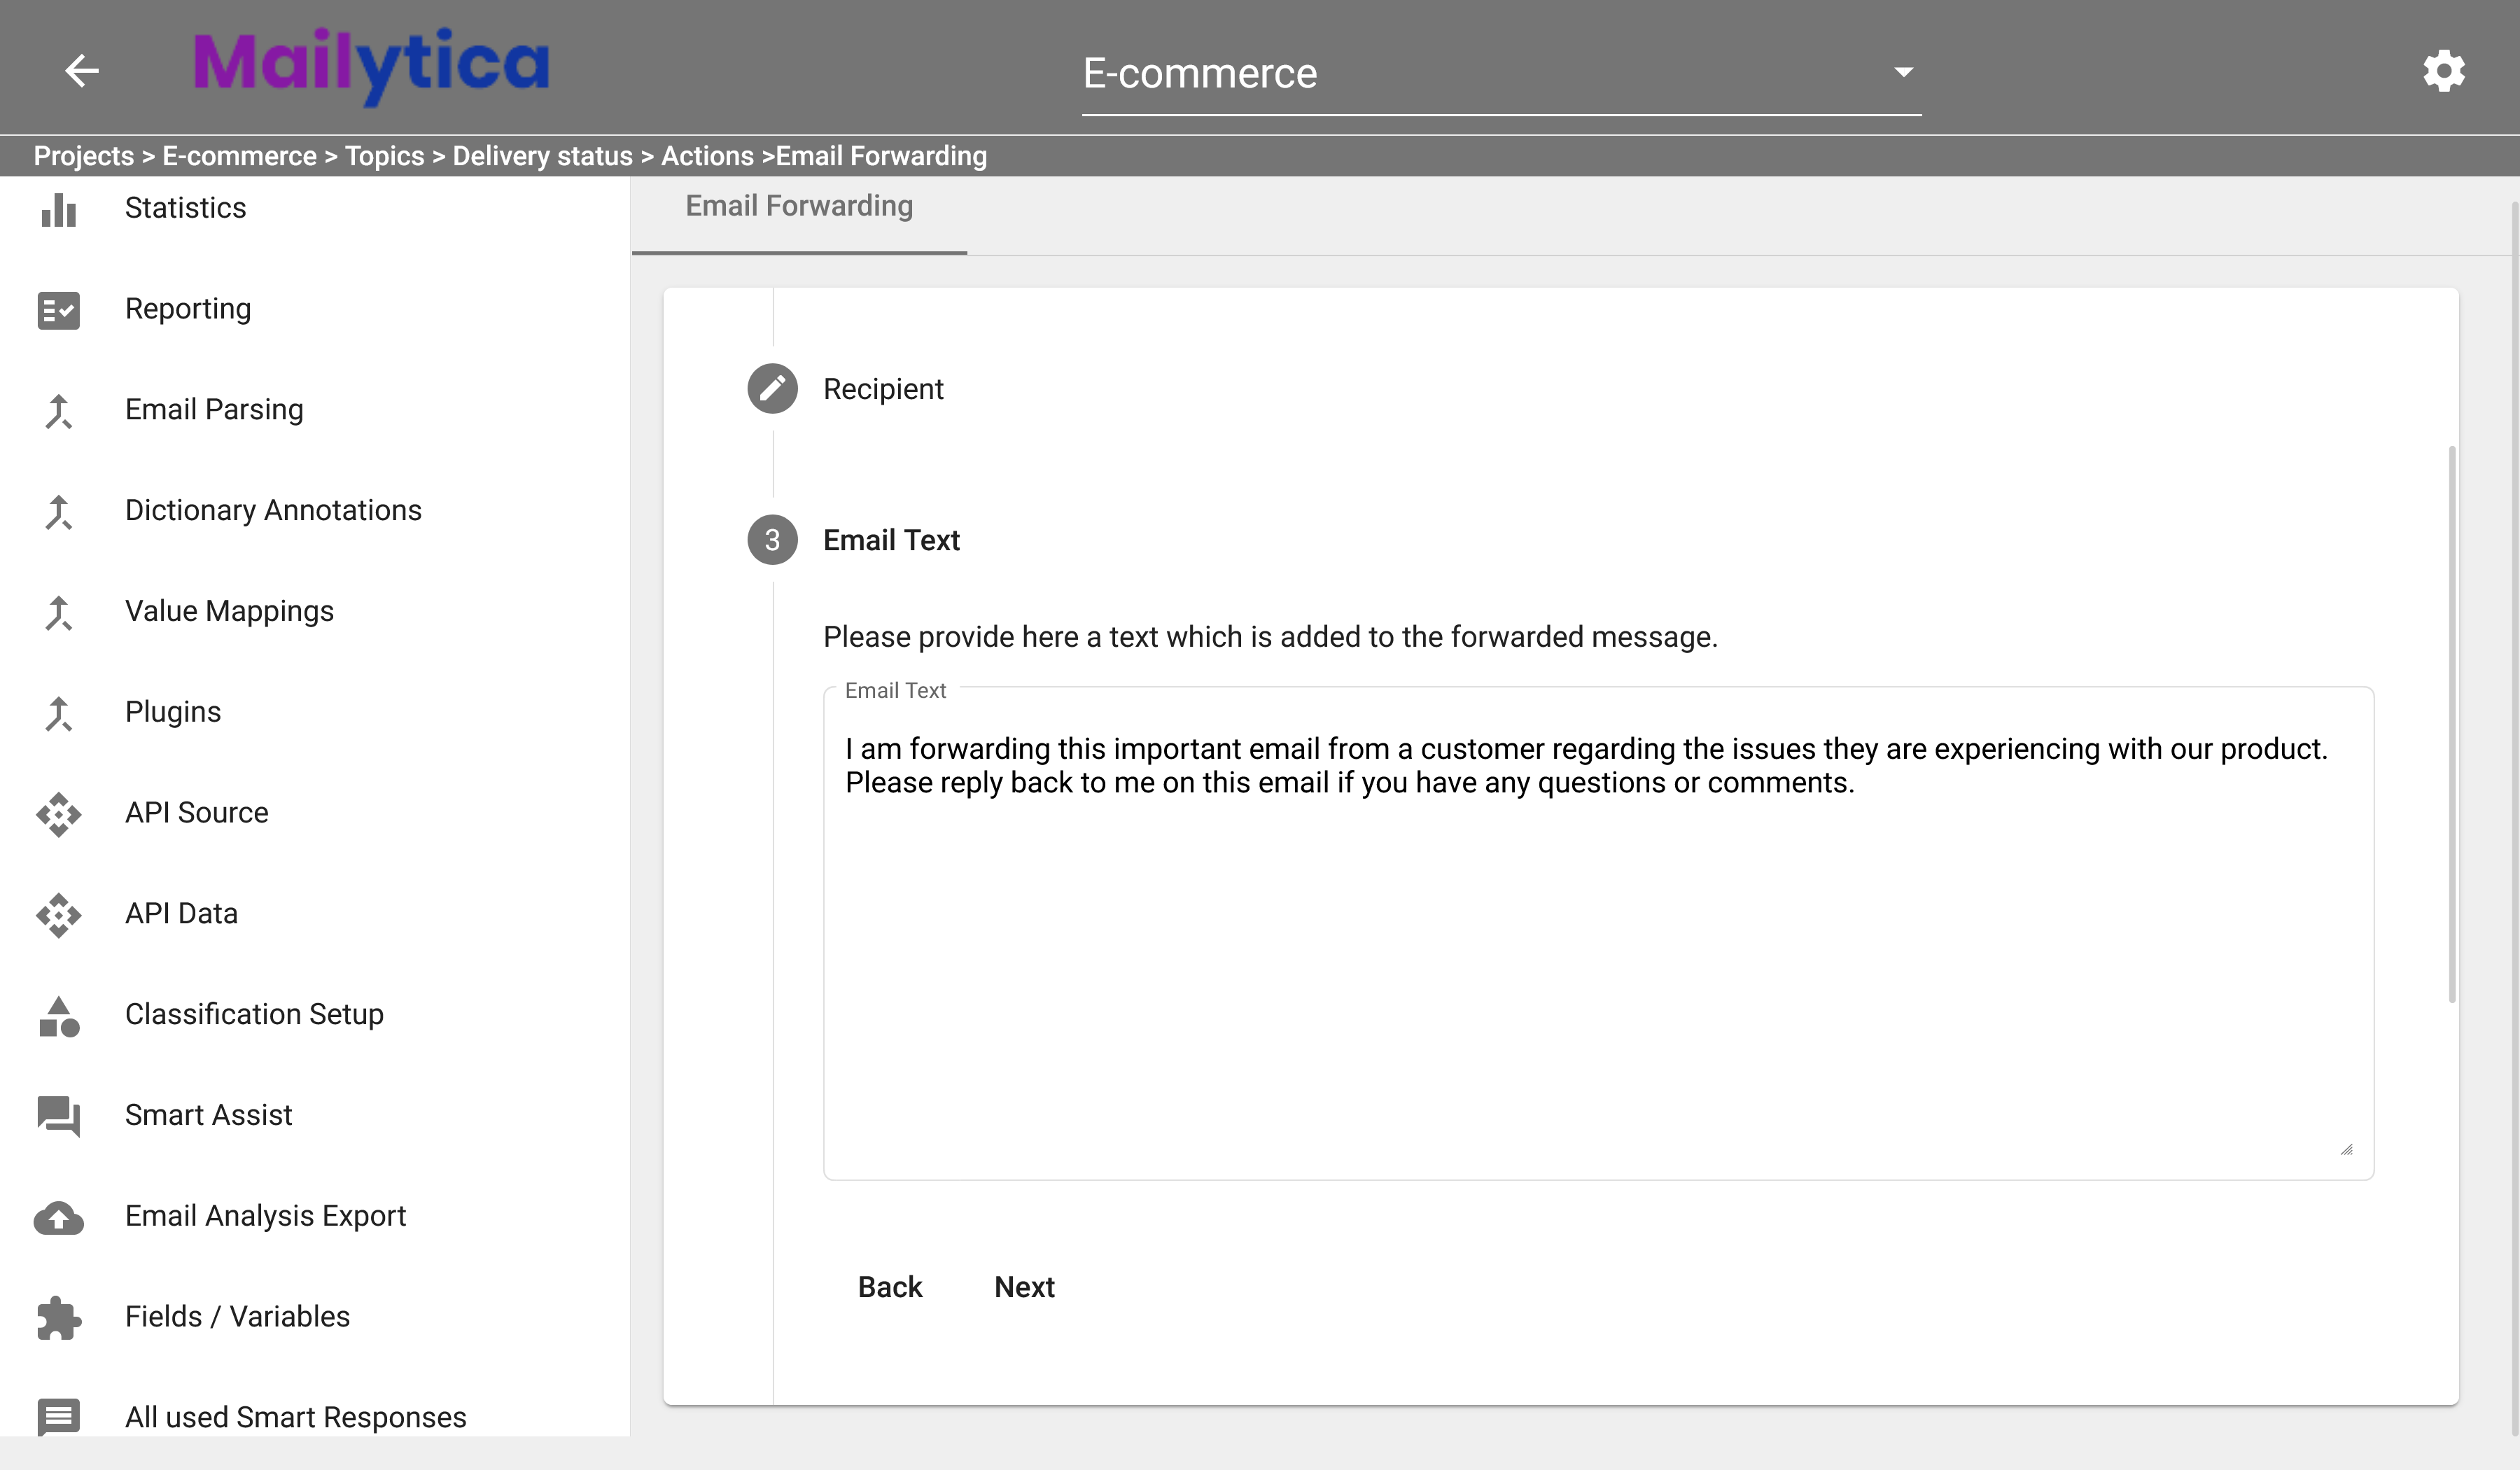
Next, in the Email Text field, you can add a message that will be placed at the top of forwarded emails. This can range from simple acknowledgments (“Forwarded for your information”) to more detailed communications that explain why the email was forwarded and what is expected in response.
Then, in Message Fields, select the data fields that you would like to include in the body of your forwarded messages. These fields can be either Mailytica’s preconfigured Email Data, which contains all the standard parts of a message (such as subject, message, name, etc.). Or custom values that you define as part of a workflow (for example, Email Parsing, Dictionary Annotations, Value Mappings, or even external sources such as APIs).
Tip
By adding these dynamic fields, you can provide contextual information in your messages. For instance, you can automatically add the customer’s name, address, or order number to your forwarded messages.
For more information make sure to visit Mailytica’s Email Data and Email Parsing.
Similarly, under Subject Fields, you can select the data fields that will appear in the subject lines of your forwarded email messages. If you want specific customer data to appear in the subject line, select those values from the list. Again, you can choose from a wide range of standard fields (such as date and name) or custom values that you define as part of a workflow.
Likewise, in Attachment Fields, you can also choose which fields to include in the names of attached files. This option is relevant only if your account uses the Server Message Block (SMB) protocol. For instance, you might want to add the customer’s name to the attached file so that it can easily be identified when downloaded. To do so, you would simply select name from the list of Attachment Fields.
Then in Execution Times, you can select the days of the week and the times during which the automatic email forwarding should be active. This feature is particularly useful if want to ensure that automatic forwarding is only carried out during working days and/or hours.
Similarly, in the Execution Conditions section, you can define conditions based on metadata fields extracted from incoming emails. You might use Mailytica’s default data (such as sender address, email subject, as seen in Mailytica’s Email Data), or custom user-defined variables (as explained in Fields / Variables). For example, you could set a condition that the confidence level—a measure of how confident Mailytica is that an email has been classified correctly—must be 0.8 or higher for a message to be forwarded.
Execution Conditions Operators
EQ: Equal to. Checks if two numerical values or two strings are equal.
EQ_IGNORE_CASE: Equal to, ignoring case sensitivity. Compares two string values for equality, without considering case sensitivity (e.g., Urgent is considered equal to urgent).
LT: Less than. Determines if one numerical value is less than another.
LTE: Less than or equal to. Determines if one numerical value is less than or equal to another.
GT: Greater than. Checks if one numerical value is greater than another.
GTE: Greater than or equal to. Checks if one numerical value is greater than or equal to another.
NON_EQ: Not equal to. Determines if two string values are not equal.
CONTAINS: Checks if a string contains a specified sequence of characters.
NOT_CONTAINS: Opposite of CONTAINS. Checks if a string does not contain a specified sequence of characters.
STARTS_WITH: Determines if a string starts with a specified sequence of characters.
ENDS_WITH: Checks if a string ends with a specified sequence of characters.
To finish, toggle the Active button in Status, and then click Add. Your Email Forwarding rule should now be activated and saved. If you don’t want Mailytica to automatically forward your messages, you can set the Status option to Inactive.
Folder Destinations#
Mailytica’s Folder Destinations feature makes it easy to automatically move email messages to a particular folder, based on the topic of the message.
Important
The Folder Destinations feature works only with Microsoft Exchange and IMAP accounts.
Folder Destinations are a great way to keep your inbox organized, as you won’t have to worry about moving emails manually every time you receive an email that matches your criteria. Additionally, it makes sure that your customers’ messages are properly filed and easy to access in your email client.
For example, you might want all emails related to customer support to be moved into a folder for each customer. Or maybe you want all invoices to go into a folder named Invoices.
Requirements
Before setting up a Folder Destination, you must make sure the following requirements are met:
You have created a Topic (Topics).
You have properly configured at least one Classification Model (Classification Setup).
You have linked one Microsoft Exchange or IMAP account, and the Move Messages to Folder option is Active (Linked Accounts).
You have created a target folder in your email client.
To set up a Folder Destination, follow these steps:
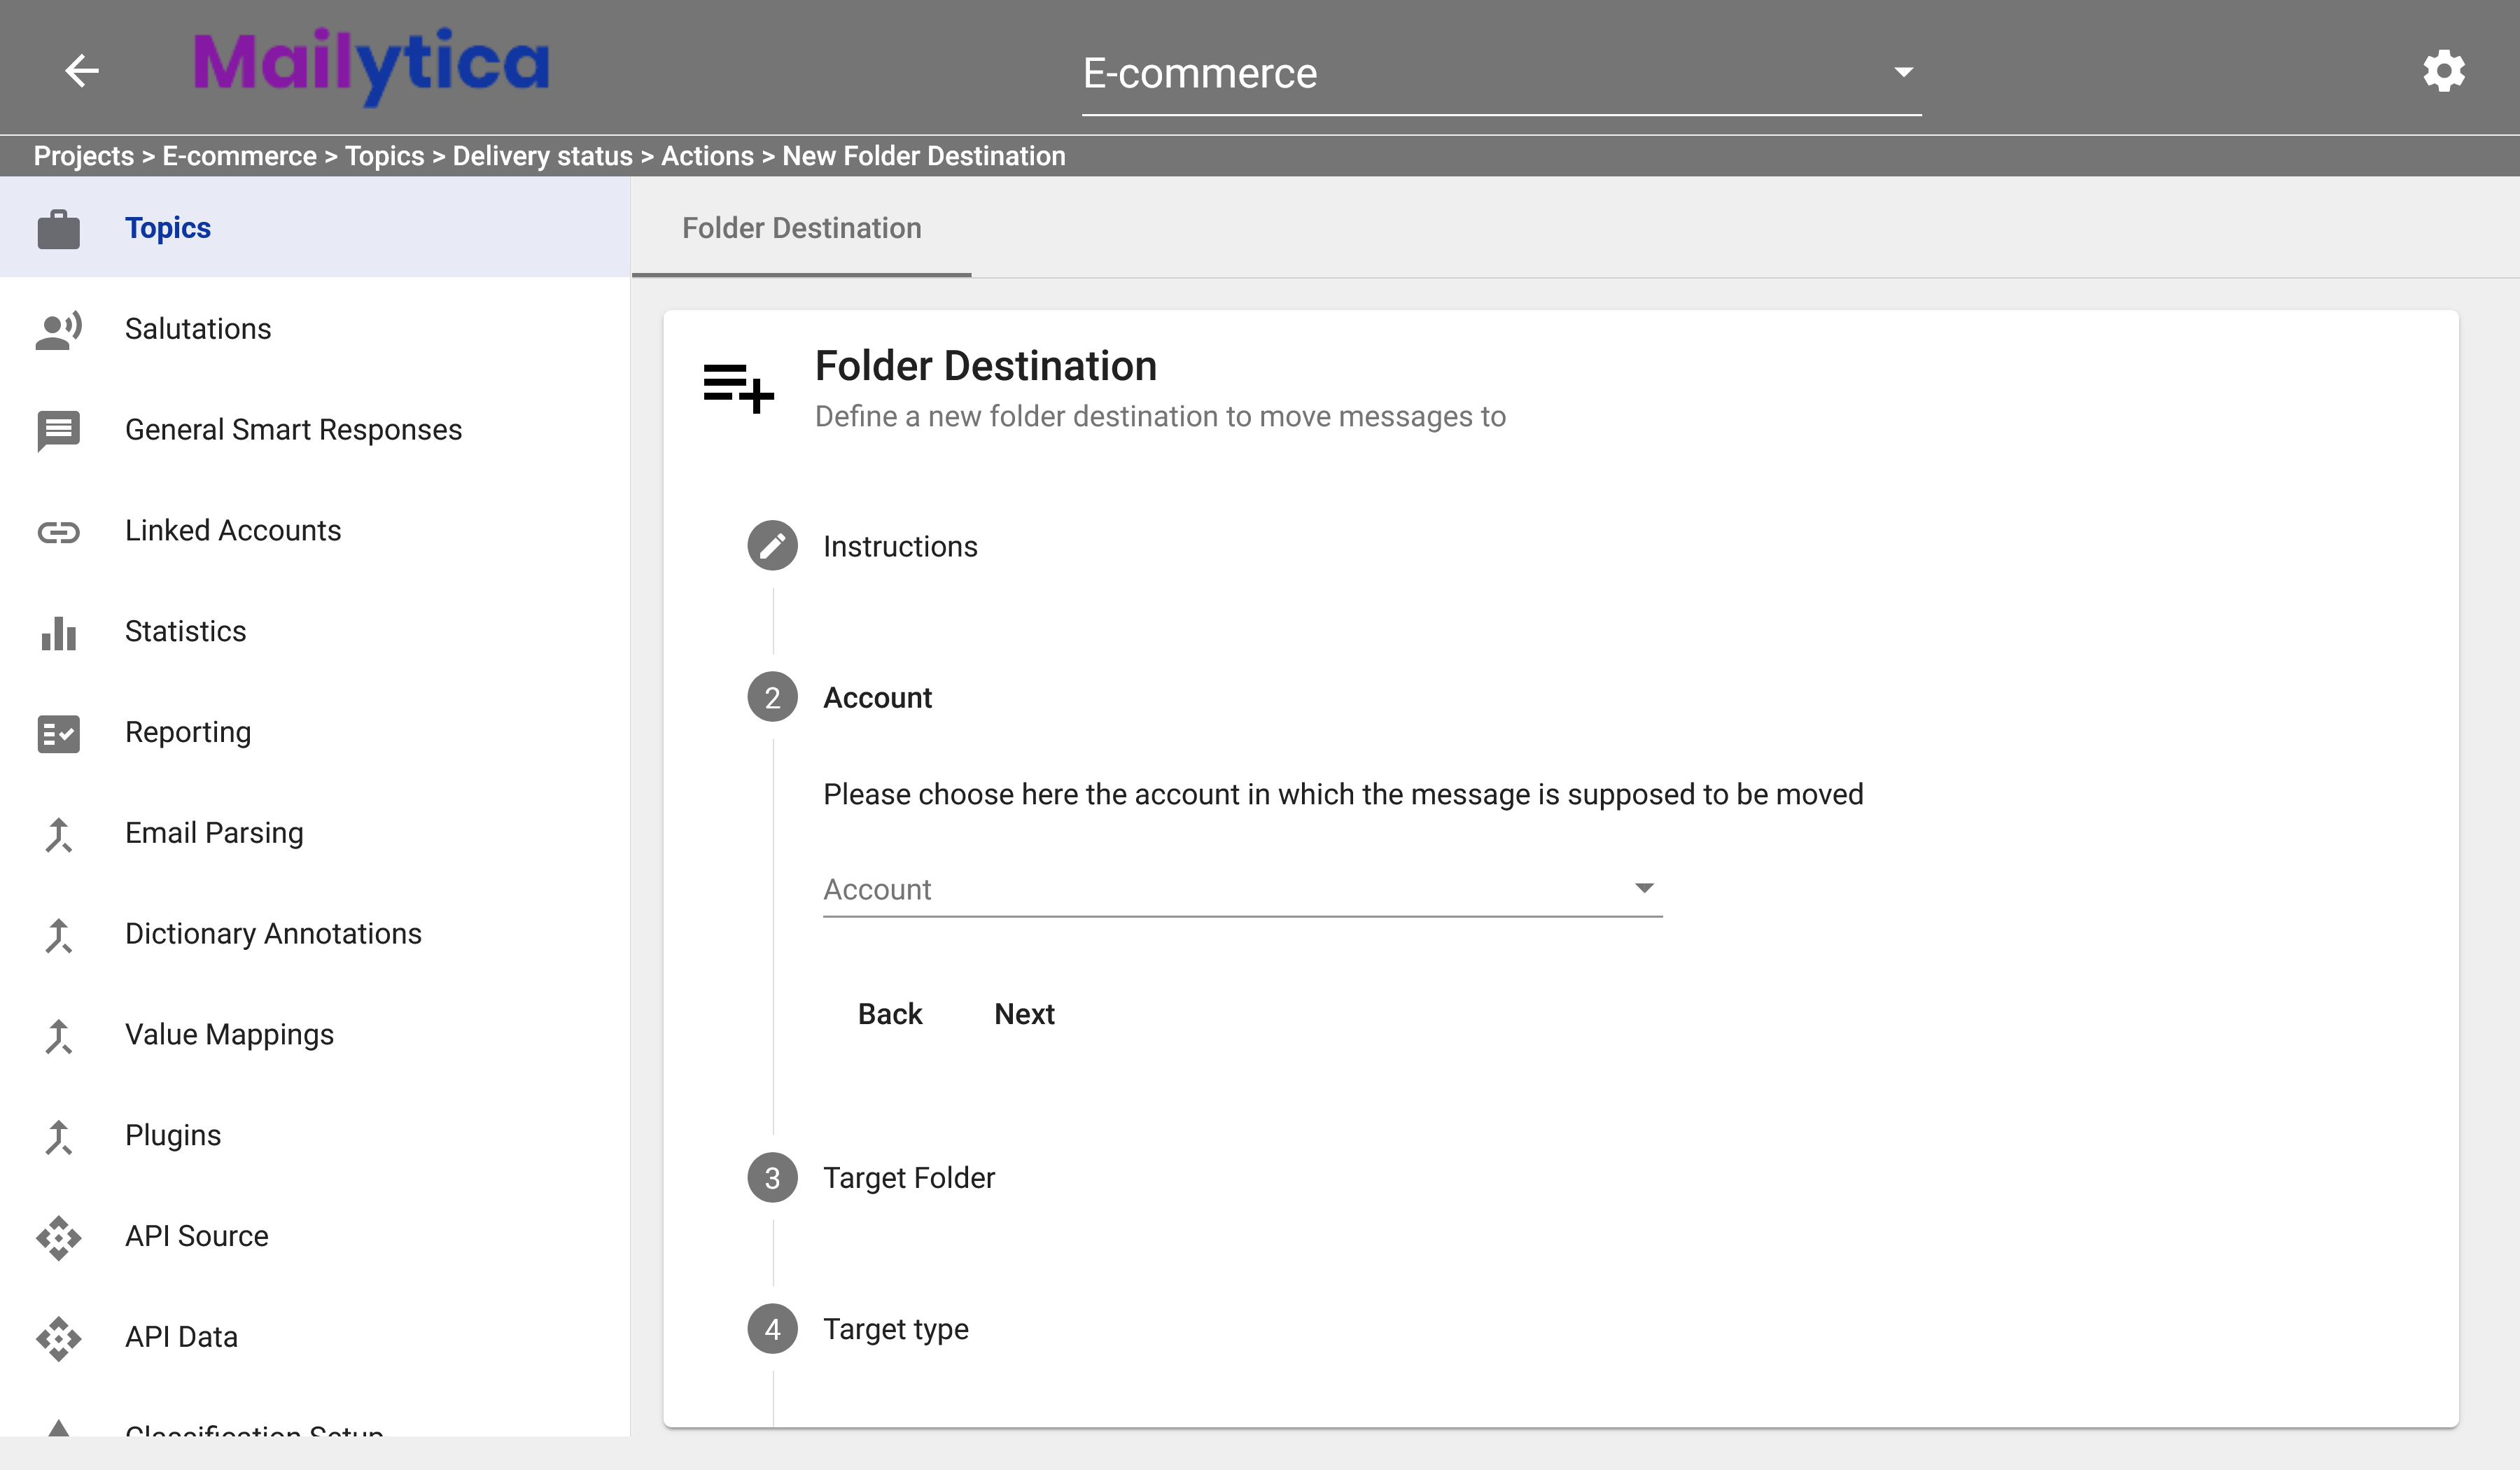
First, you need to have already created a topic as explained in the Add a New Topic section. Then, in the Edit section of your topic, select Actions from the top tab bar. Click on the button in the Folder Destinations card. The Folder Destinations section will show you the instructions on how to sort your messages into folders. Click Next.
Under Account, select from the dropdown the account that you want to use with Folder Destinations. This should be the email account that you want Mailytica to organize your messages into folders. If you don’t see your account listed in the dropdown, it means that you have not linked it to Mailytica.
In Target Folder, click the text box to see a list of all available folders in your email account. If no list appears, try typing
/in the text box. If this doesn’t work, it’s likely that there are no folders available in your email account, and you might need to create a new one directly in your email client.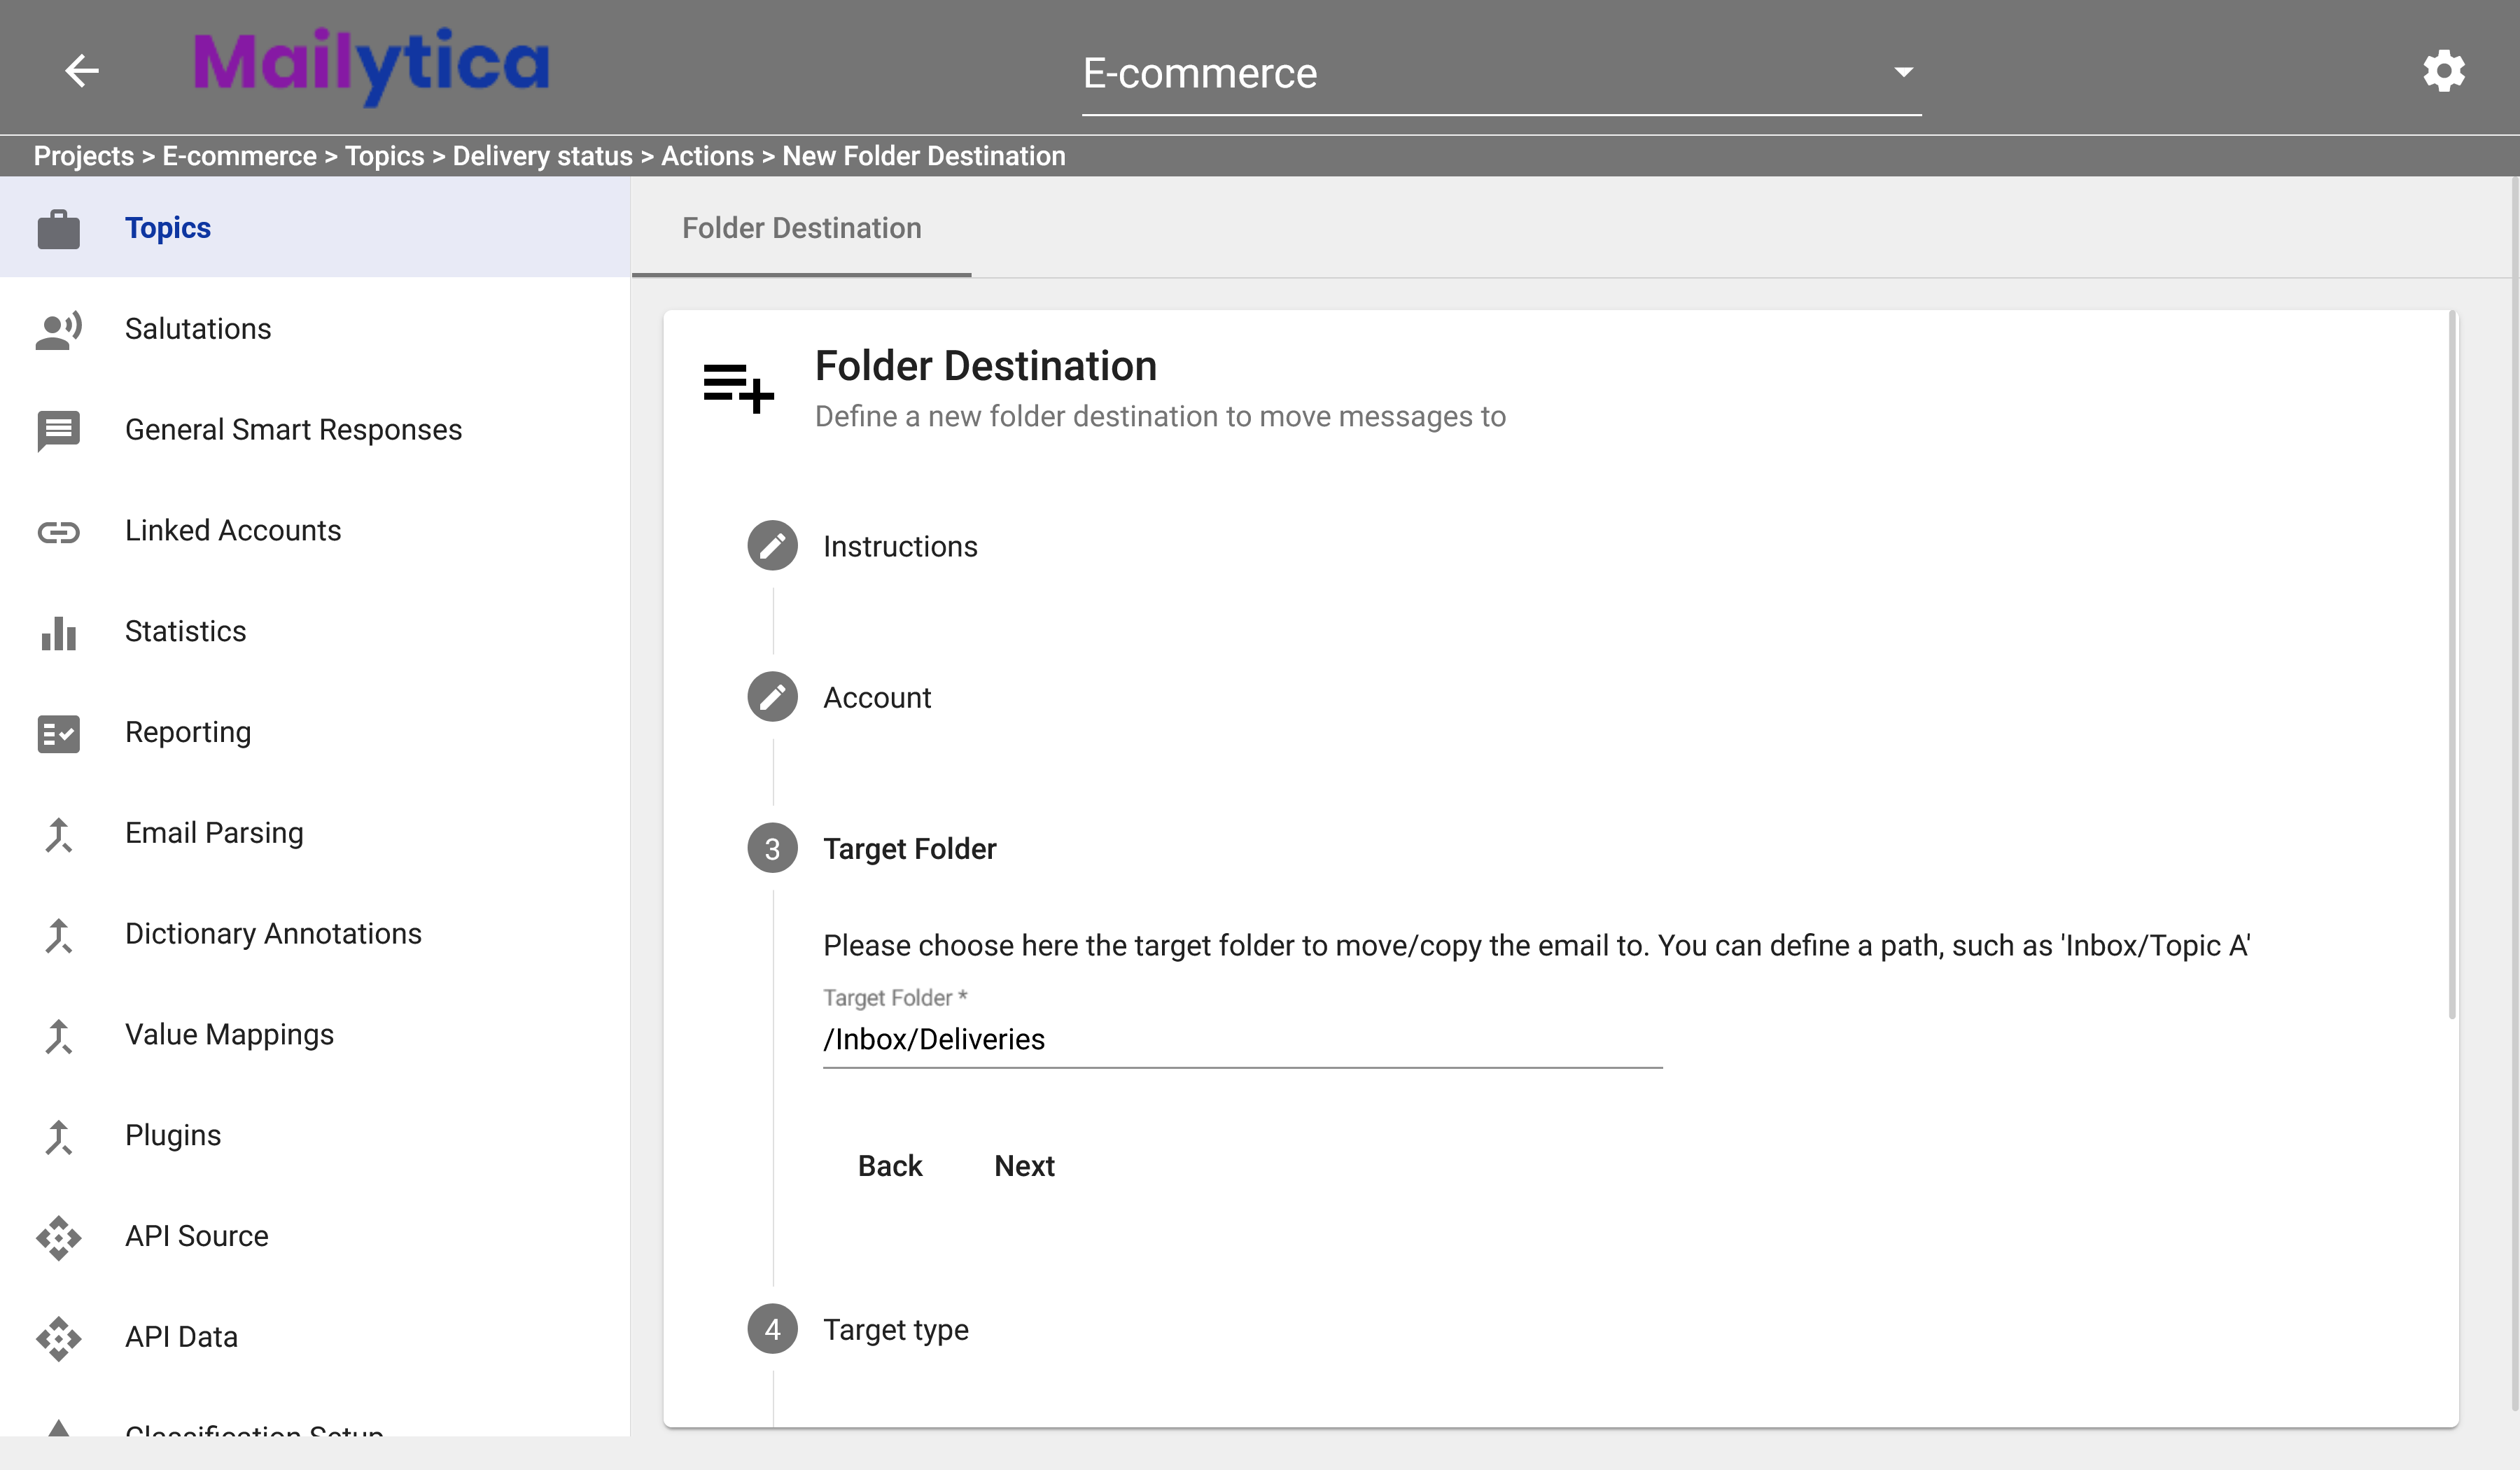
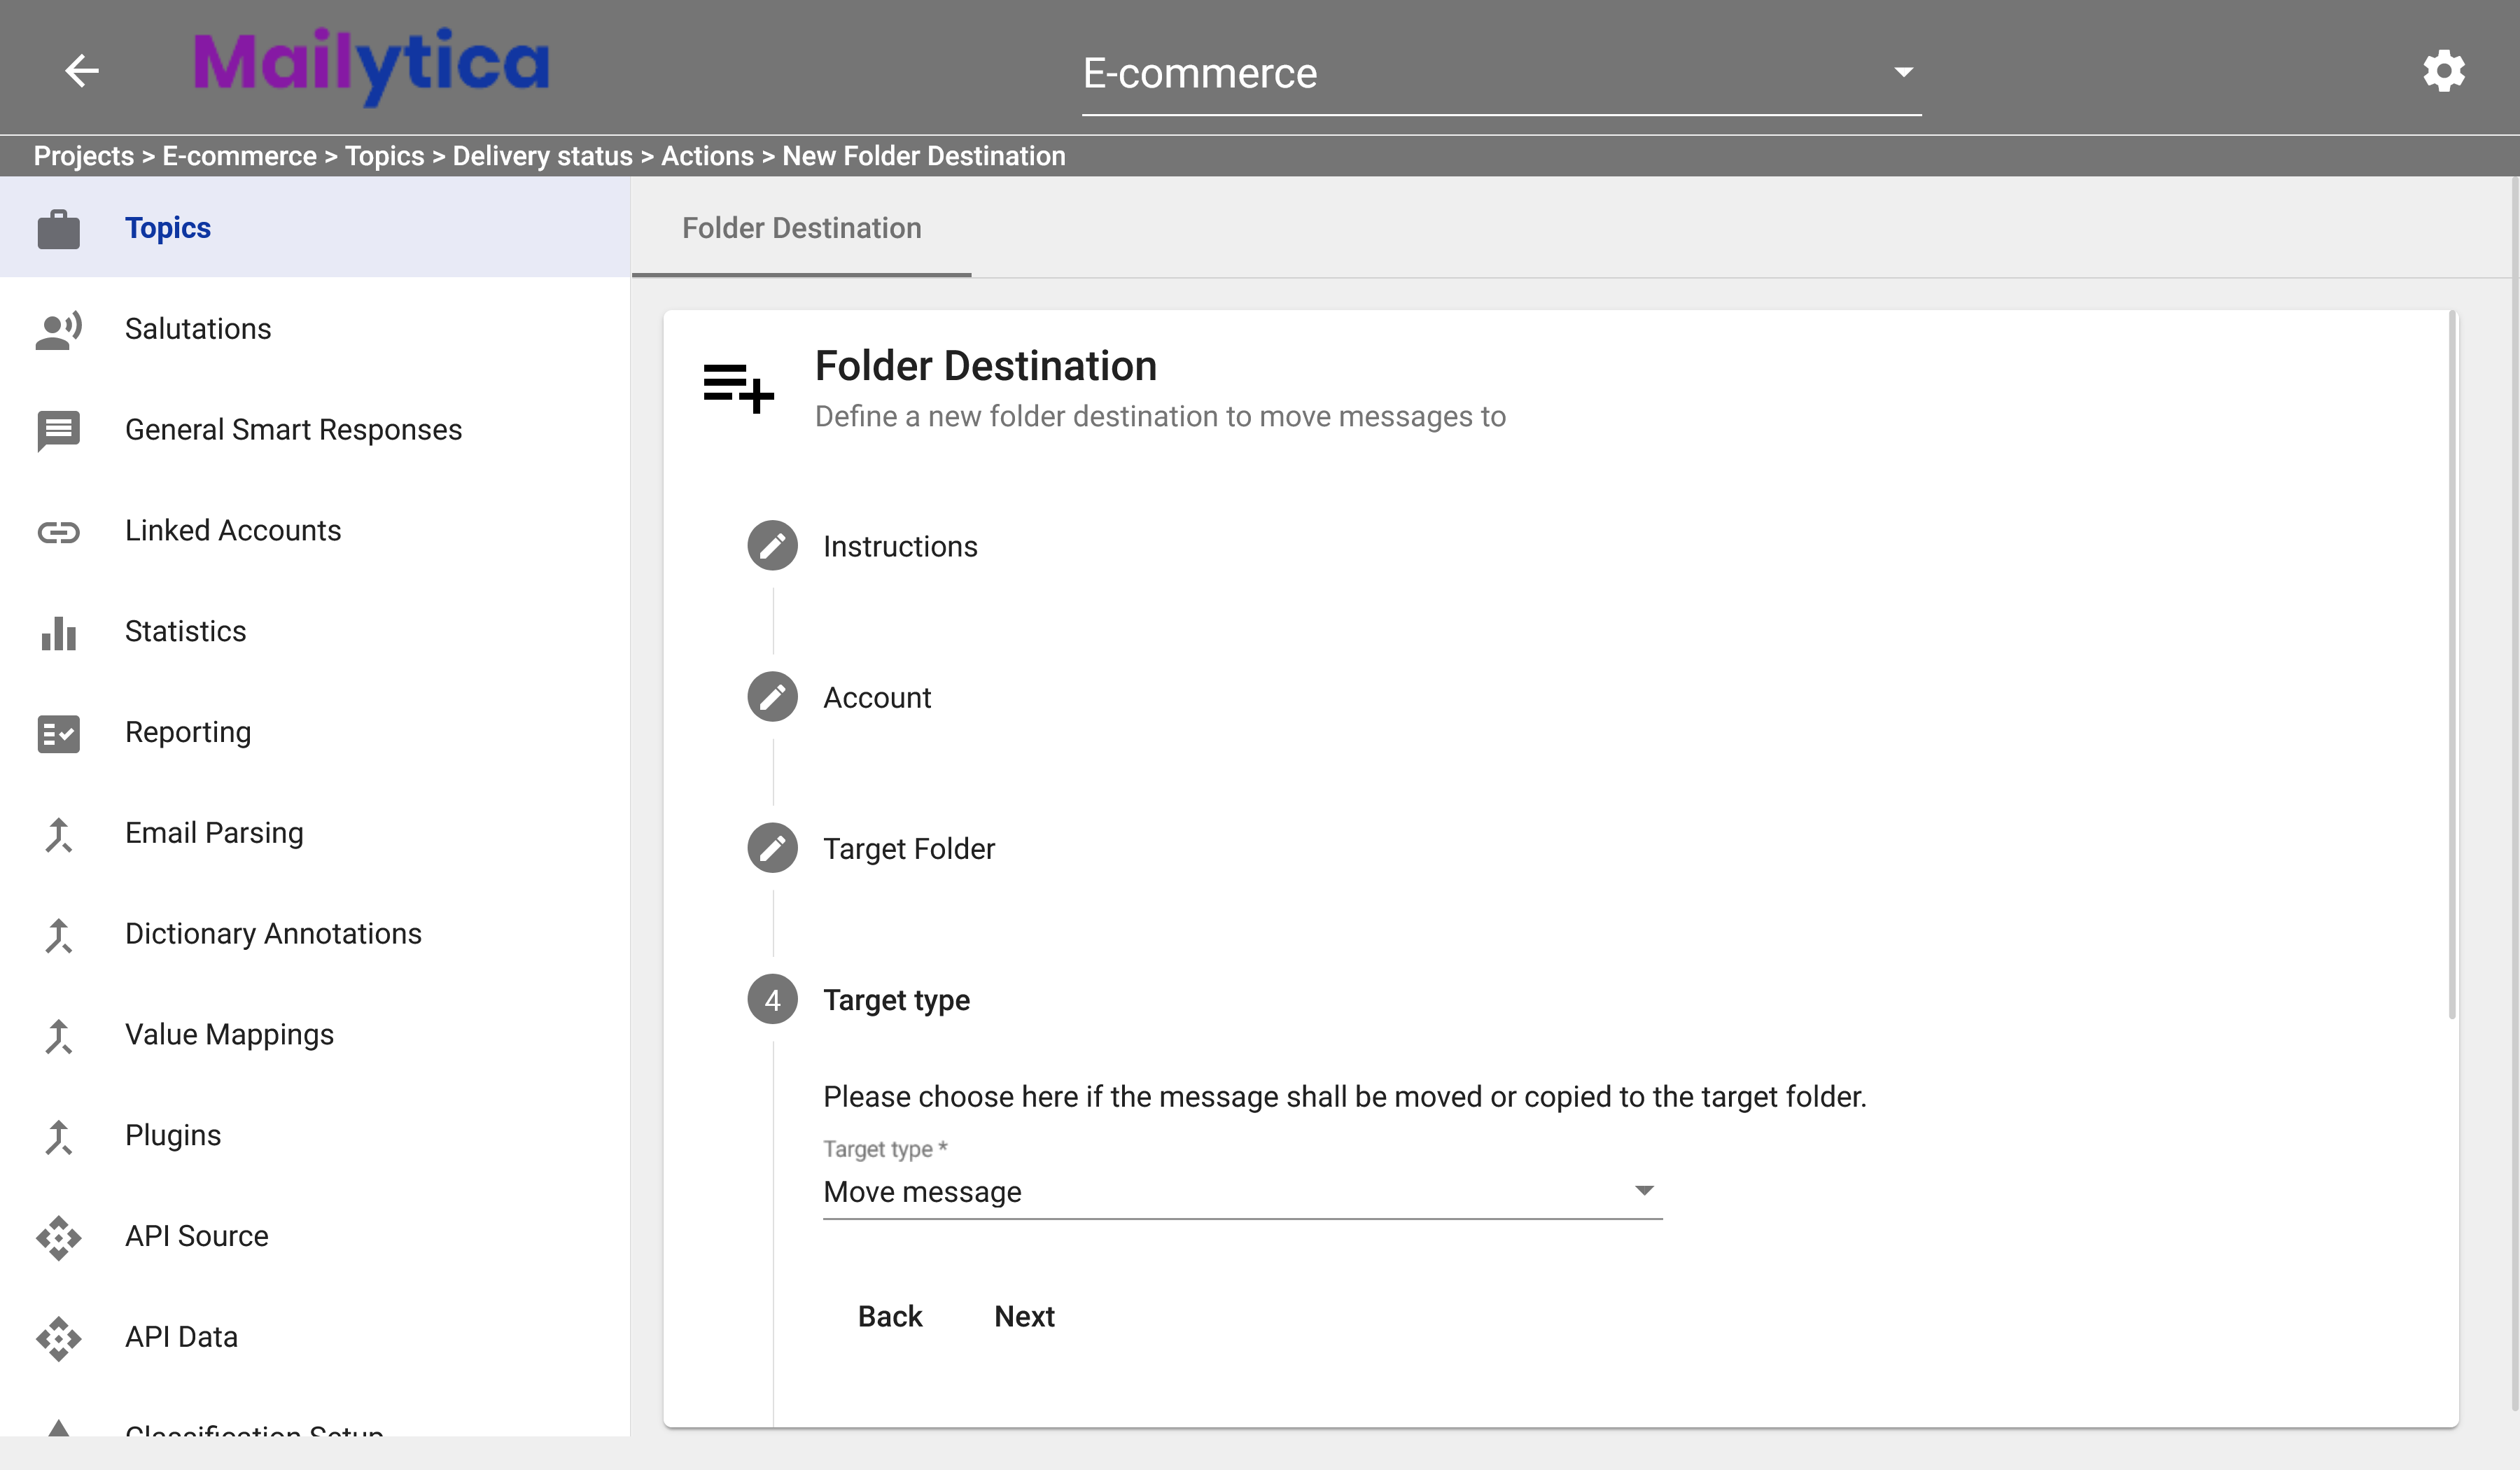
Next, in Target Type you have the option to either Move or Copy your messages. If you choose Move, then the email is deleted from your inbox and moved into the target folder. If Copy is selected instead, then both copies will be available—one in the target folder, and one in your inbox.
Following, in Mark Messages as Read you can set this option to Active if you want Mailytica to automatically move your messages to your target folder where they will appear as read. If you set the option to Inactive, messages will be moved to your target folder but will appear as unread until you open them. This is a good feature to use if you want to move an email from your inbox into another folder without actually reading it yet.
Then in Move Messages Multiple Times you can choose if a message should be moved even though it has been moved before by Mailytica. For example, you could set up a folder destination called Invoices where Mailytica automatically moves invoice requests. But if you manually move an invoice request to another folder, then setting this option to Active allows Mailytica to move the message to the Invoices folder again. When this option is set to Inactive, Mailytica will not re-sort your messages.
In Execution Triggers, you can determine the specific event that triggers the automated action of moving an email into a designated folder.
Execution Triggers
User Action: Choosing this option will add a new button to Mailytica’s add-in. The message is then moved to the target folder when a user clicks on that button. For example, if a user reads an email and clicks on the User Action button in the add-in, Mailytica can be set to automatically move it to a Follow-Up folder. This helps prioritizing emails that need attention.
Prediction: The message is moved when Mailytica classifies an email under a specific topic.
Finished: This trigger adds a Email Finished button to Mailytica’s add-in. The message is then moved to the target folder when a user clicks on that button.
Gold: This trigger happens when a user manually changes the classification of an email in Mailytica’s add-in.
Following, in Execution Times, you can select the days of the week and the times during which the automatic folder destination should be active. This feature is particularly useful if want to ensure that automatic folder destination is only carried out during working days and/or hours.
Similarly, in the Execution Conditions section, you can define conditions based on metadata fields extracted from incoming emails. You might use Mailytica’s default data (such as sender address, email subject, as seen in Mailytica’s Email Data), or custom user-defined variables (as explained in Fields / Variables). For example, you could set a condition that the confidence level—a measure of how confident Mailytica is that an email has been classified correctly—must be 0.8 or higher for a message to be moved.
Finally, toggle the Active button in Status, and then click Add. Your Folder Destination should now be activated and saved. If you don’t want Mailytica to automatically move your messages, you can set the Status option to Inactive.
Tip
In addition, you can also import and export folder destinations between Mailytica accounts.
Export: To export a folder destinations, navigate to your folder destinations list. Expand the title box of the folder destinations you want to export, then click on the Export button. The folder destination data will be immediately downloaded to your local computer as a .zip file.
Import: When you want to import the previously exported folder destinations, return to your list and click on the button at the top of the page next to Folder Destinations. Locate and select the .zip file you exported earlier. The Mailytica folder destination, along with all its contents, will be imported into your new account. This feature makes it easy to transfer folder destinations between accounts and collaborate with team members.
Important
How quickly Mailytica moves your email messages with the Folder Destination feature will depend on the query period that you set when connecting your account.
The query period refers to how often Mailytica will check your inbox for new emails.
So for instance, if your query period is set to 3 minutes, then Mailytica will check your inbox every three minutes and move the new messages it finds into their correct folders.
For more information please visit the Connectors section.