Email Parsing#
Mailytica’s email parsing will help you extract data out of an email message such as sender contact info, order numbers, shipping date and time, and more. The email parser can extract critical information and perform complex parsing tasks in just a few simple steps.
Mailytica can parse your emails quickly and efficiently with regular expressions, whether you’re a novice or an experienced user. Its user-friendly interface makes it simple to create filters and dictionary annotations so that you can complete these tasks quickly.
Additionally, you can then use Mailytica to send its output to other apps, or you can even use the output fields in your Smart Responses.
Important
Mailytica saves all the parsed data into Output Fields, which you can use for a variety of purposes:
Include the extracted data in your Smart Responses to give them a more personal touch.
Integrate the data with other apps and services. Either via APIs or by using any of Mailytica’s Integrations.
Add Email Parsing Rules#
Mailytica’s Email Parsing engine makes use of regular expressions (also known as regex or RegExp), which are patterns that you can use to match specific characters.
Some common regular expressions include the following:
Regular Expression |
Meaning |
Example |
|---|---|---|
|
Matches characters inside brackets |
|
|
Matches characters between a-z or A-Z |
|
|
Matches any kind of letter, including language-specific characters |
|
|
Any character |
|
|
Any digit |
|
|
Capture everything inside parentheses |
|
|
Case insensitive match |
|
|
Defines an unnamed group. You can use it to define optional matches. |
|
|
Either or |
|
|
0 or 1 |
|
|
0 or more |
|
|
1 or more |
|
|
An exact number of characters |
|
|
Beginning of the string or line |
|
|
End of the string or line |
|
|
Matches a line break |
|
Tip
For a more in-depth explanation of regular expressions, please check RegexOne Introductory Course, and Regex101 Editor.
To add an email parsing rule, follow these steps:
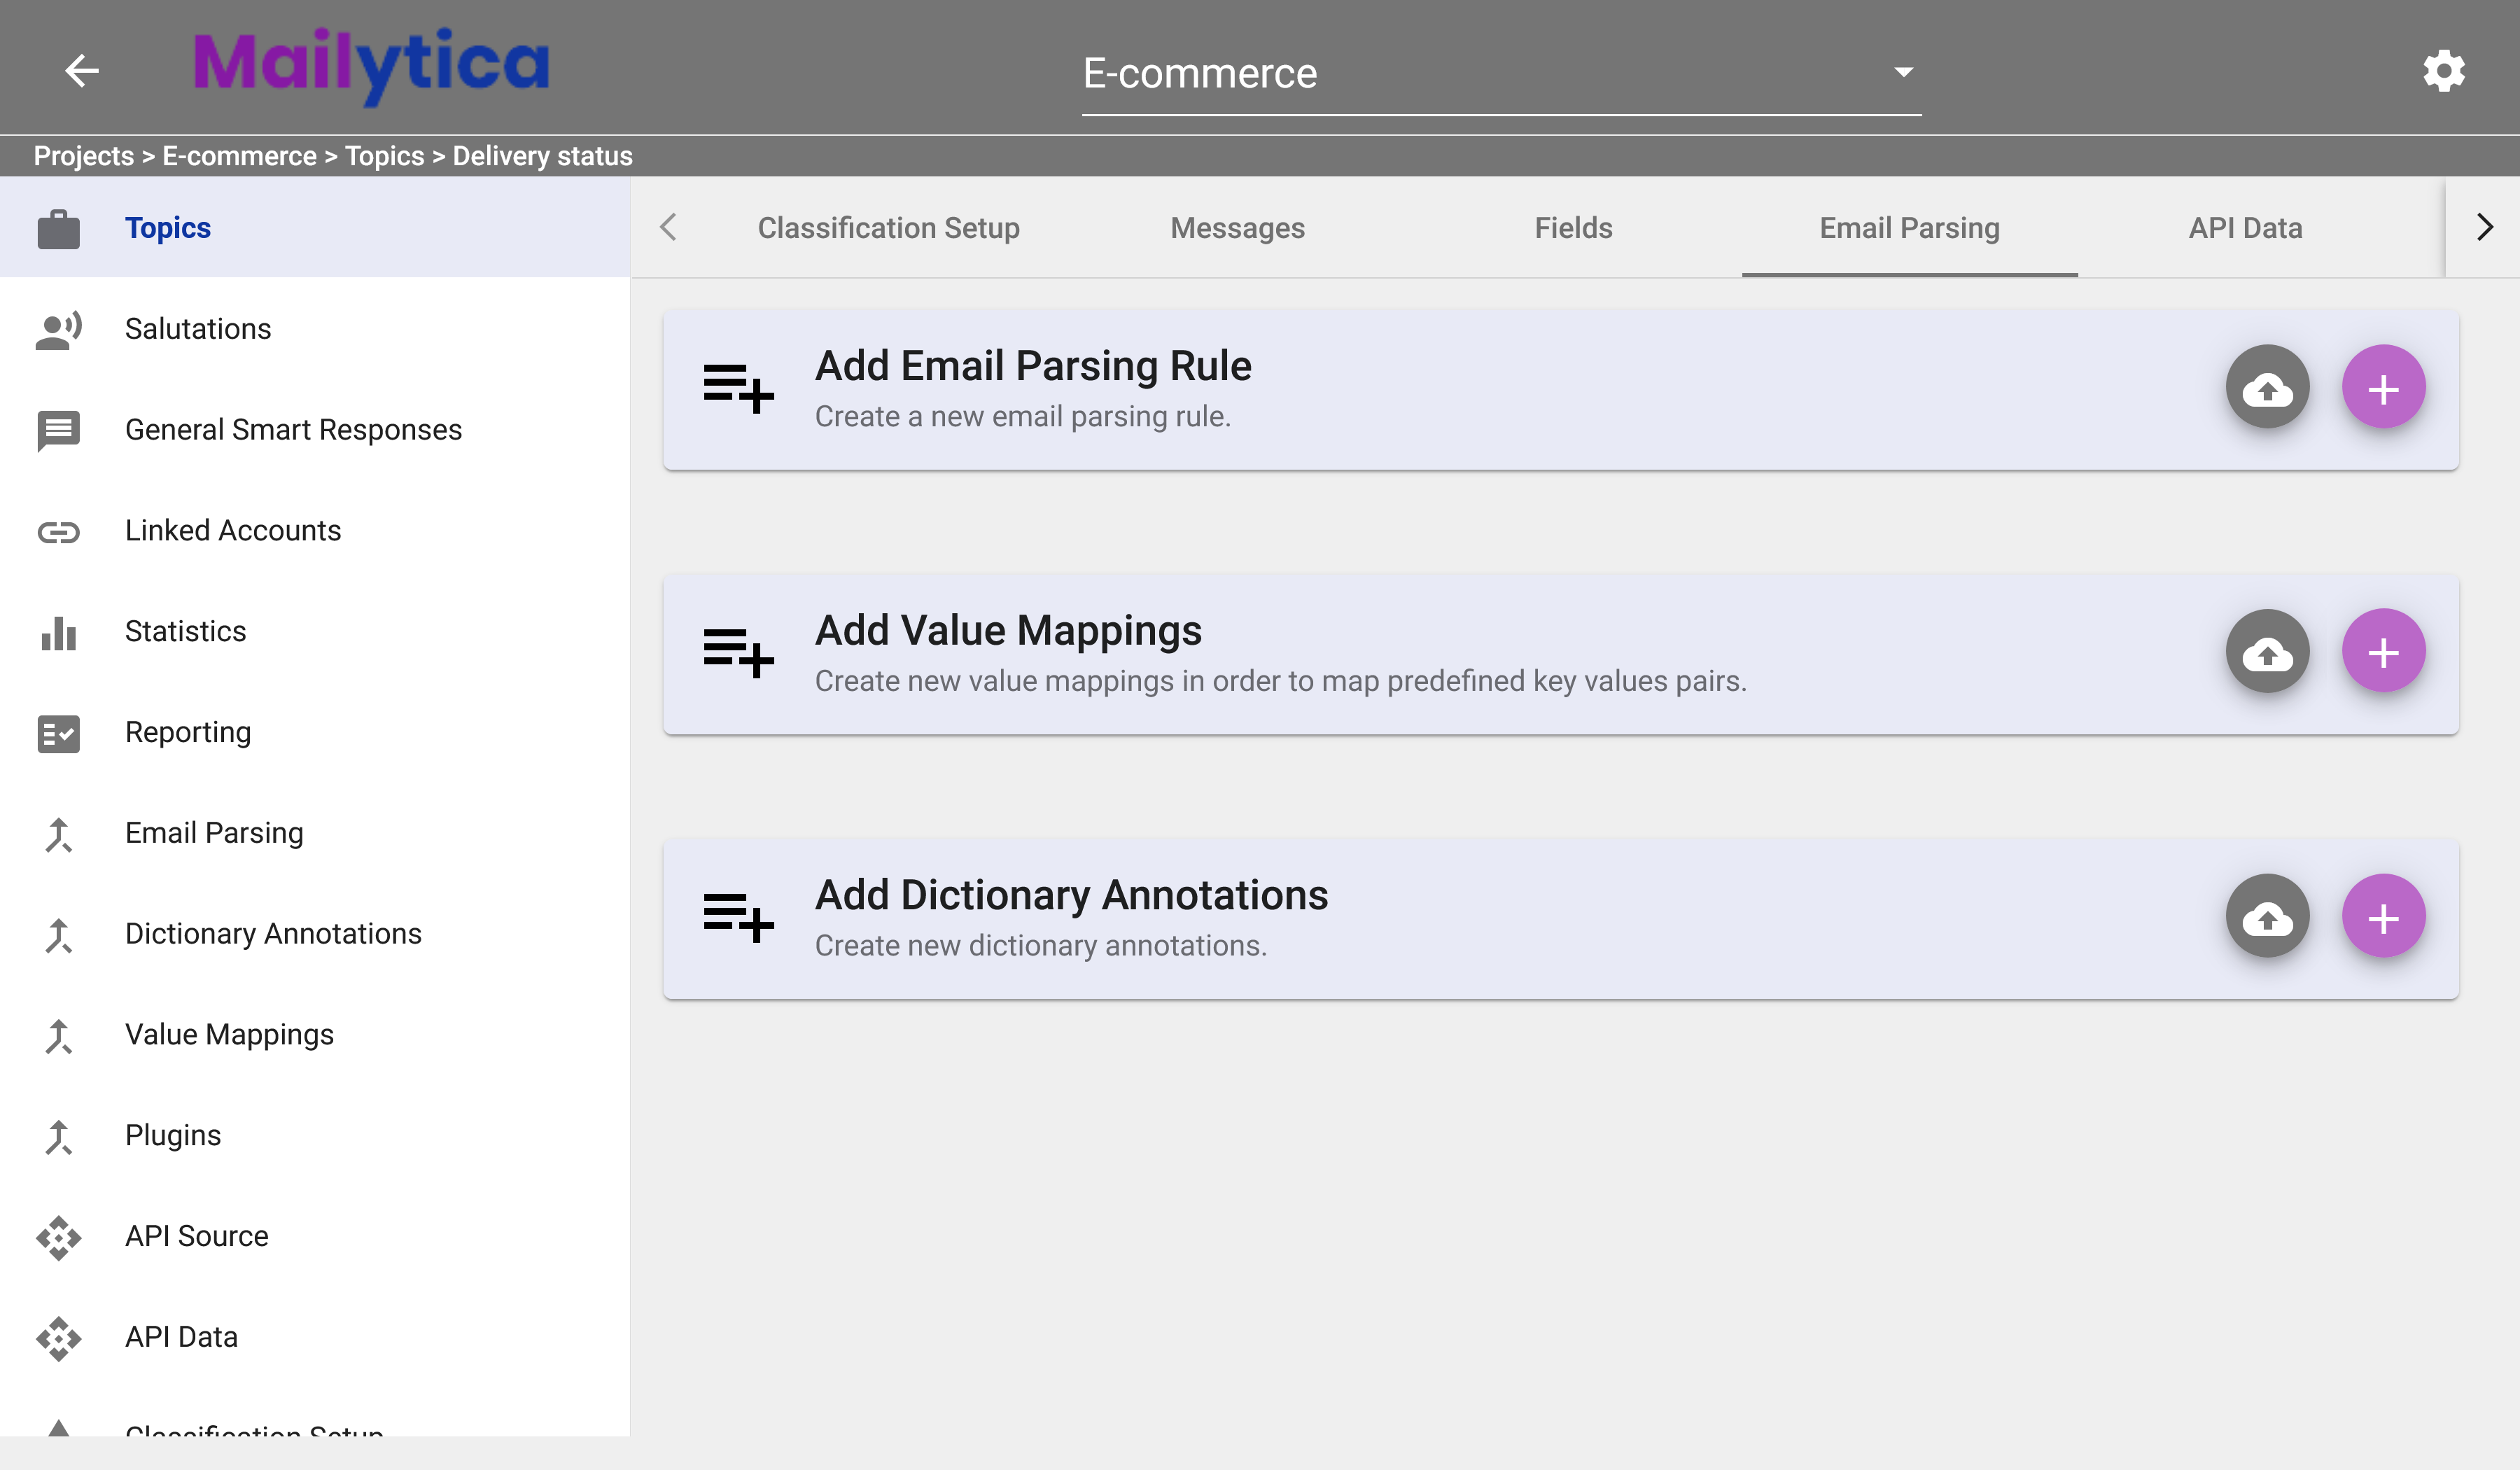
To get started, you need to have already created a topic as explained in the Add a New Topic section. Then, in the Edit section of your topic, select Email Parsing from the top tab bar. Click on the button in the Add Email Parsing Rule card. The Add Email Parsing Rule section will show you the instructions on how to define your parsing rules. Click Next.
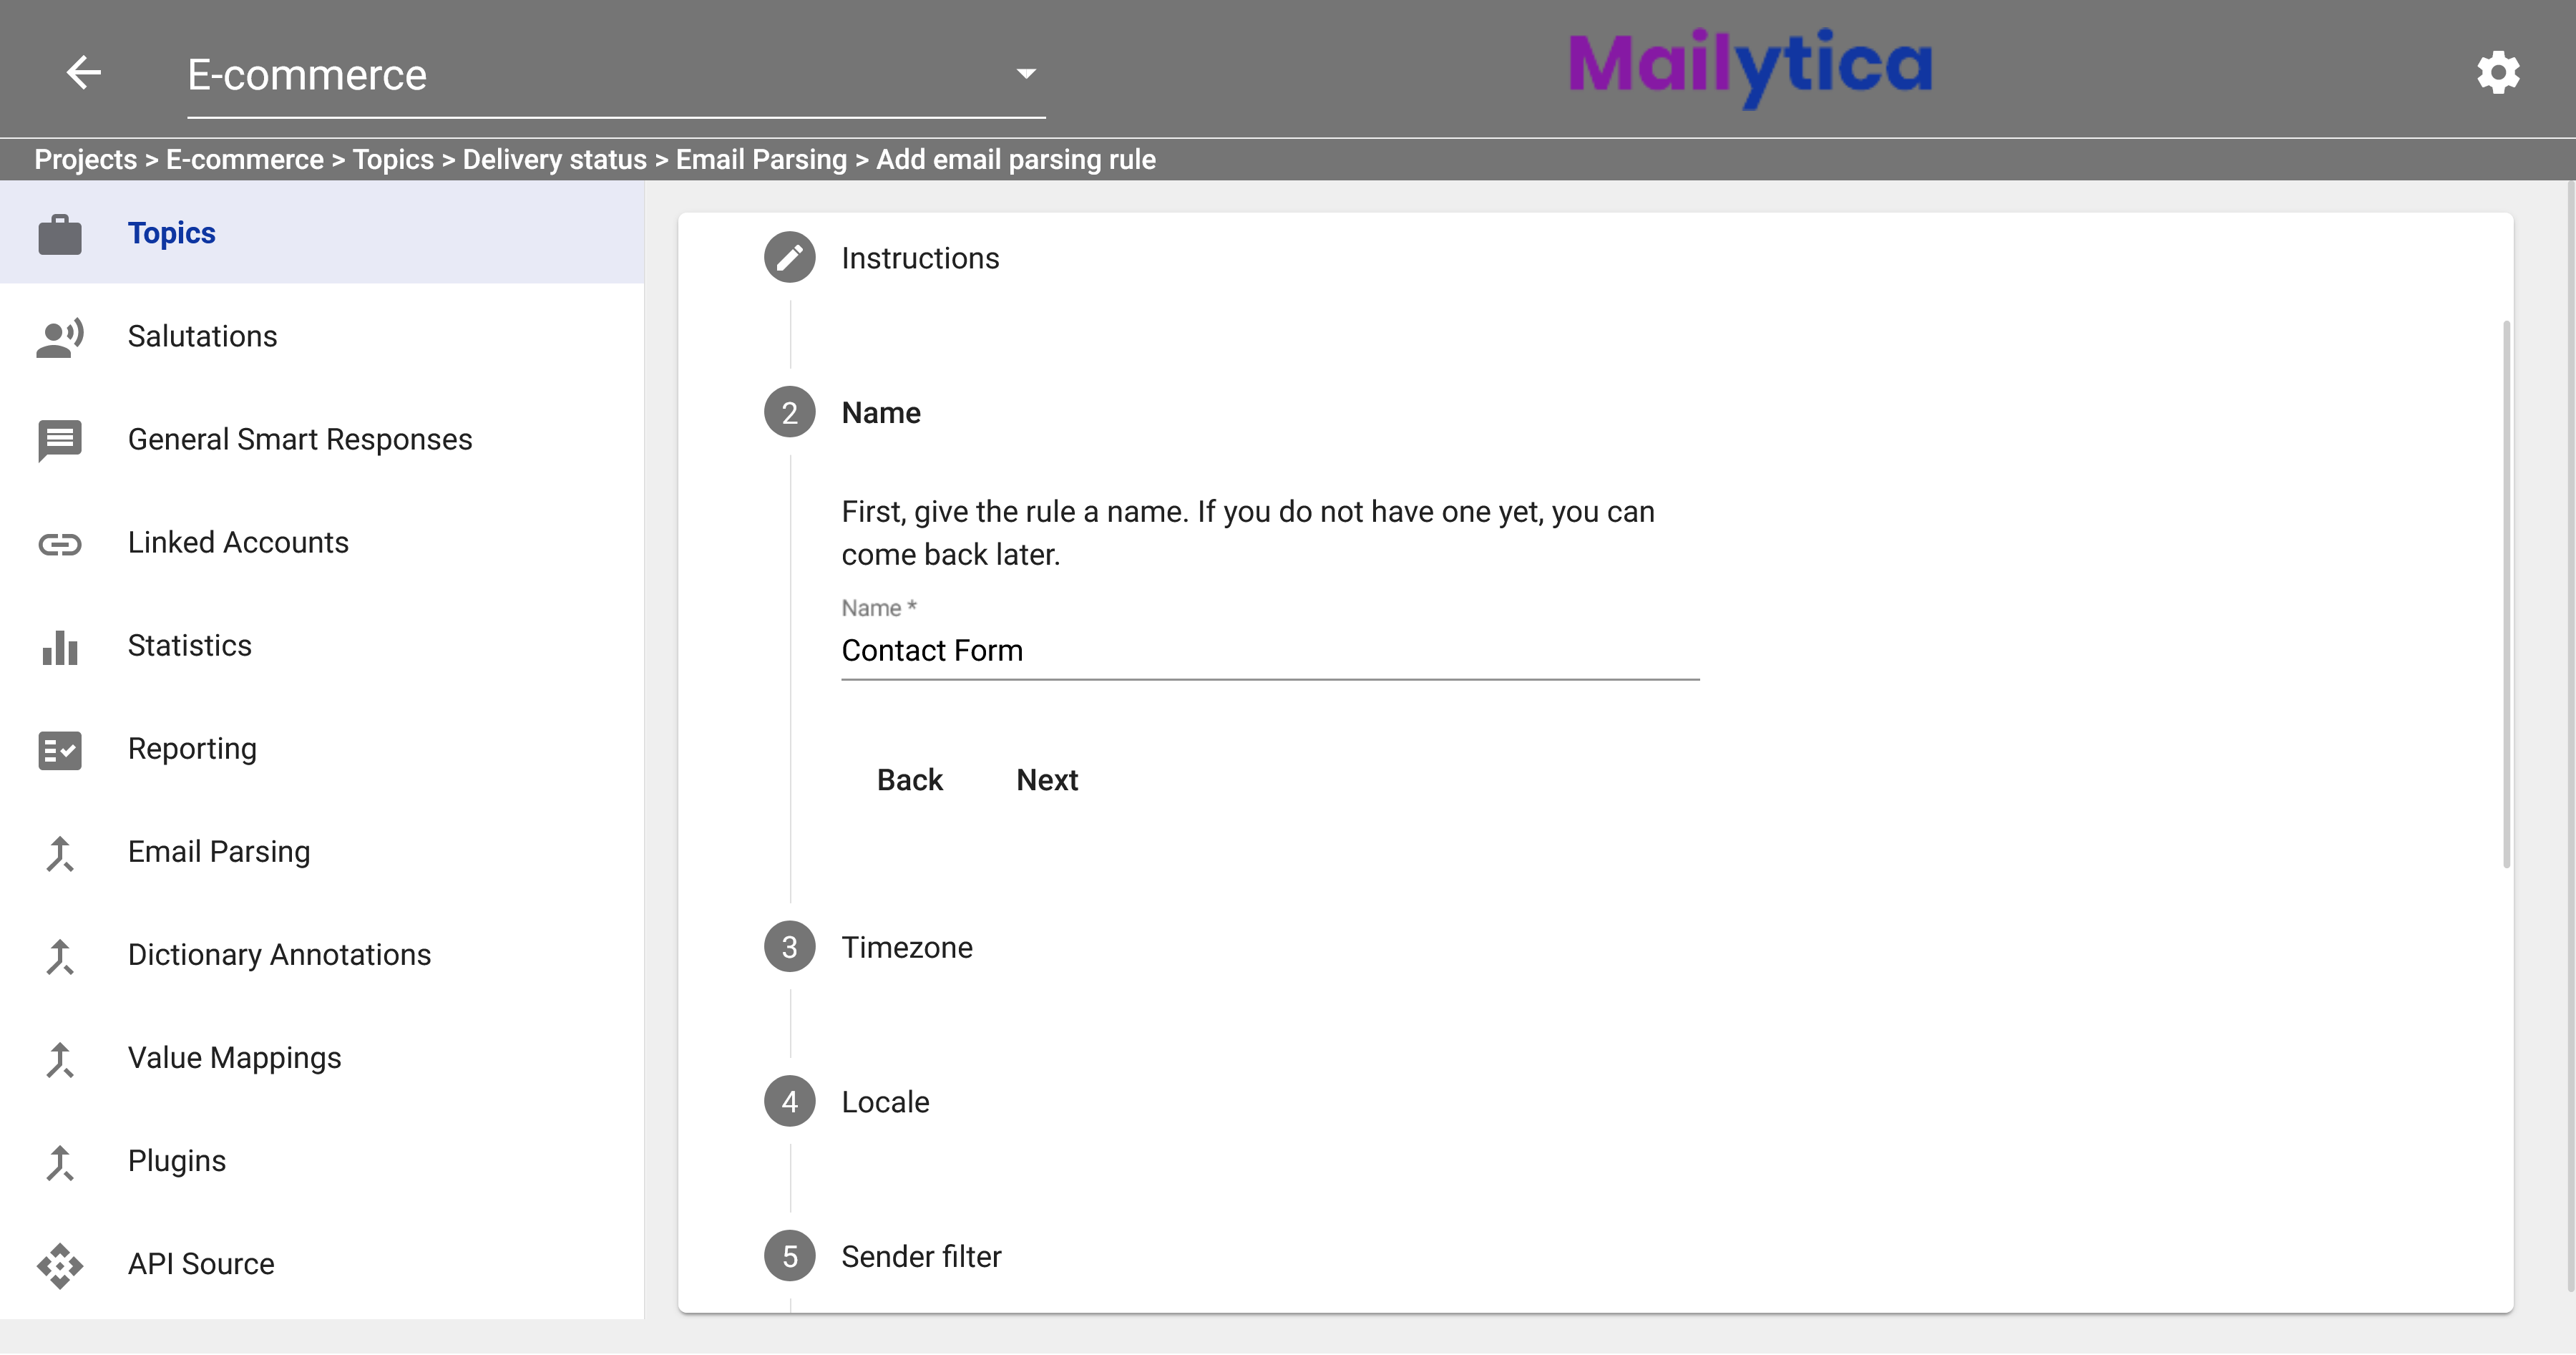
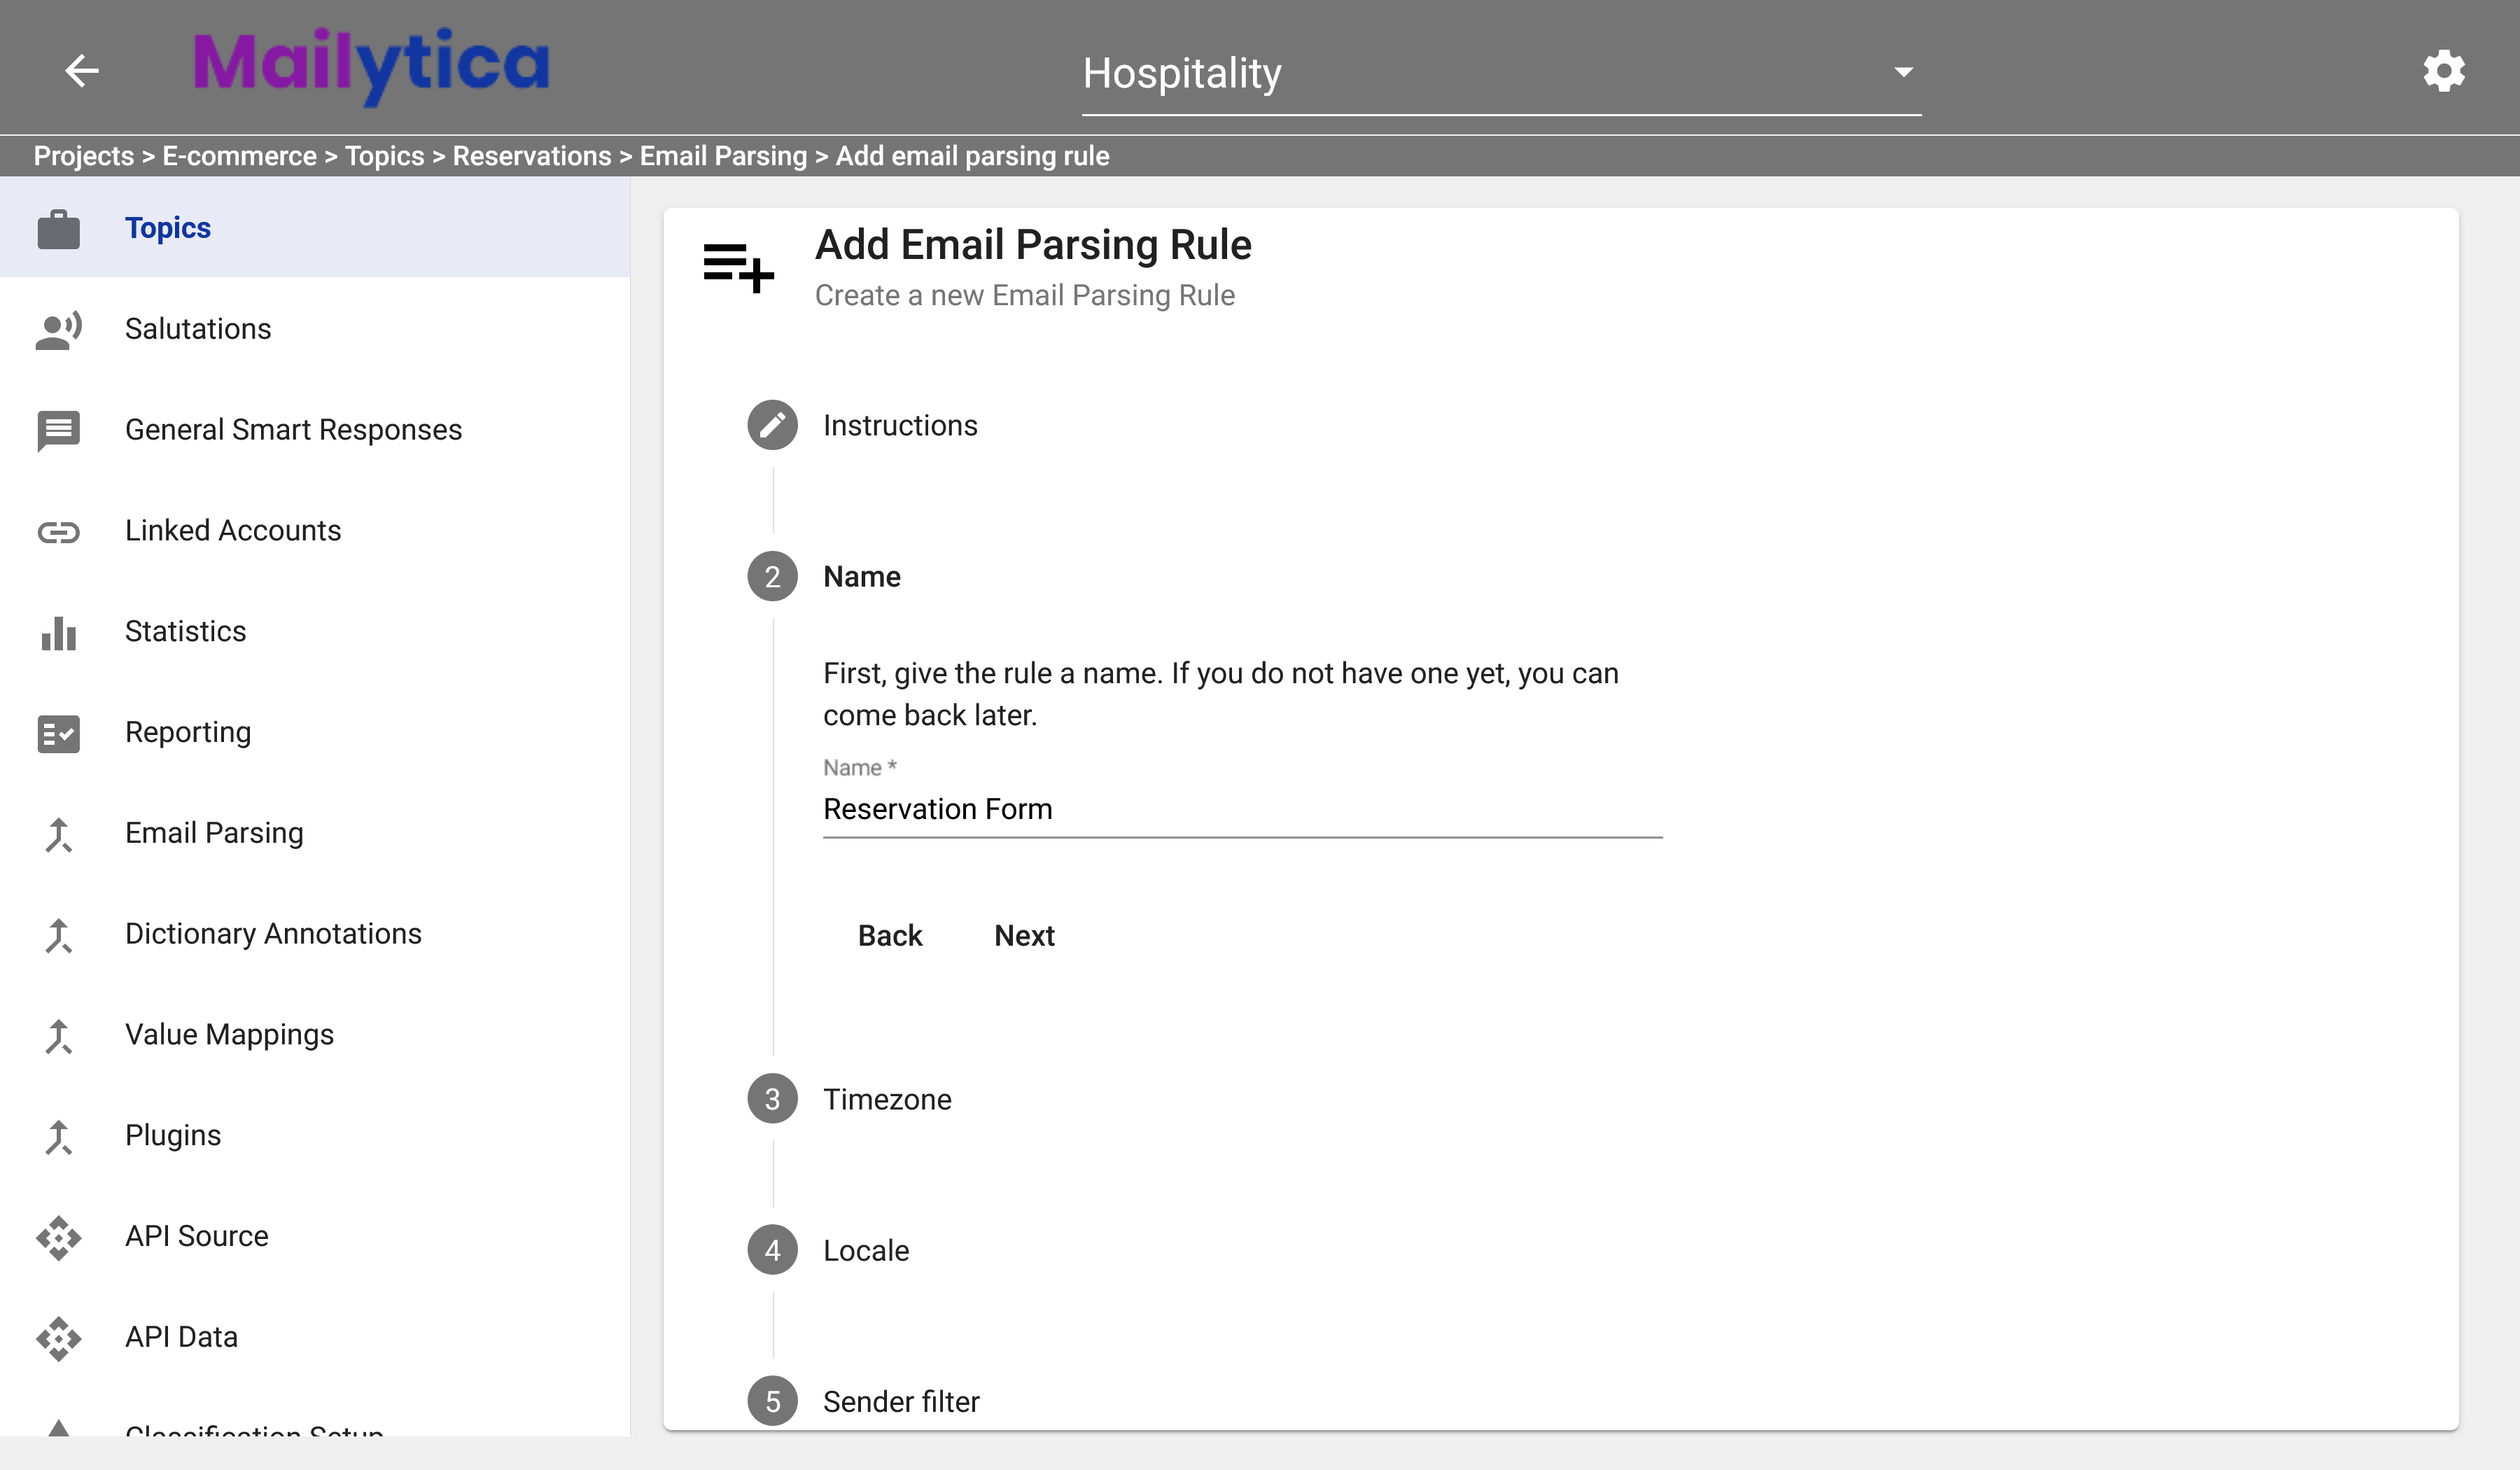
Next, in the Name section, give the email parsing rule a descriptive name. This name should make it easier for you to find your parsing rule later. For example, you can create a parsing rule named Contact Form to extract contact information from filled out forms that you normally receive by email.
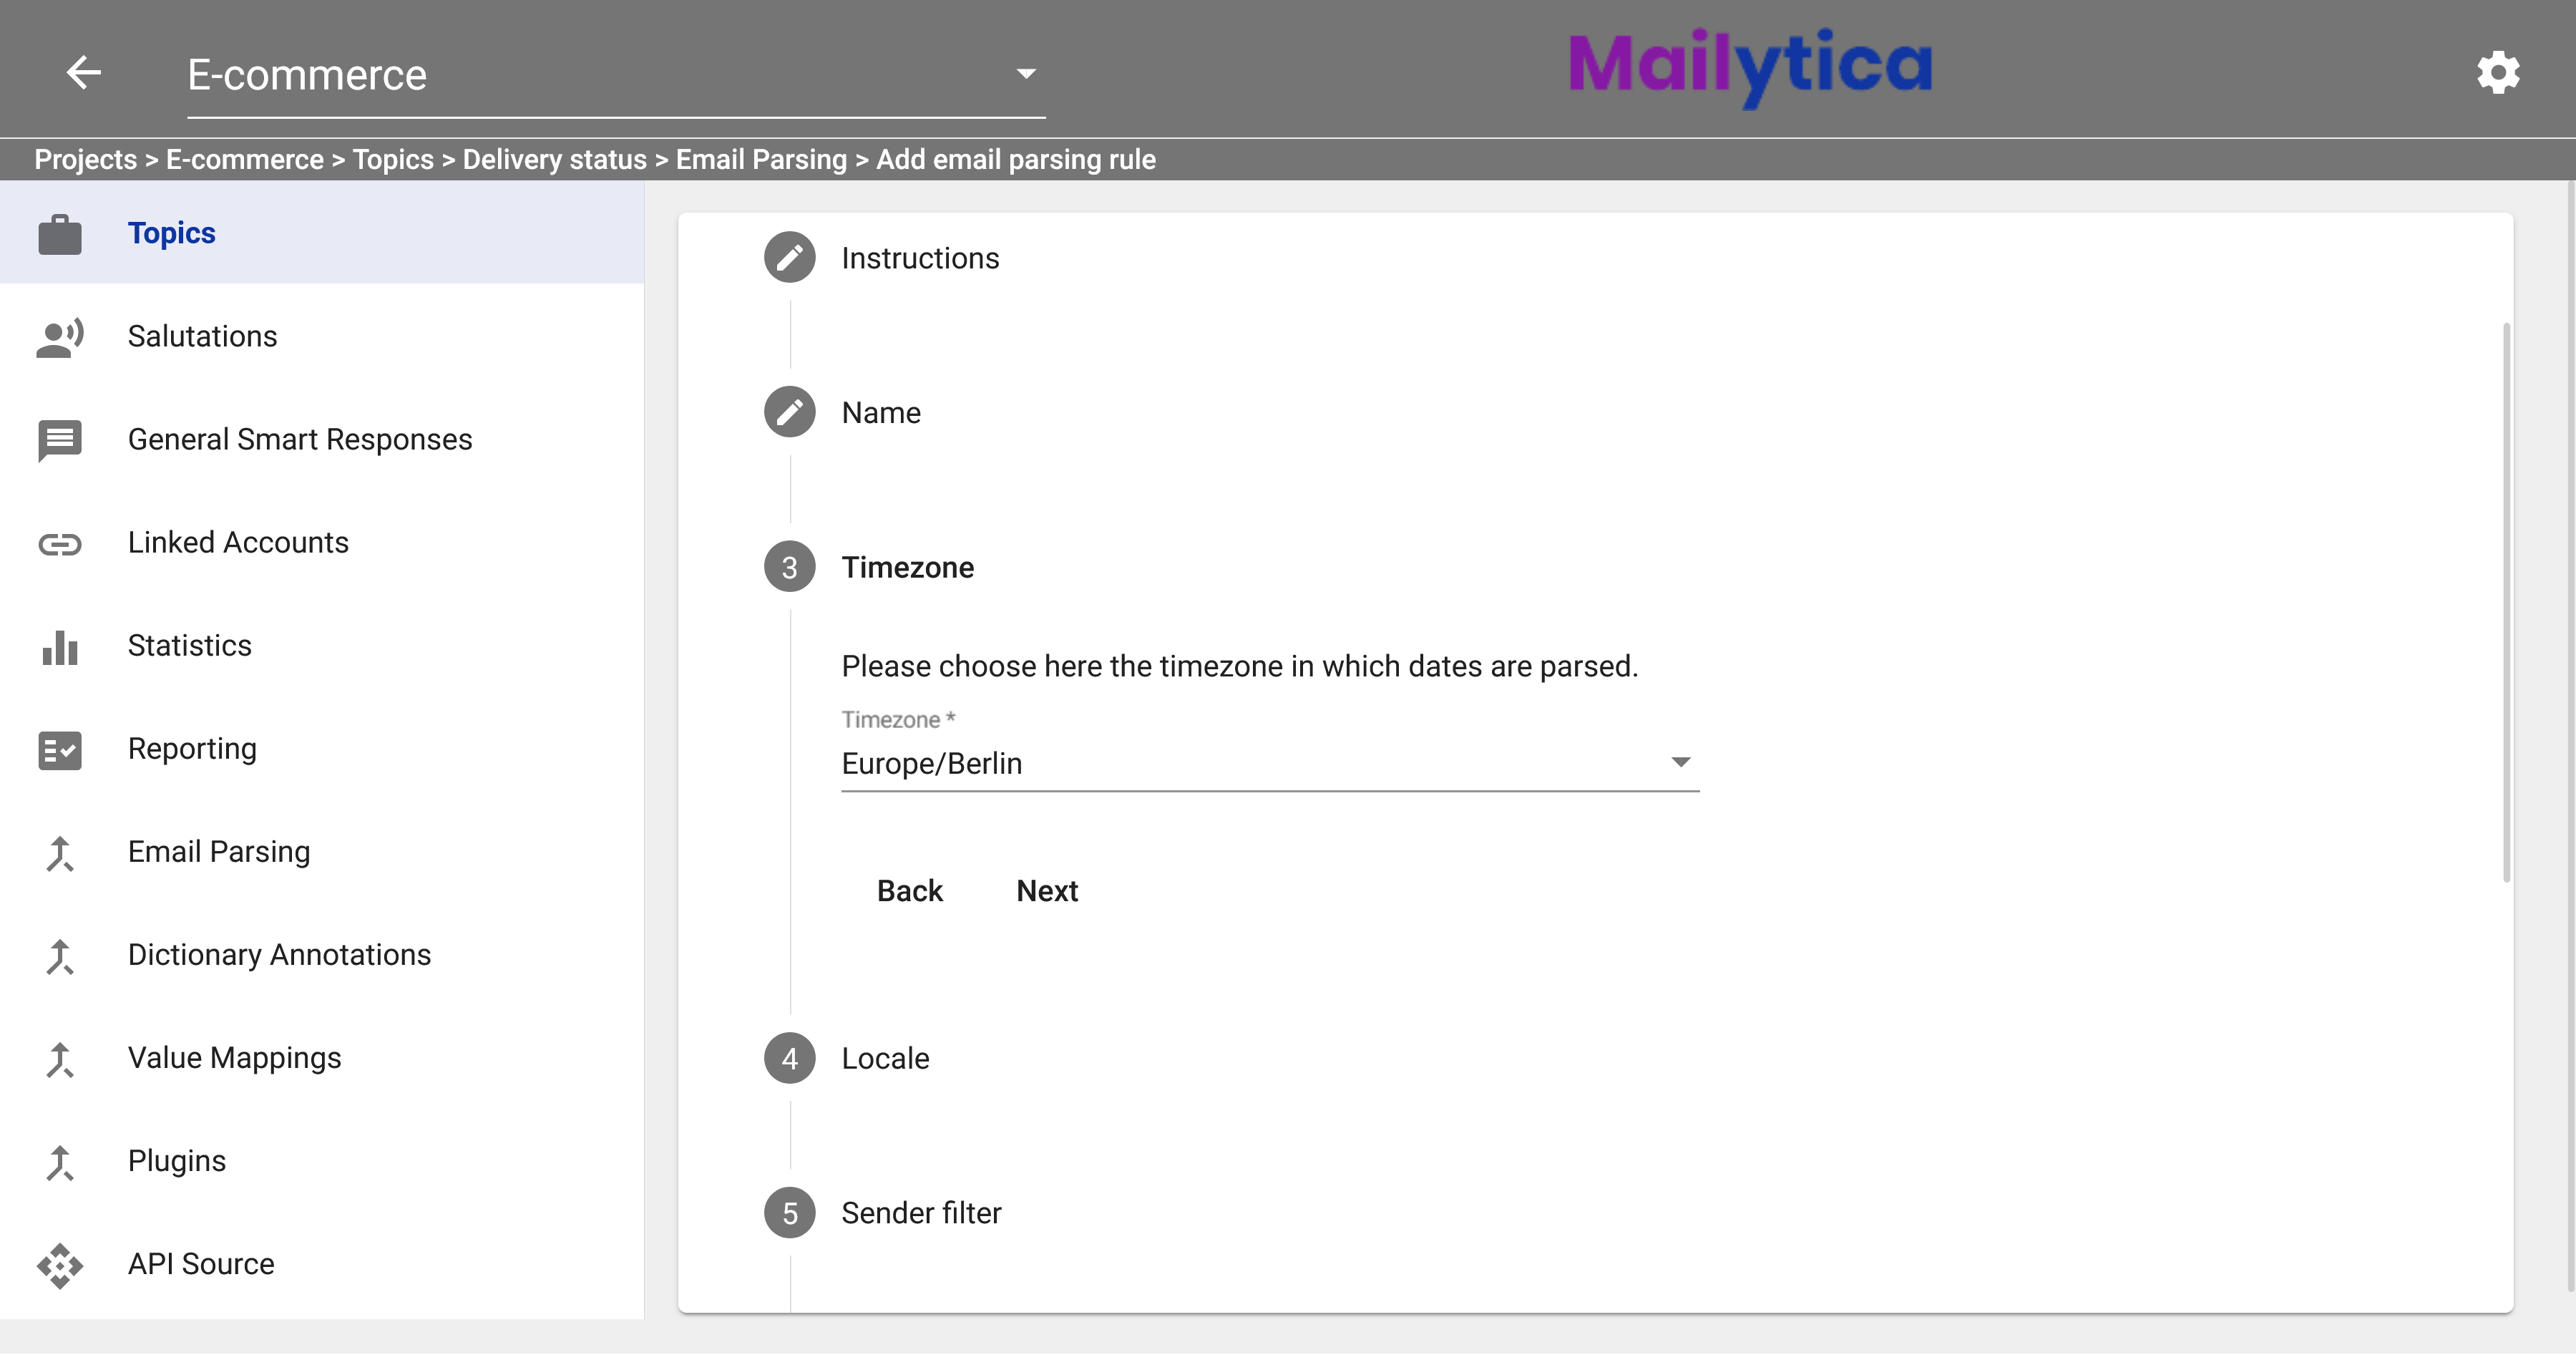
Then, in Time Zone, you’ll be able to set a specific time zone for parsing dates. You can choose between Berlin, London, Paris, or New York. This setting is something to keep in mind if your parsing rules will extract date or time data, otherwise there’s no downside to leaving it at its default value.
Similarly, Locale allows you to specify the format that should be used when parsing dates. The two options are German locale, which is the equivalent to the format
dd.mm.yyyy. Or English locale, equivalent toyyyy-mm-dd.Tip
It is important to note that if you set up an email parsing rule with Output Field Type equal to Date (as explained in Step 8), Mailytica will try to match several date formats regardless of locale.
Under Sender Filter, if the sender holds an identifier that can be used as a filter, you can add its corresponding regular expression. Otherwise, you can add the expression
.*to include every character.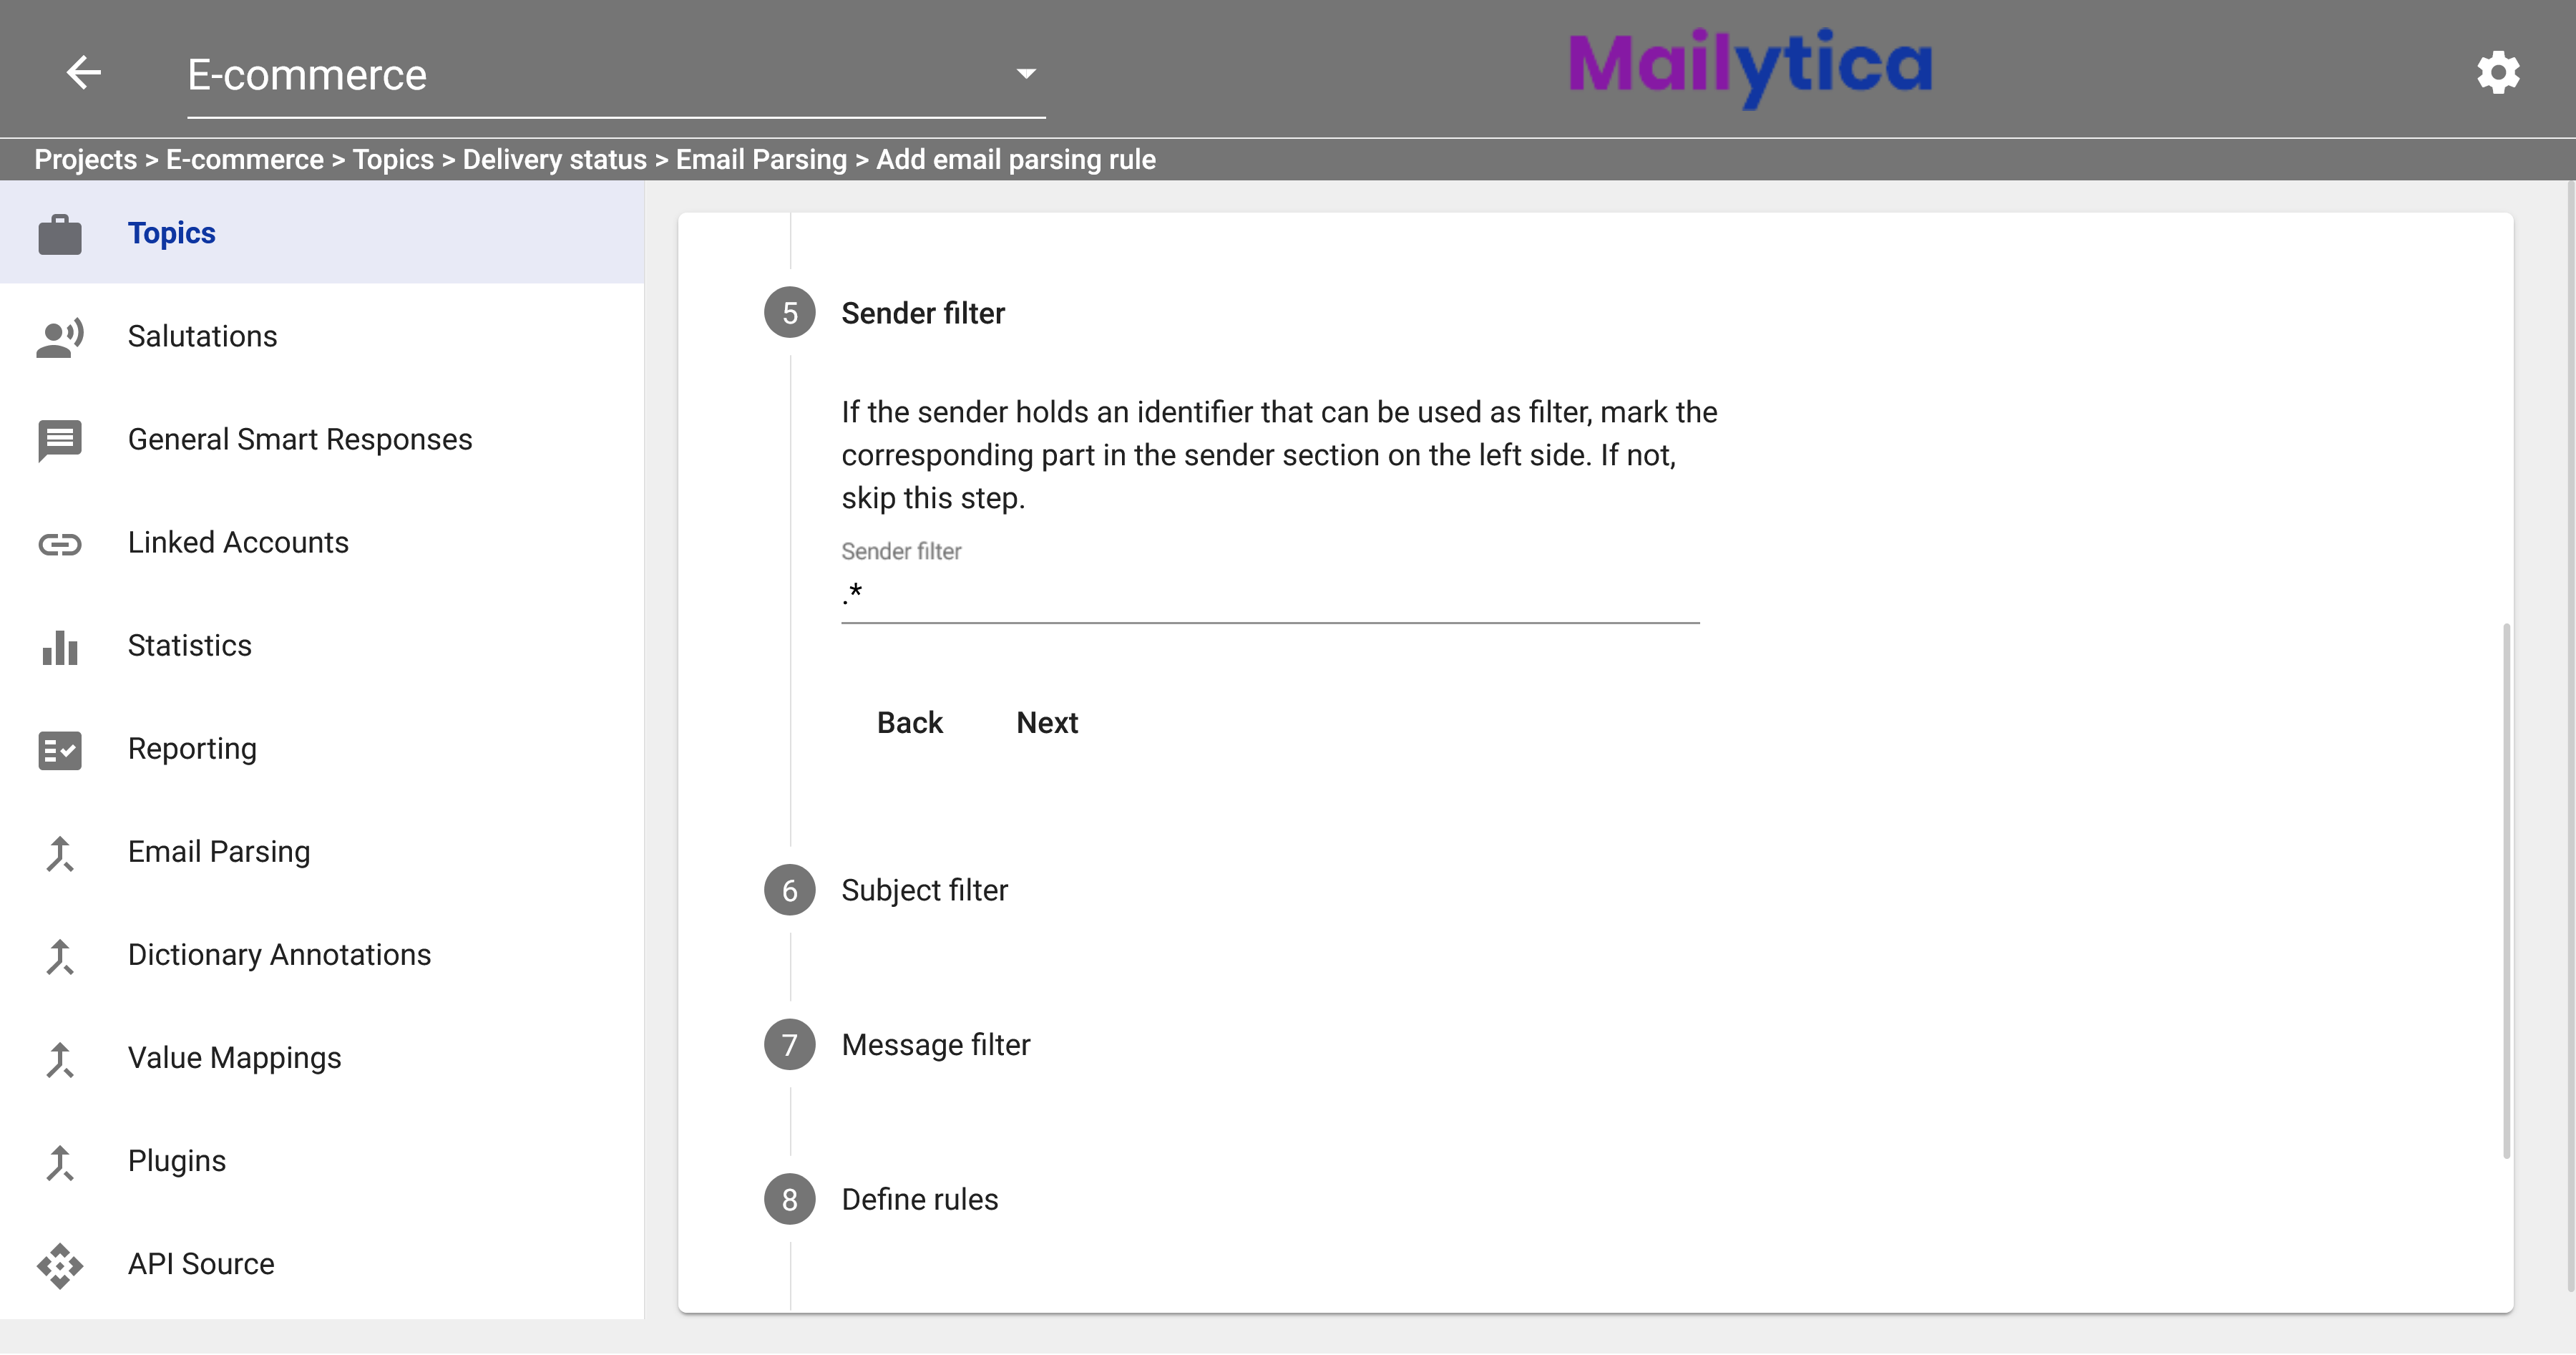
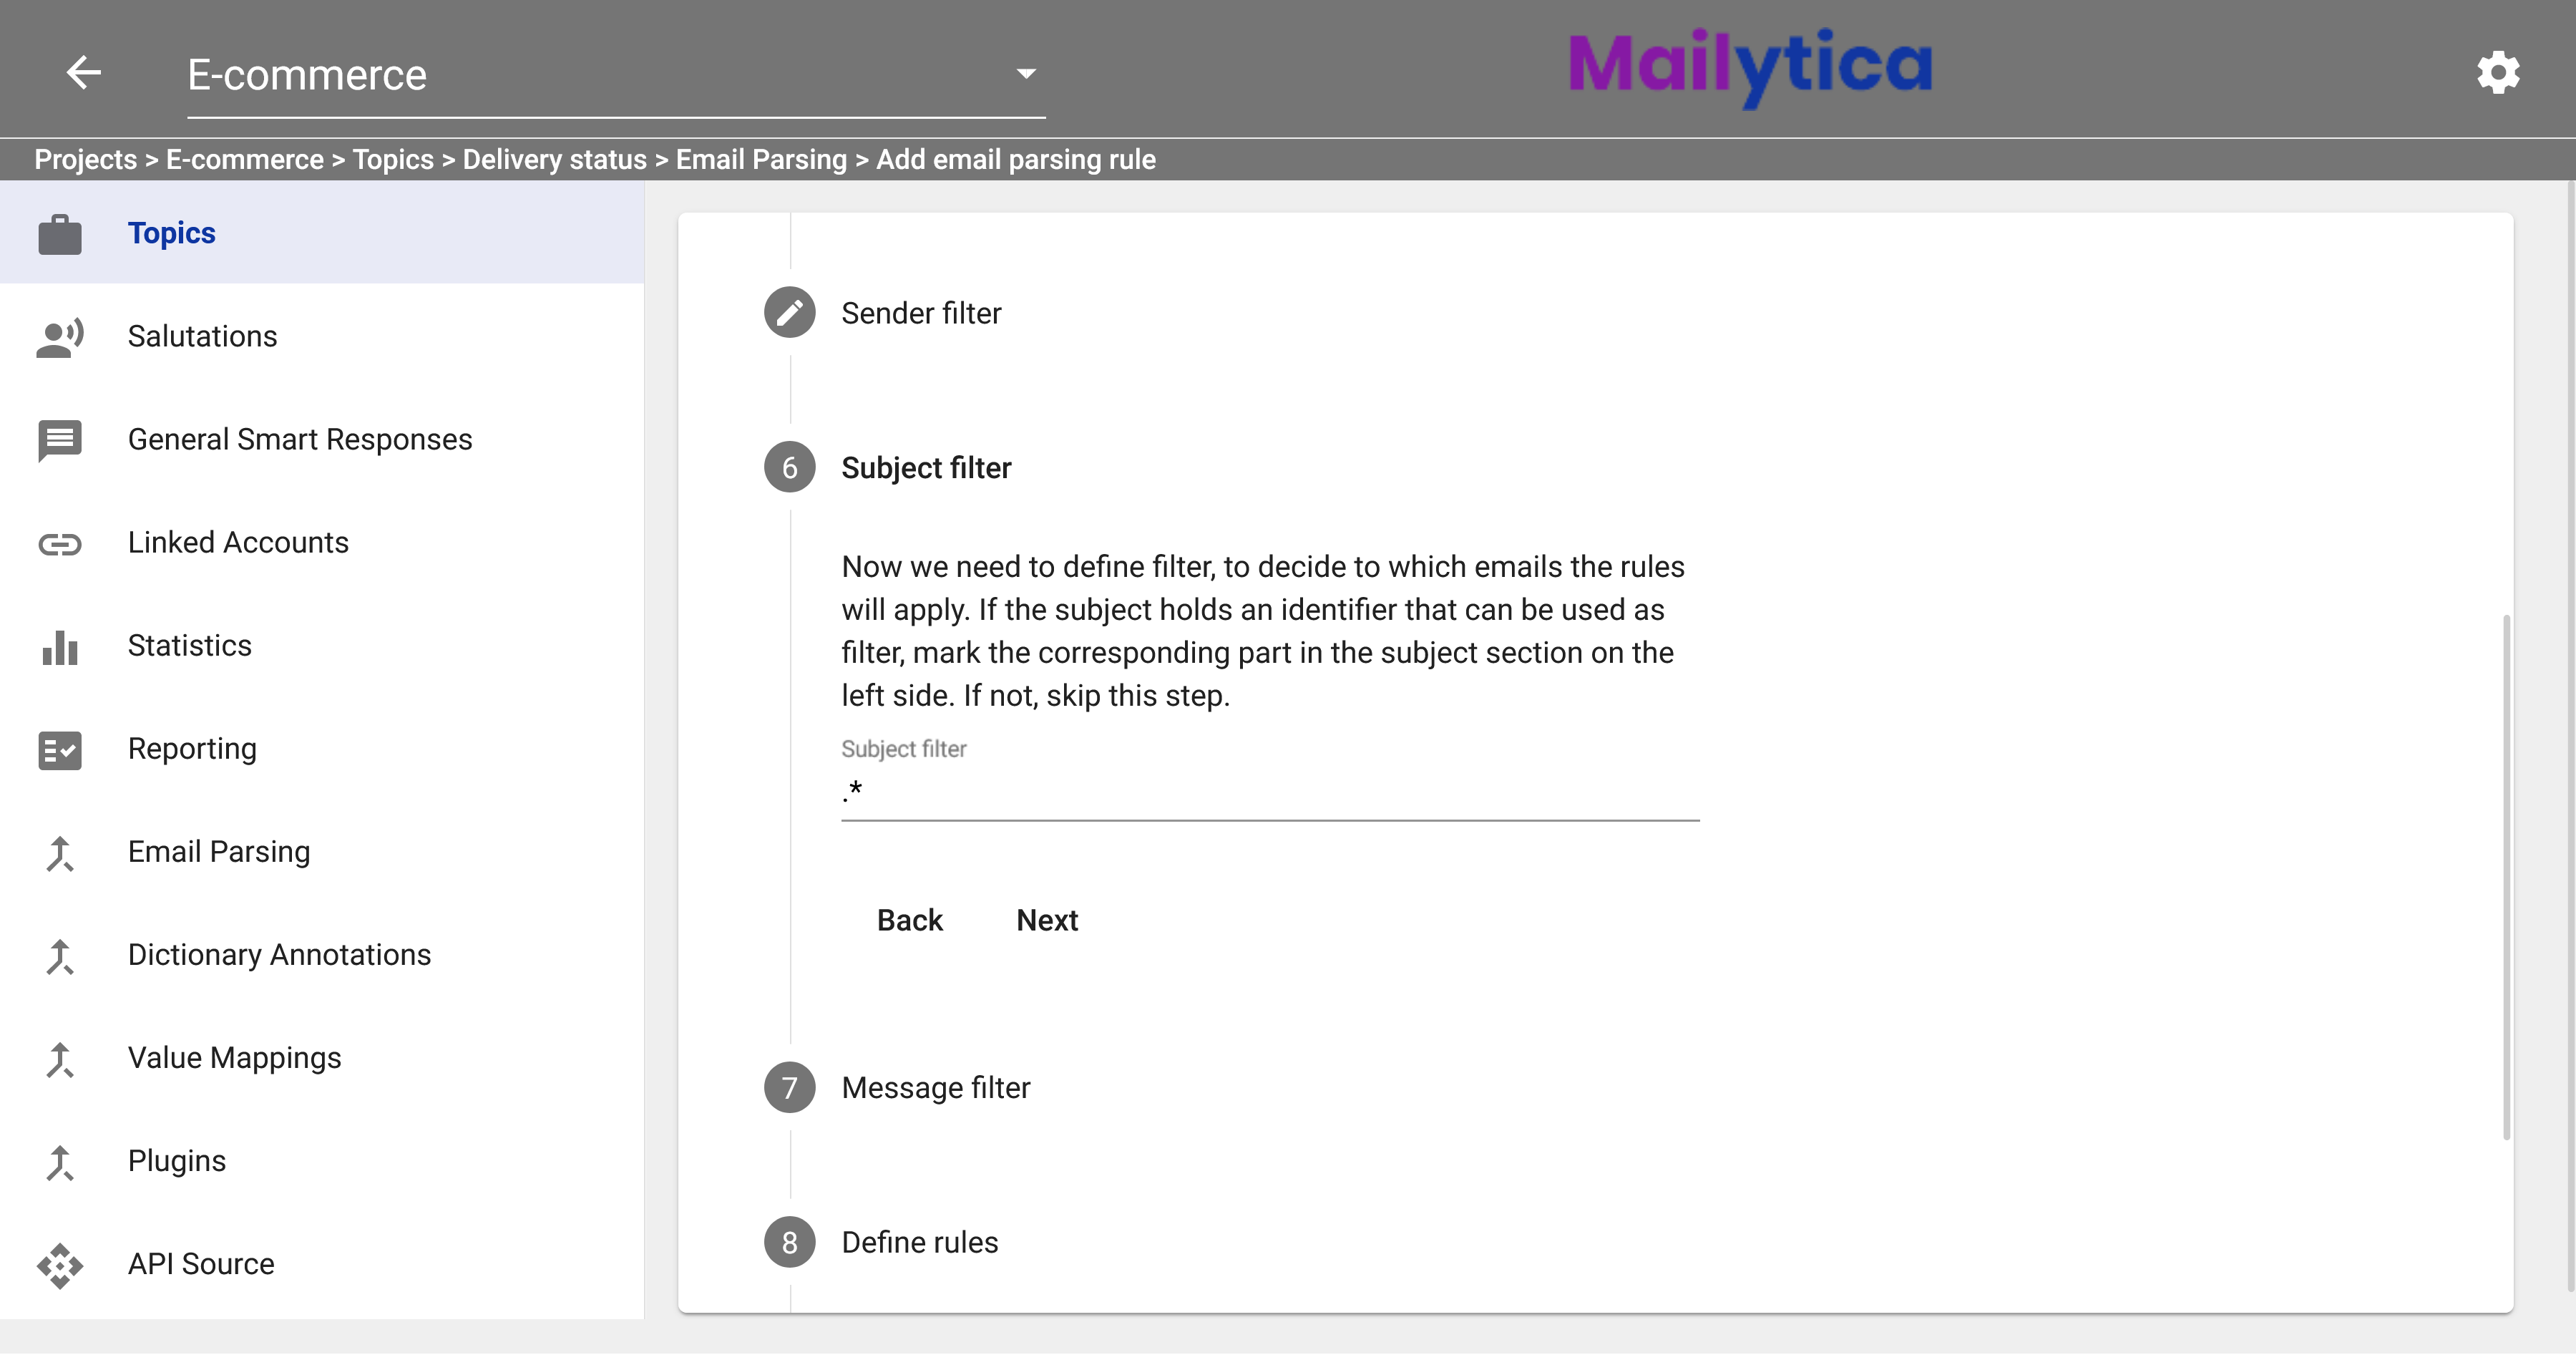
Likewise, in Subject Filter, if the subject of the email message holds an identifier that can be used as a filter, you can add its corresponding regular expression or just add
.*.
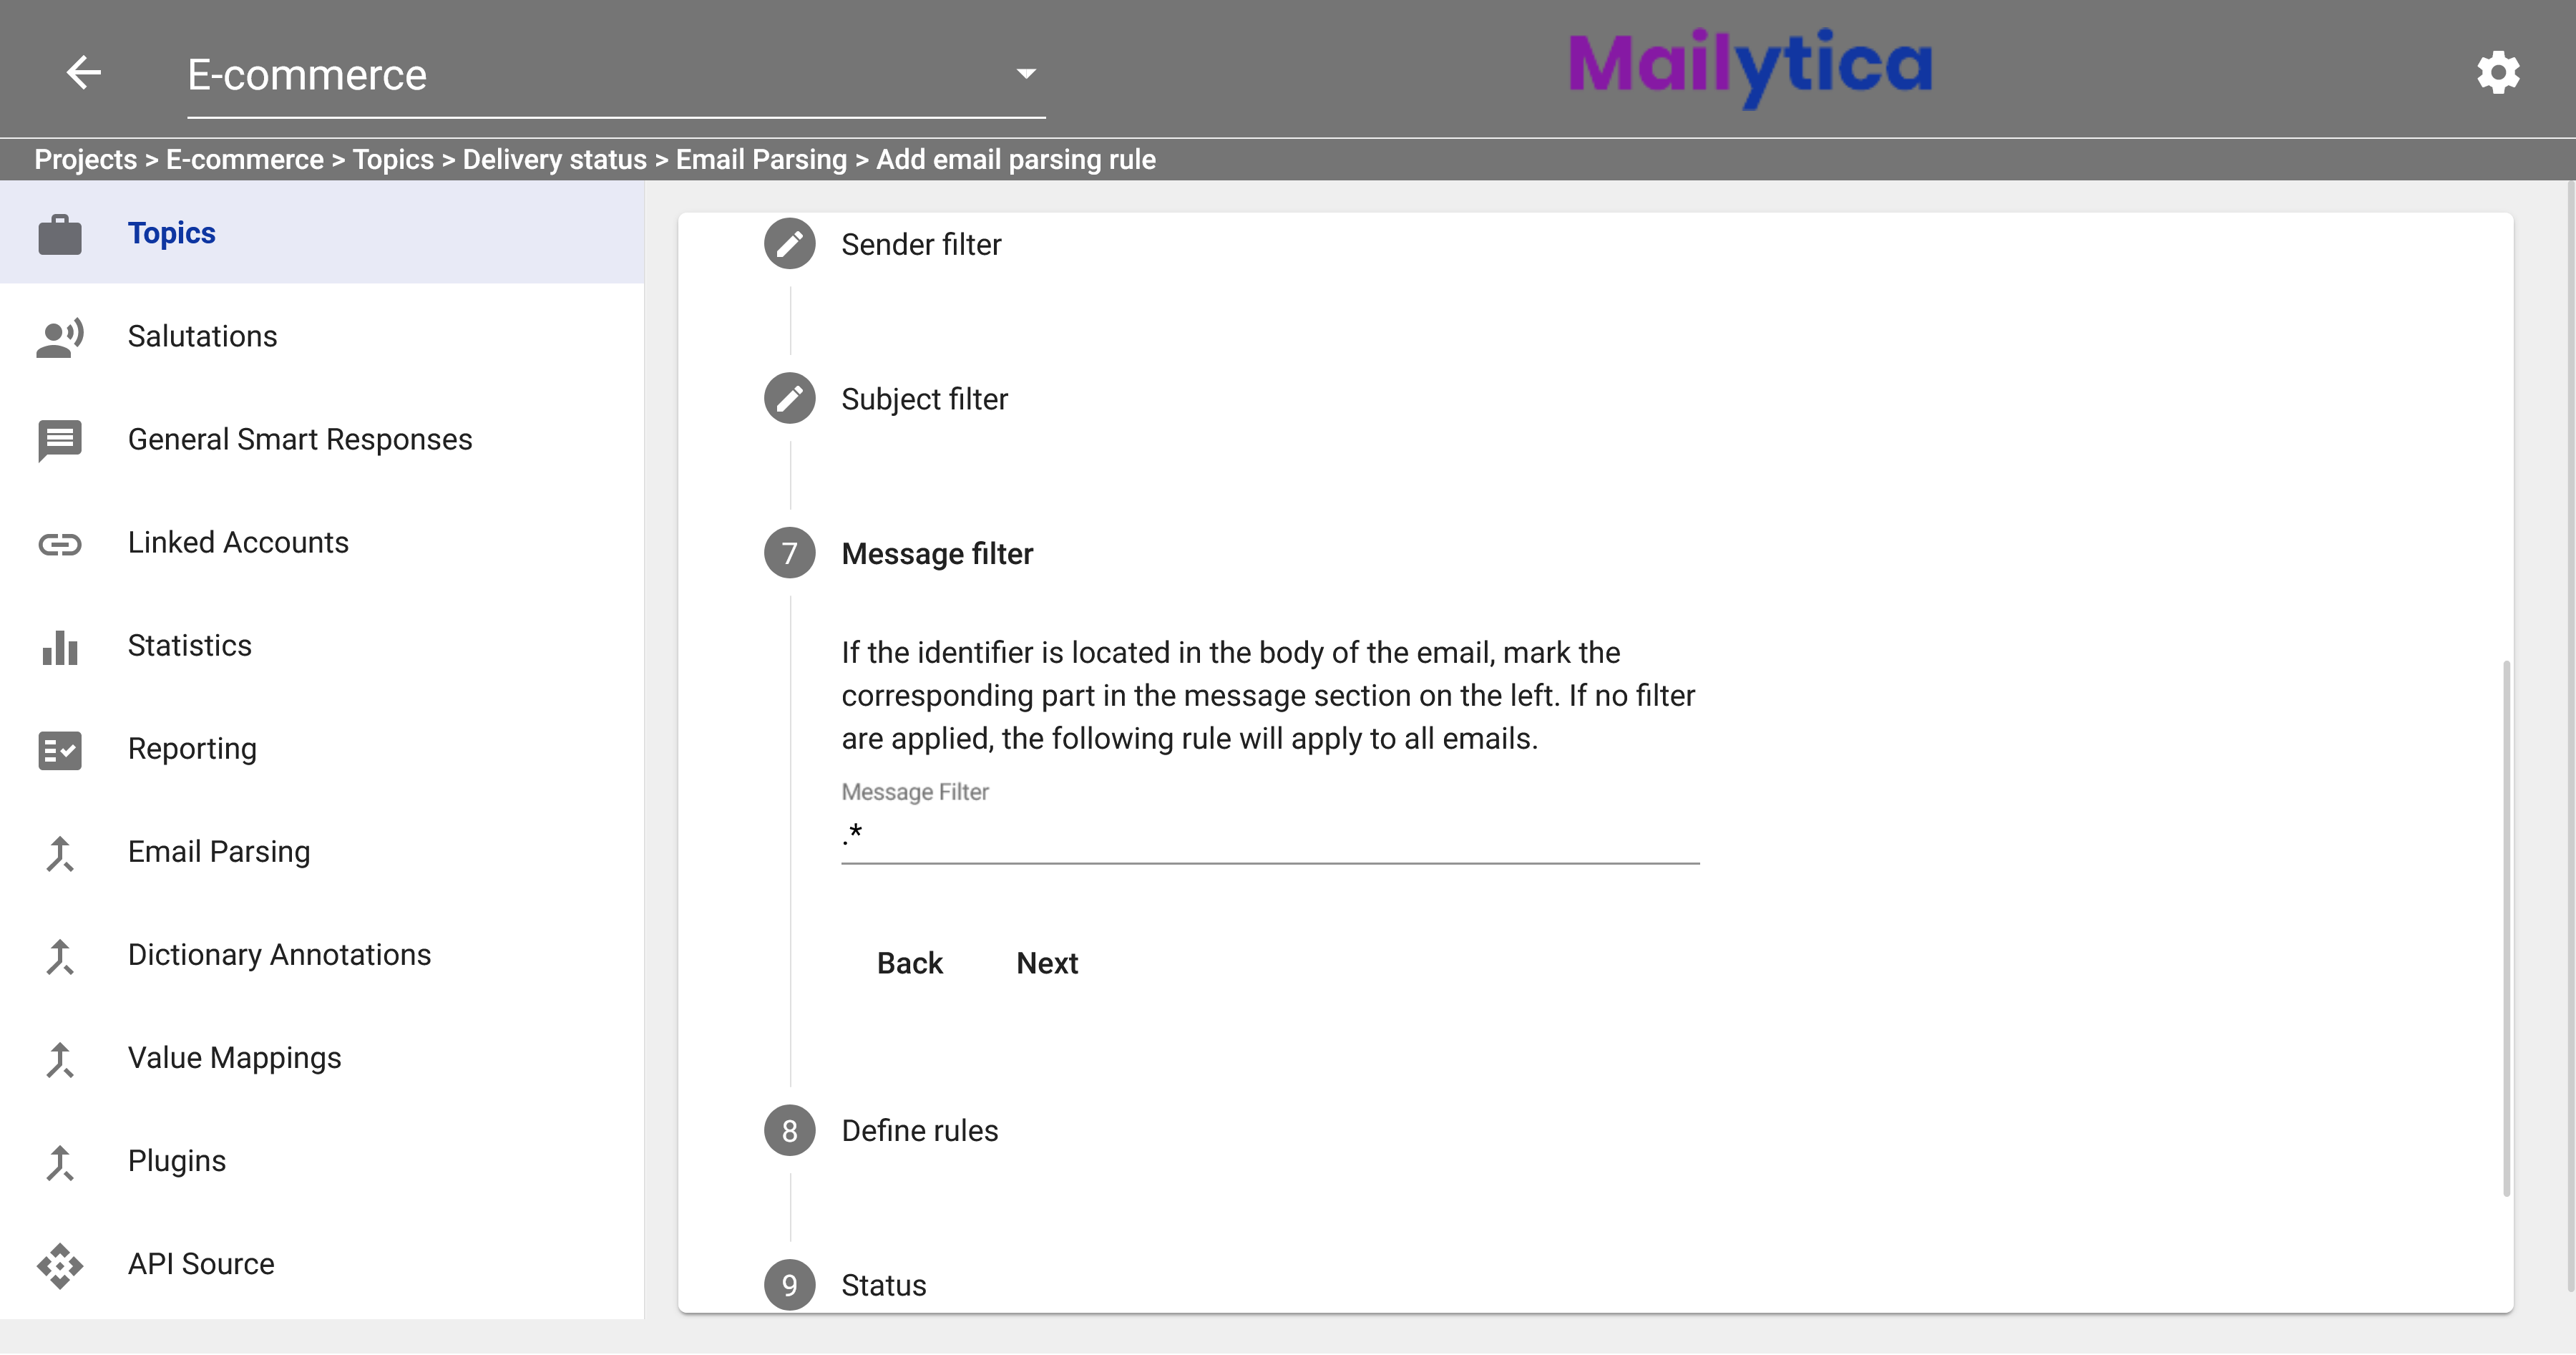
Next, if the identifier is located in the body of the email, you can add its corresponding regular expression in the Message Filter field or just add
.*.
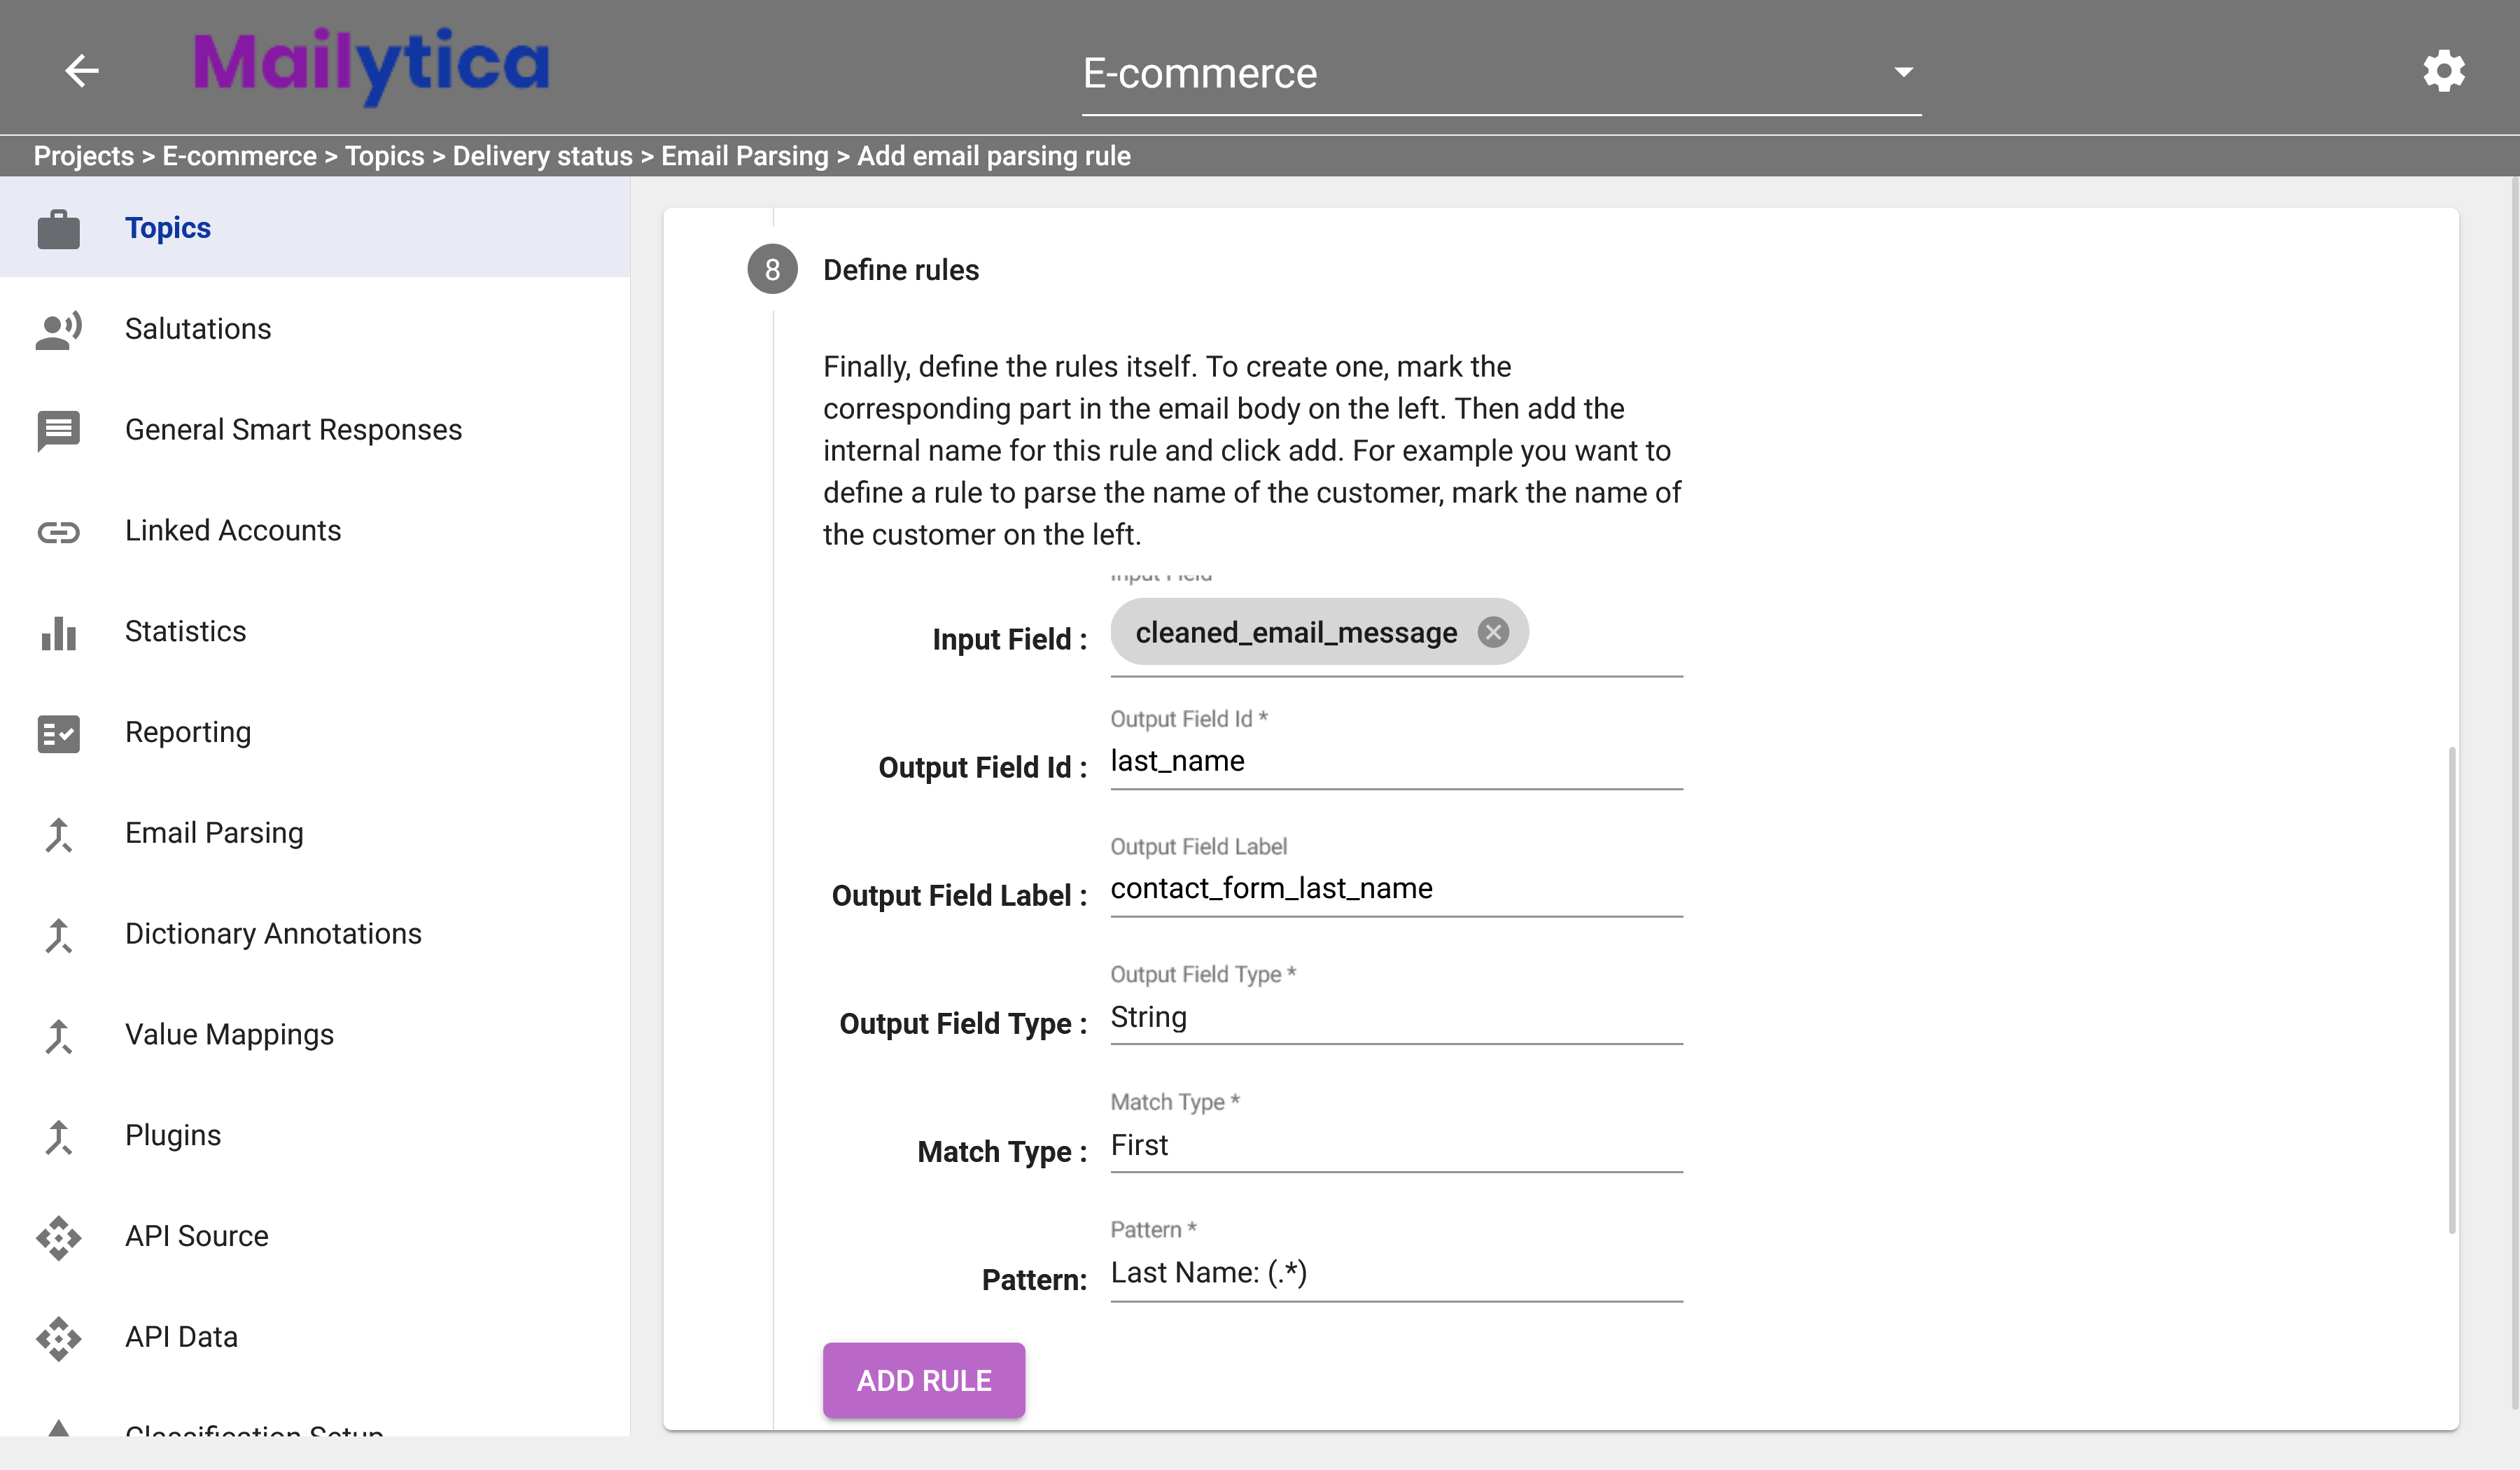
Subsequently, in the Define Rules section, you can specify the email parsing rules. First, select the Input Field where the data should be extracted. The recommended value is cleaned_email_message, since it contains only the text in the message’s body but excluding unnecessary information.
Then, you can select an Output Field Id (the data that you will extract) or simply write a new one in the text box.
Under Output Field Label, you have the option to give a label to your parsing rule to recognize it more easily.
Following, in Output Field Type, you can select the type of data that your parsing rule will extract. For example, if we wish to extract last names from the contact form, the Output Field Type would be String because it only contains characters.
The next option is Match Type, which allows you to specify how the regular expression pattern should be applied to the text of your email. You have four options: Match First, Match All, Replace First, and Replace All.
Match First: Matches only the first occurrence of a pattern in an email. For example, if you were to search for the pattern
(shipment)in a message, it would only find the first instance of the word shipment while ignoring all subsequent cases.Match All: Finds every instance of a pattern in an email. For instance, if the regular expression pattern
(shipment)is set to Match All, then Mailytica will look for every occurrence of the word shipment in the email message. This is a useful option if you want to see how many times a particular word or phrase appears in an email.Replace First: Replaces the first occurrence of a pattern with your replacement text. For example, if you wanted to replace the first instance of shipment with delivery, you would write
(shipment)->(delivery)in the Pattern field. The arrow symbol->indicates that the first pattern should be replaced with the second pattern.Replace All: Replaces every instance of a pattern with your replacement text. For instance, you can replace all occurrences of the word Deutschland in an email message with Germany by using
(Deutschland)->(Germany)in the Pattern field.
In the Pattern field, you can specify your regular expression or select from the predefined ones. Once you have finished setting up the regular expression pattern, click Add Rule. You can continue setting up as many additional parsing rules as necessary. Then click Next.
Note
For more details on how to define email parsing rules, please visit the Email Parsing Fields section.
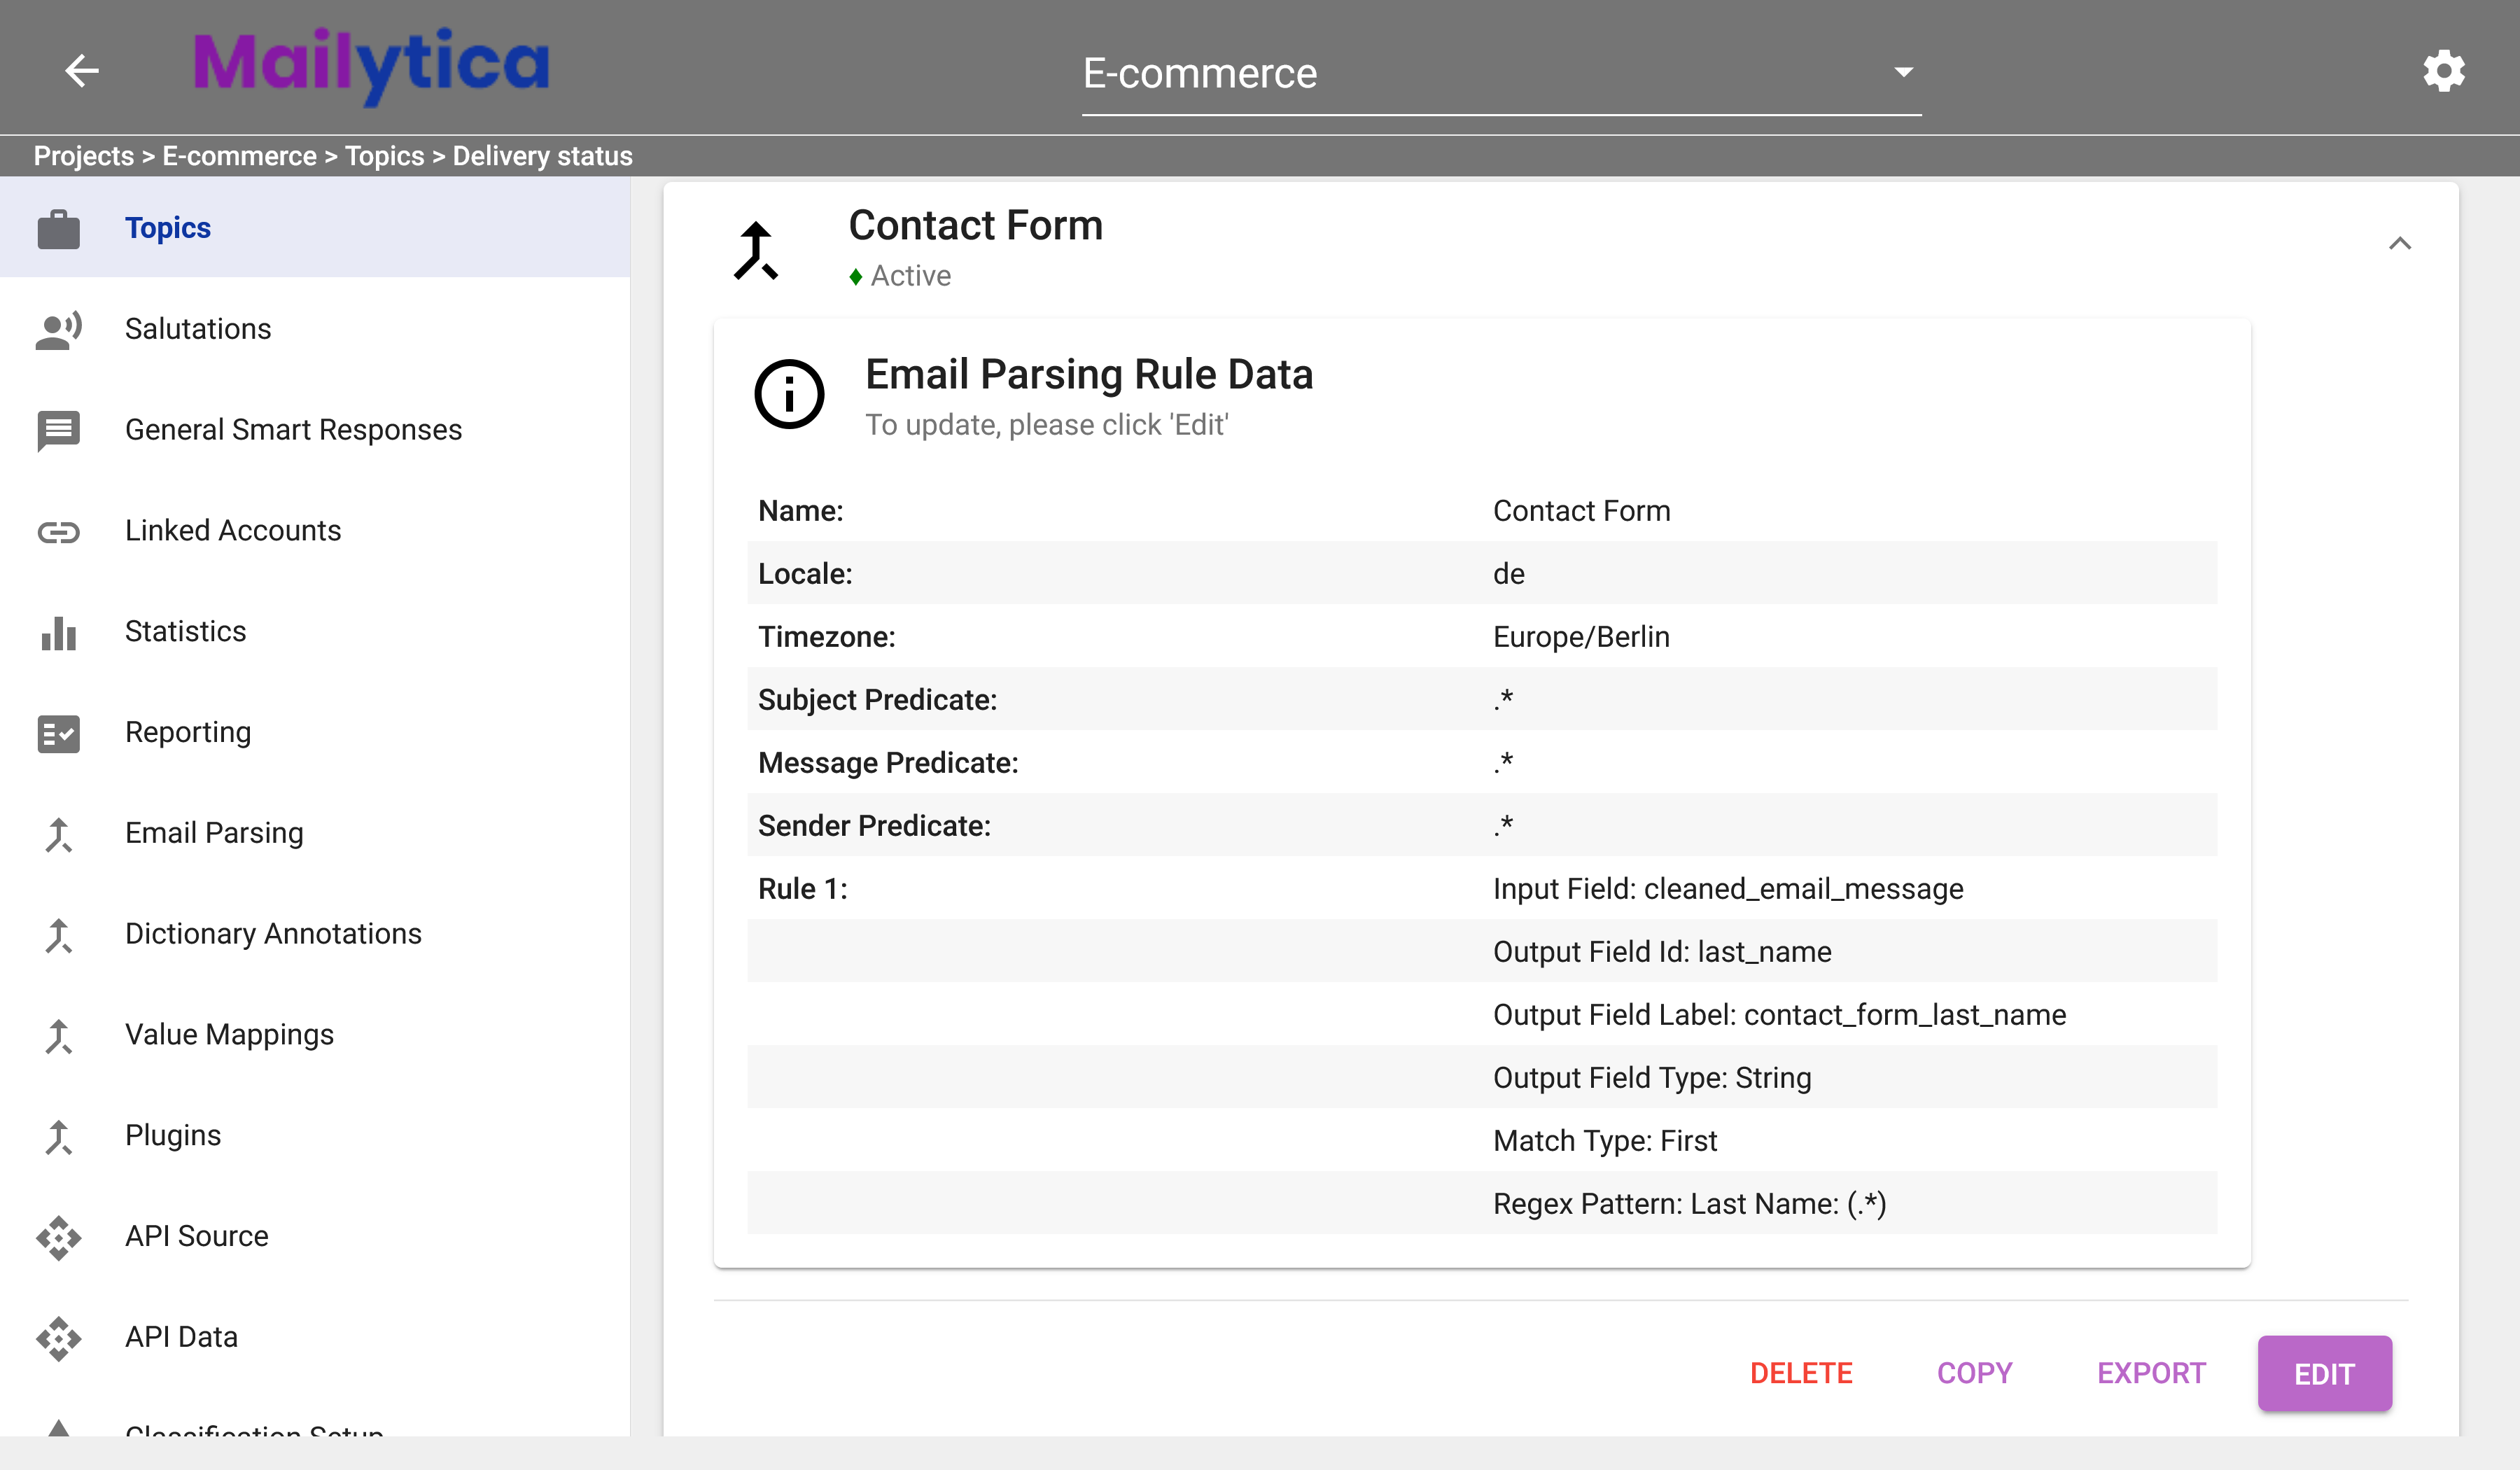
To finish, in Status, toggle the Active button and then click Add. Your Email Parsing Rule should now be activated and saved. If you don’t want your parsing rule to extract any data from your emails, you can set the Status option to Inactive.
Tip
In addition, you can also import and export parsing rules between Mailytica accounts.
Export: To export a parsing rule, navigate to your parsing rule list. Expand the title box of the parsing rule you want to export, then click on the Export button. The parsing rules data will be immediately downloaded to your local computer as a .zip file.
Import: When you want to import the previously exported parsing rule, return to your list and click on the button at the top of the page next to Add Email Parsing Rule. Locate and select the .zip file you exported earlier. The Mailytica parsing rule, along with all its contents, will be imported into your new account. This feature makes it easy to transfer parsing rules between accounts and collaborate with team members.
Email Parsing Fields#
Input Field: Part of the email message that Mailytica will use to find the data, the recommended value is
cleaned_email_message. The available options aredocument,emailAddress,name,subject,email_message,cleaned_email_message,signoff,email_history,written_salutation,ReceivedOn, andattachments. For more information on Input Fields, please visit the section Mailytica’s Email Data.Output Field Id: Information that you wish to extract from the email message. You can either use one of the already existing options for this field (the same ones that are available for Input Field), or create your own.
Output Field Label: A label to easily identify your email parsing rule. This field is optional.
Output Field Type: The format of the data that you are going to extract with your email parsing rule. The available options are:
Date: Parses any date type and converts it to machine-readable date format -
YYYY-MM-DDThh:mm:ssTZD.DateWithoutTime: Parses any date type and converts it to machine-readable date format without time data.
Double: Parses quantities / digits and converts them using the decimal point (.). For example,
1,50would be converted to1.50.EuropeanDateTime: Parses any date type and converts it to European date formatted as
DD.MM.YYYY hh:mm:ss.Link: You can use this field to create a link from email data and include it inside of Mailytica’s integrations.
Long: Parses any digits and transforms them into integers that can span large quantities. For example,
100,00would be transformed into100.PeriodDate: Represents the difference between two dates. It parses phrases such as “in 1 month and 15 days” and transforms it to the format
P01M15D.String: Parses email data and converts them into strings—sequences of characters / words.
StringArray: Parses strings and converts them into arrays. Can be used if you expect more than one match in the parsing rules. The output can then be used to display drop down lists in Mailytica’s integrations.
Match Type: The method to use to match your regular expression pattern in the email message. The available methods are match
Alloccurrences, matchFirstoccurrence,ReplaceAlloccurrences, andReplaceFirstoccurrence.Pattern: A regular expression pattern that matches the information you want to extract out of the email messages. For more information on regular expressions please visit the Regular Expression Classification section.
Additionally, once you have created an email parsing rule you can delete it by clicking on the button and then on the Update Rule button.
Similarly, you can also update an existing parsing rule by clicking on the button, modifying the necessary fields, and then selecting Update Rule.
Click to show screenshot

Email Parsing Example#
Email parsing can be used for many applications, one of which is extracting information from web forms. Web forms collect unstructured information, so they must be parsed in order to use that data.
Consider the following scenario:
A restaurant has a website where customers can fill out forms and submit them to make a reservation. The forms are then sent as emails to the company, but they are in HTML format, which makes it difficult for the company to store the data. These tables contain information about the customer, including their name and reservation date:
Full Name: |
Name LastName |
Reservation Date: |
01/02/2023 |
Reservation Time: |
19:00 |
The company wants to be able to quickly extract the information from these emails and store it in a database or file.
To do this, we’ll create a new Email Parsing Rule in Mailytica’s Online Platform and name it Reservation Form.
In the Define Rules section, we’ll first extract the client’s name. In this case, the regular expression pattern
Full Name:\s+(.*)looks for the fieldFull Name:followed by any amount of whitespace\s+, and then any other character(.*).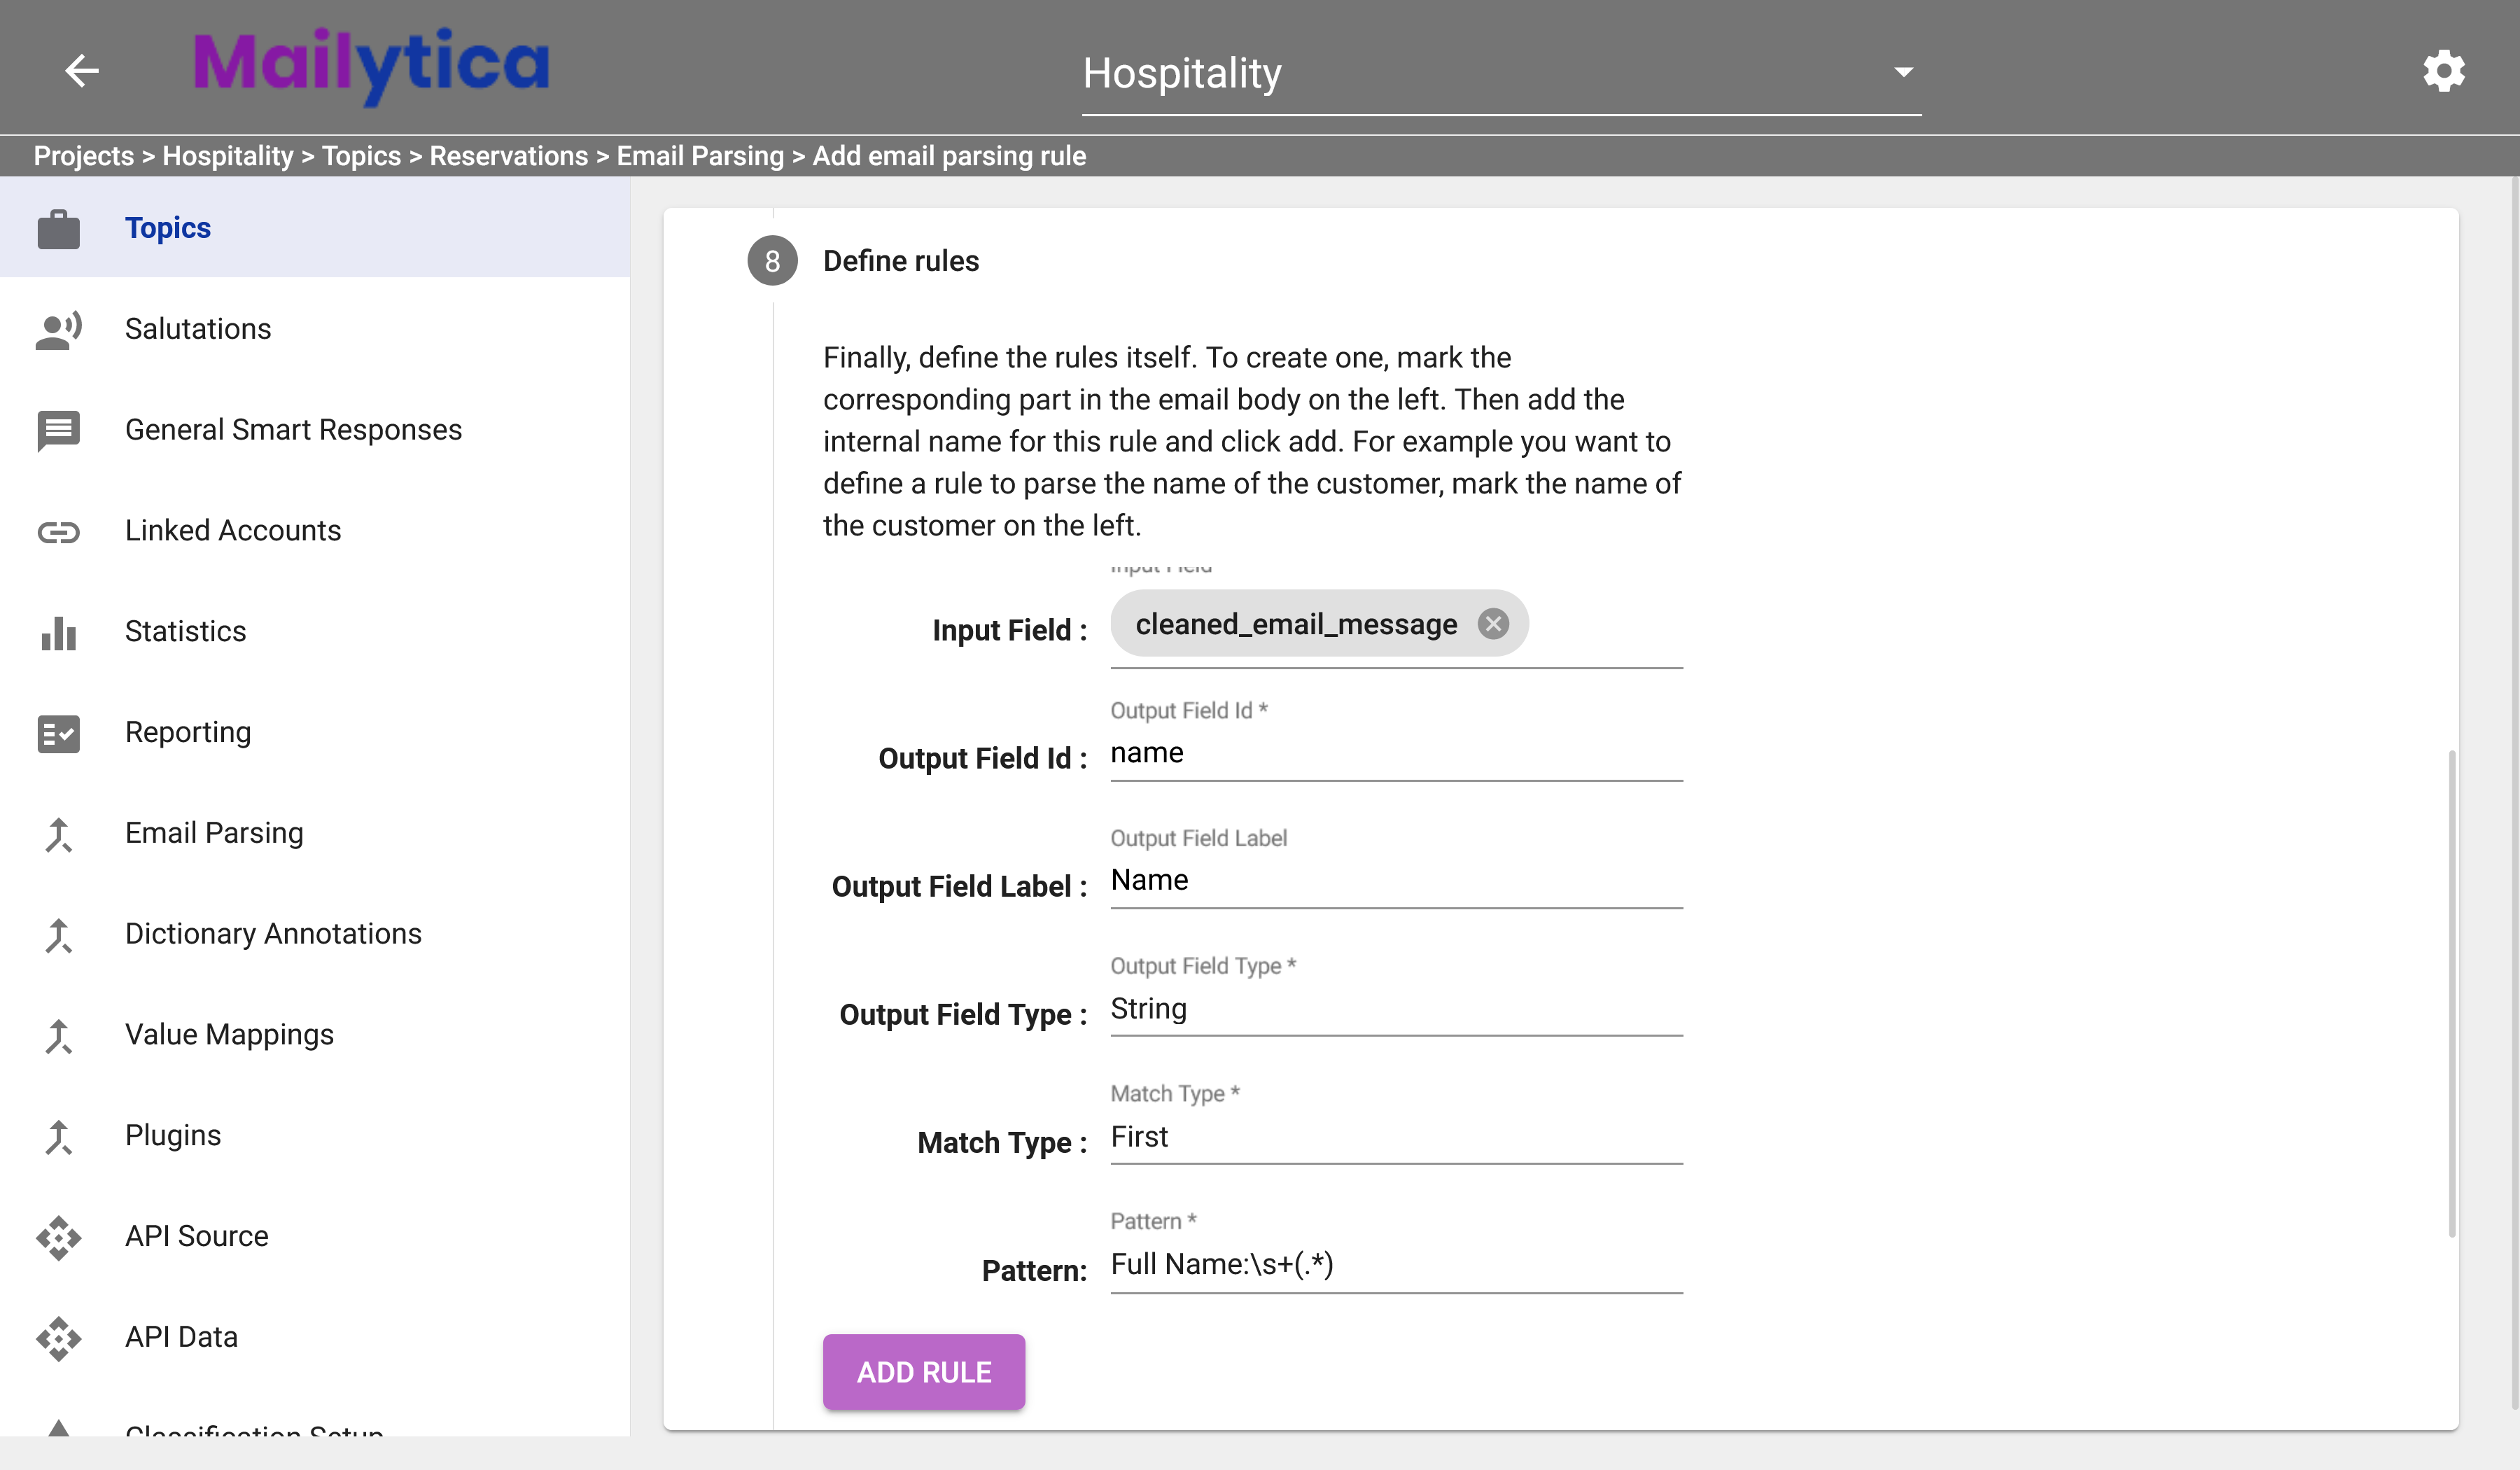
Next, well click on the Add Rule button to add another parsing rule for the date information. The regular expression pattern
Reservation Date:\s+(\d\d\/\d\d\/\d\d\d\d)looks for the fieldReservation Date:followed by whitespace\s+, and(\d\d\/\d\d\/\d\d\d\d)matches the date pattern 00/00/0000.
Then, we’ll add another parsing rule for the time information. The regular expression
Reservation Time:\s+(\d\d\:\d\d)searches for the fieldReservation Time:followed by any whitespace\s+, and(\d\d\:\d\d\)matches the time pattern 00:00.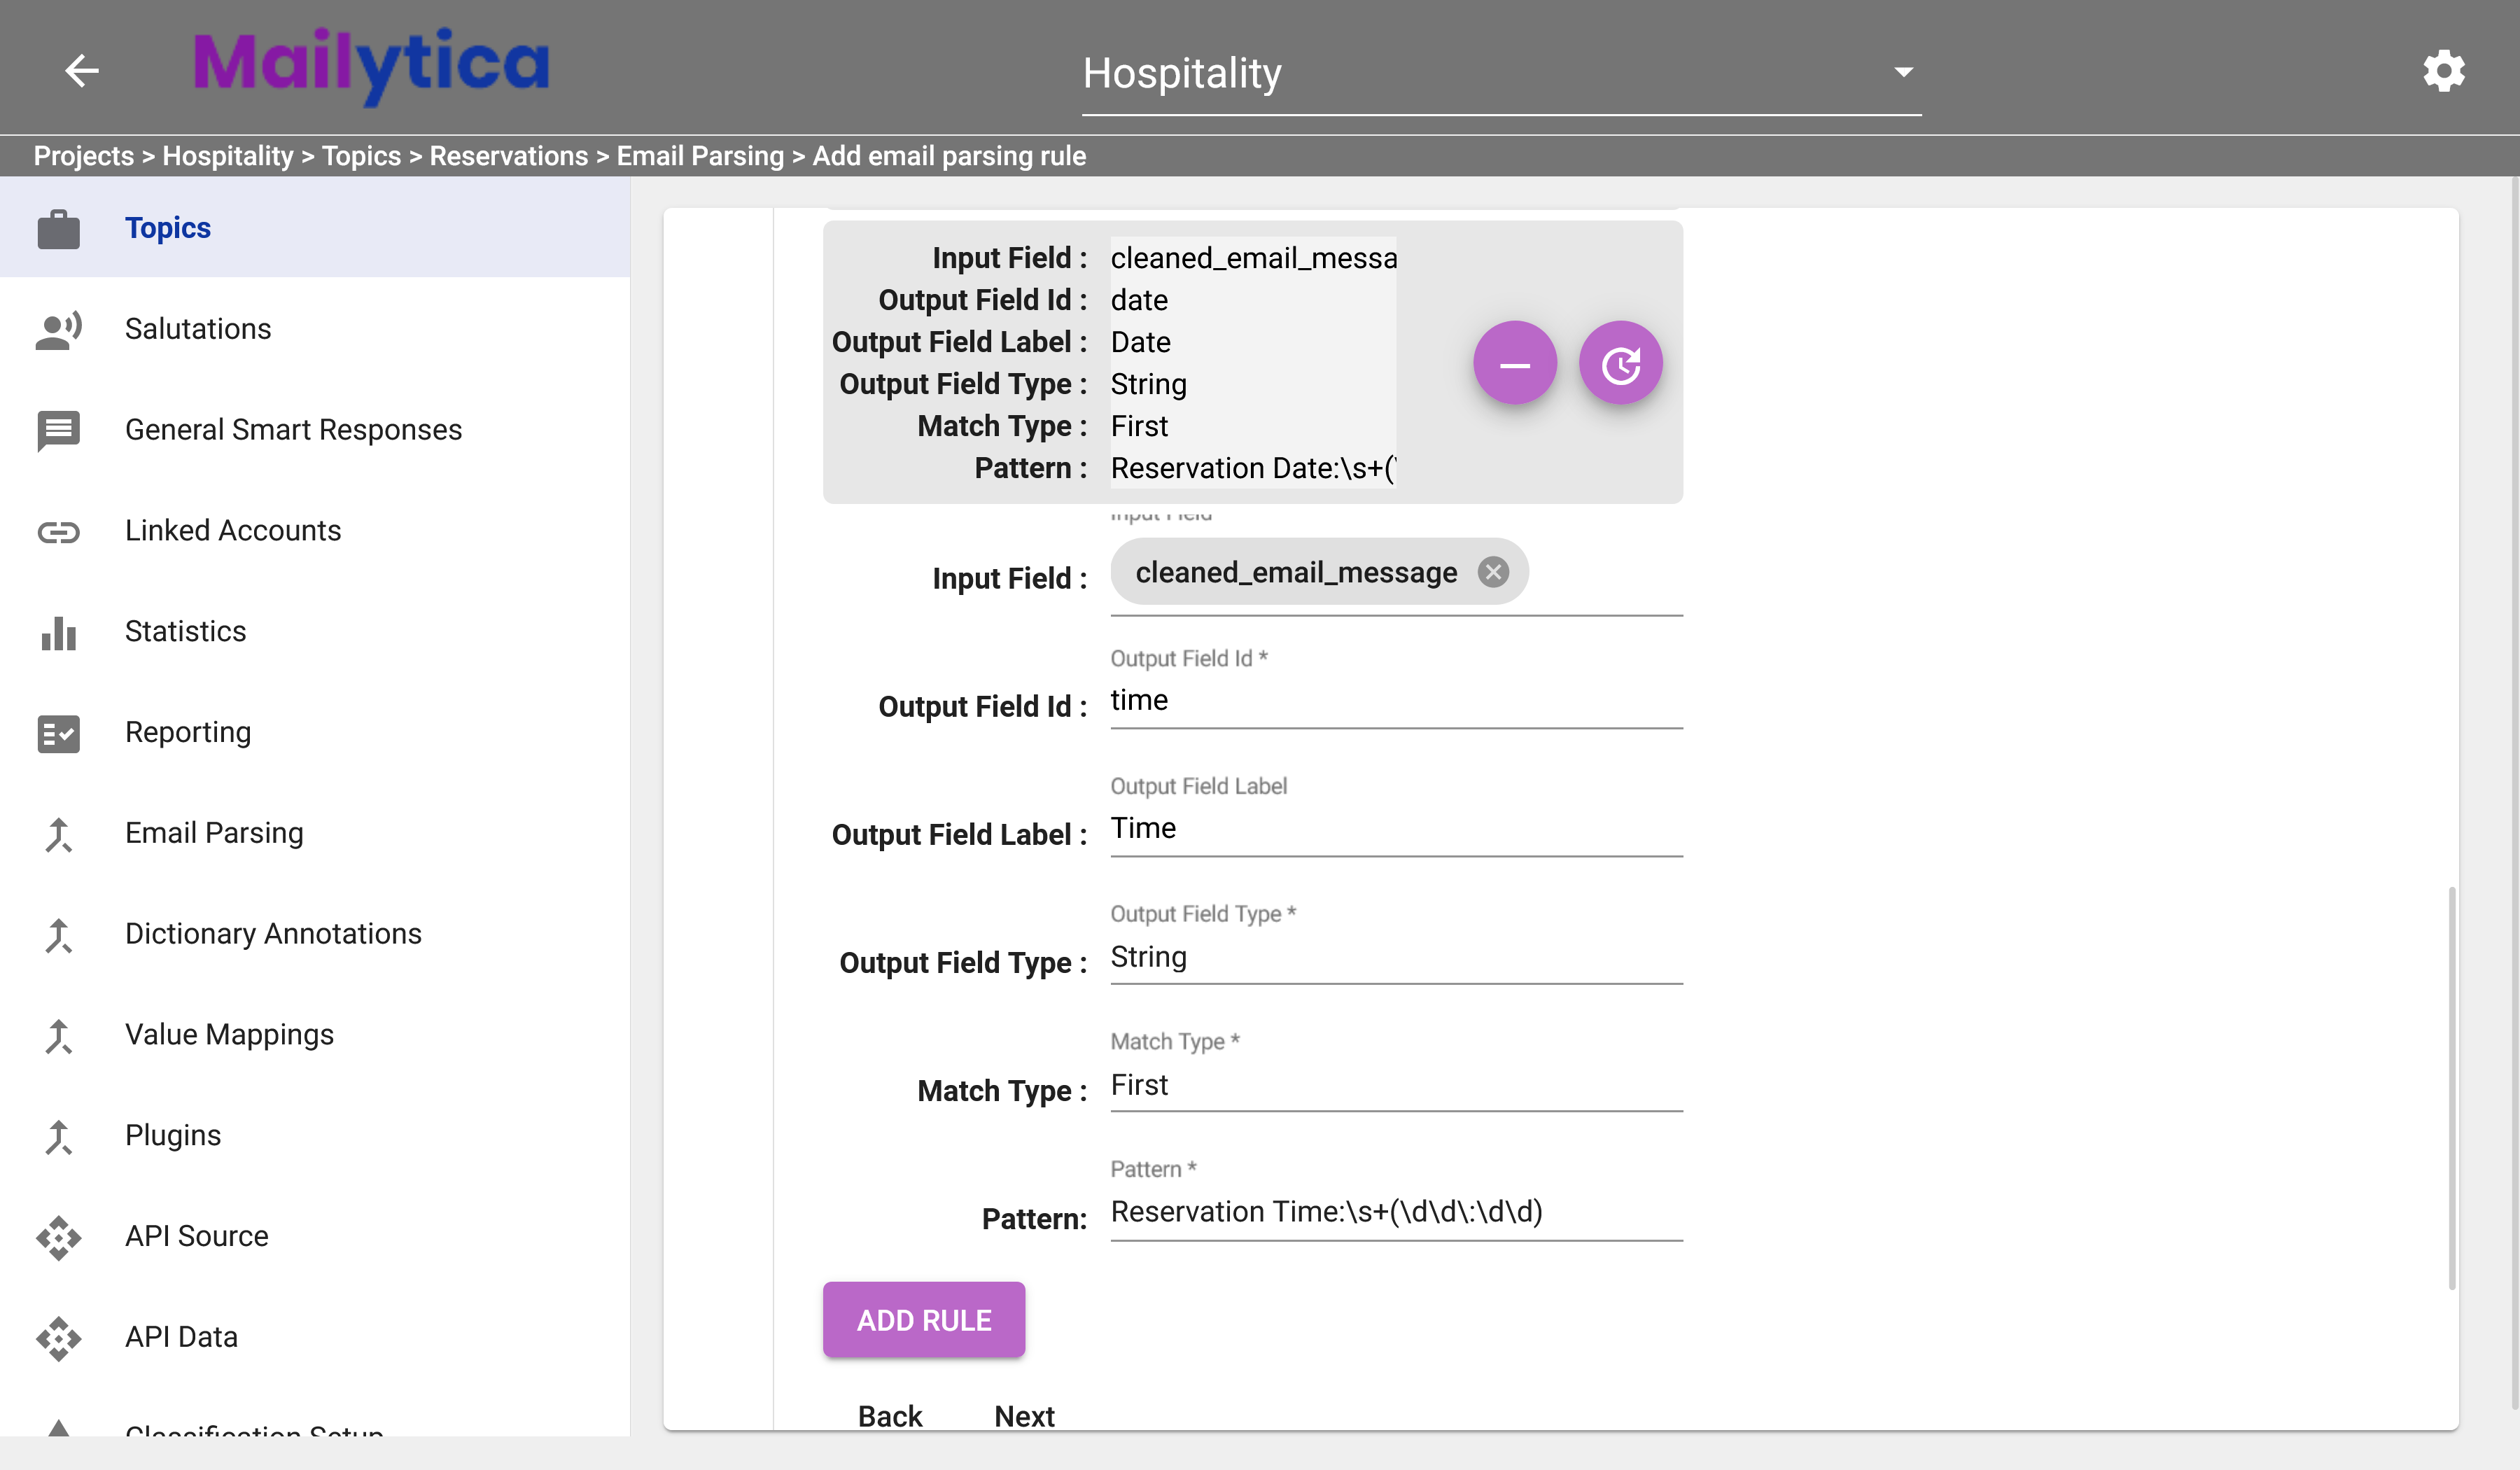
Finally, in Status, we’ll toggle the Active button and then click Add to save the new Email Parsing Rules.
By doing this, Mailytica can automatically parse incoming reservation emails and extract the client’s name and booking time. This information can later be exported from Mailytica’s Online Platform to other applications.
This is just one example of the many uses of email parsing rules in Mailytica. It is a powerful feature that can help you save time and effort when you’re trying to extract data from incoming emails.
Add Value Mappings#
Mailytica’s Value Mappings functionality allows you to transform the data in your email messages.
Because Value Mappings are simpler and more straightforward than Email Parsing Rules, they offer less flexibility but greater ease-of-use. In fact, you cannot use Value Mappings to modify or remove data from messages by using regular expressions.
For example, when extracting profession names from email messages, you can use Value Mappings to condense more information. Let’s say some people write attorney and others use lawyer in an email form. You can harness the power of Value Mappings to transform all instances of attorney into lawyer, creating a standardized list of professions.
To add Value Mappings to your email messages, follow these steps:
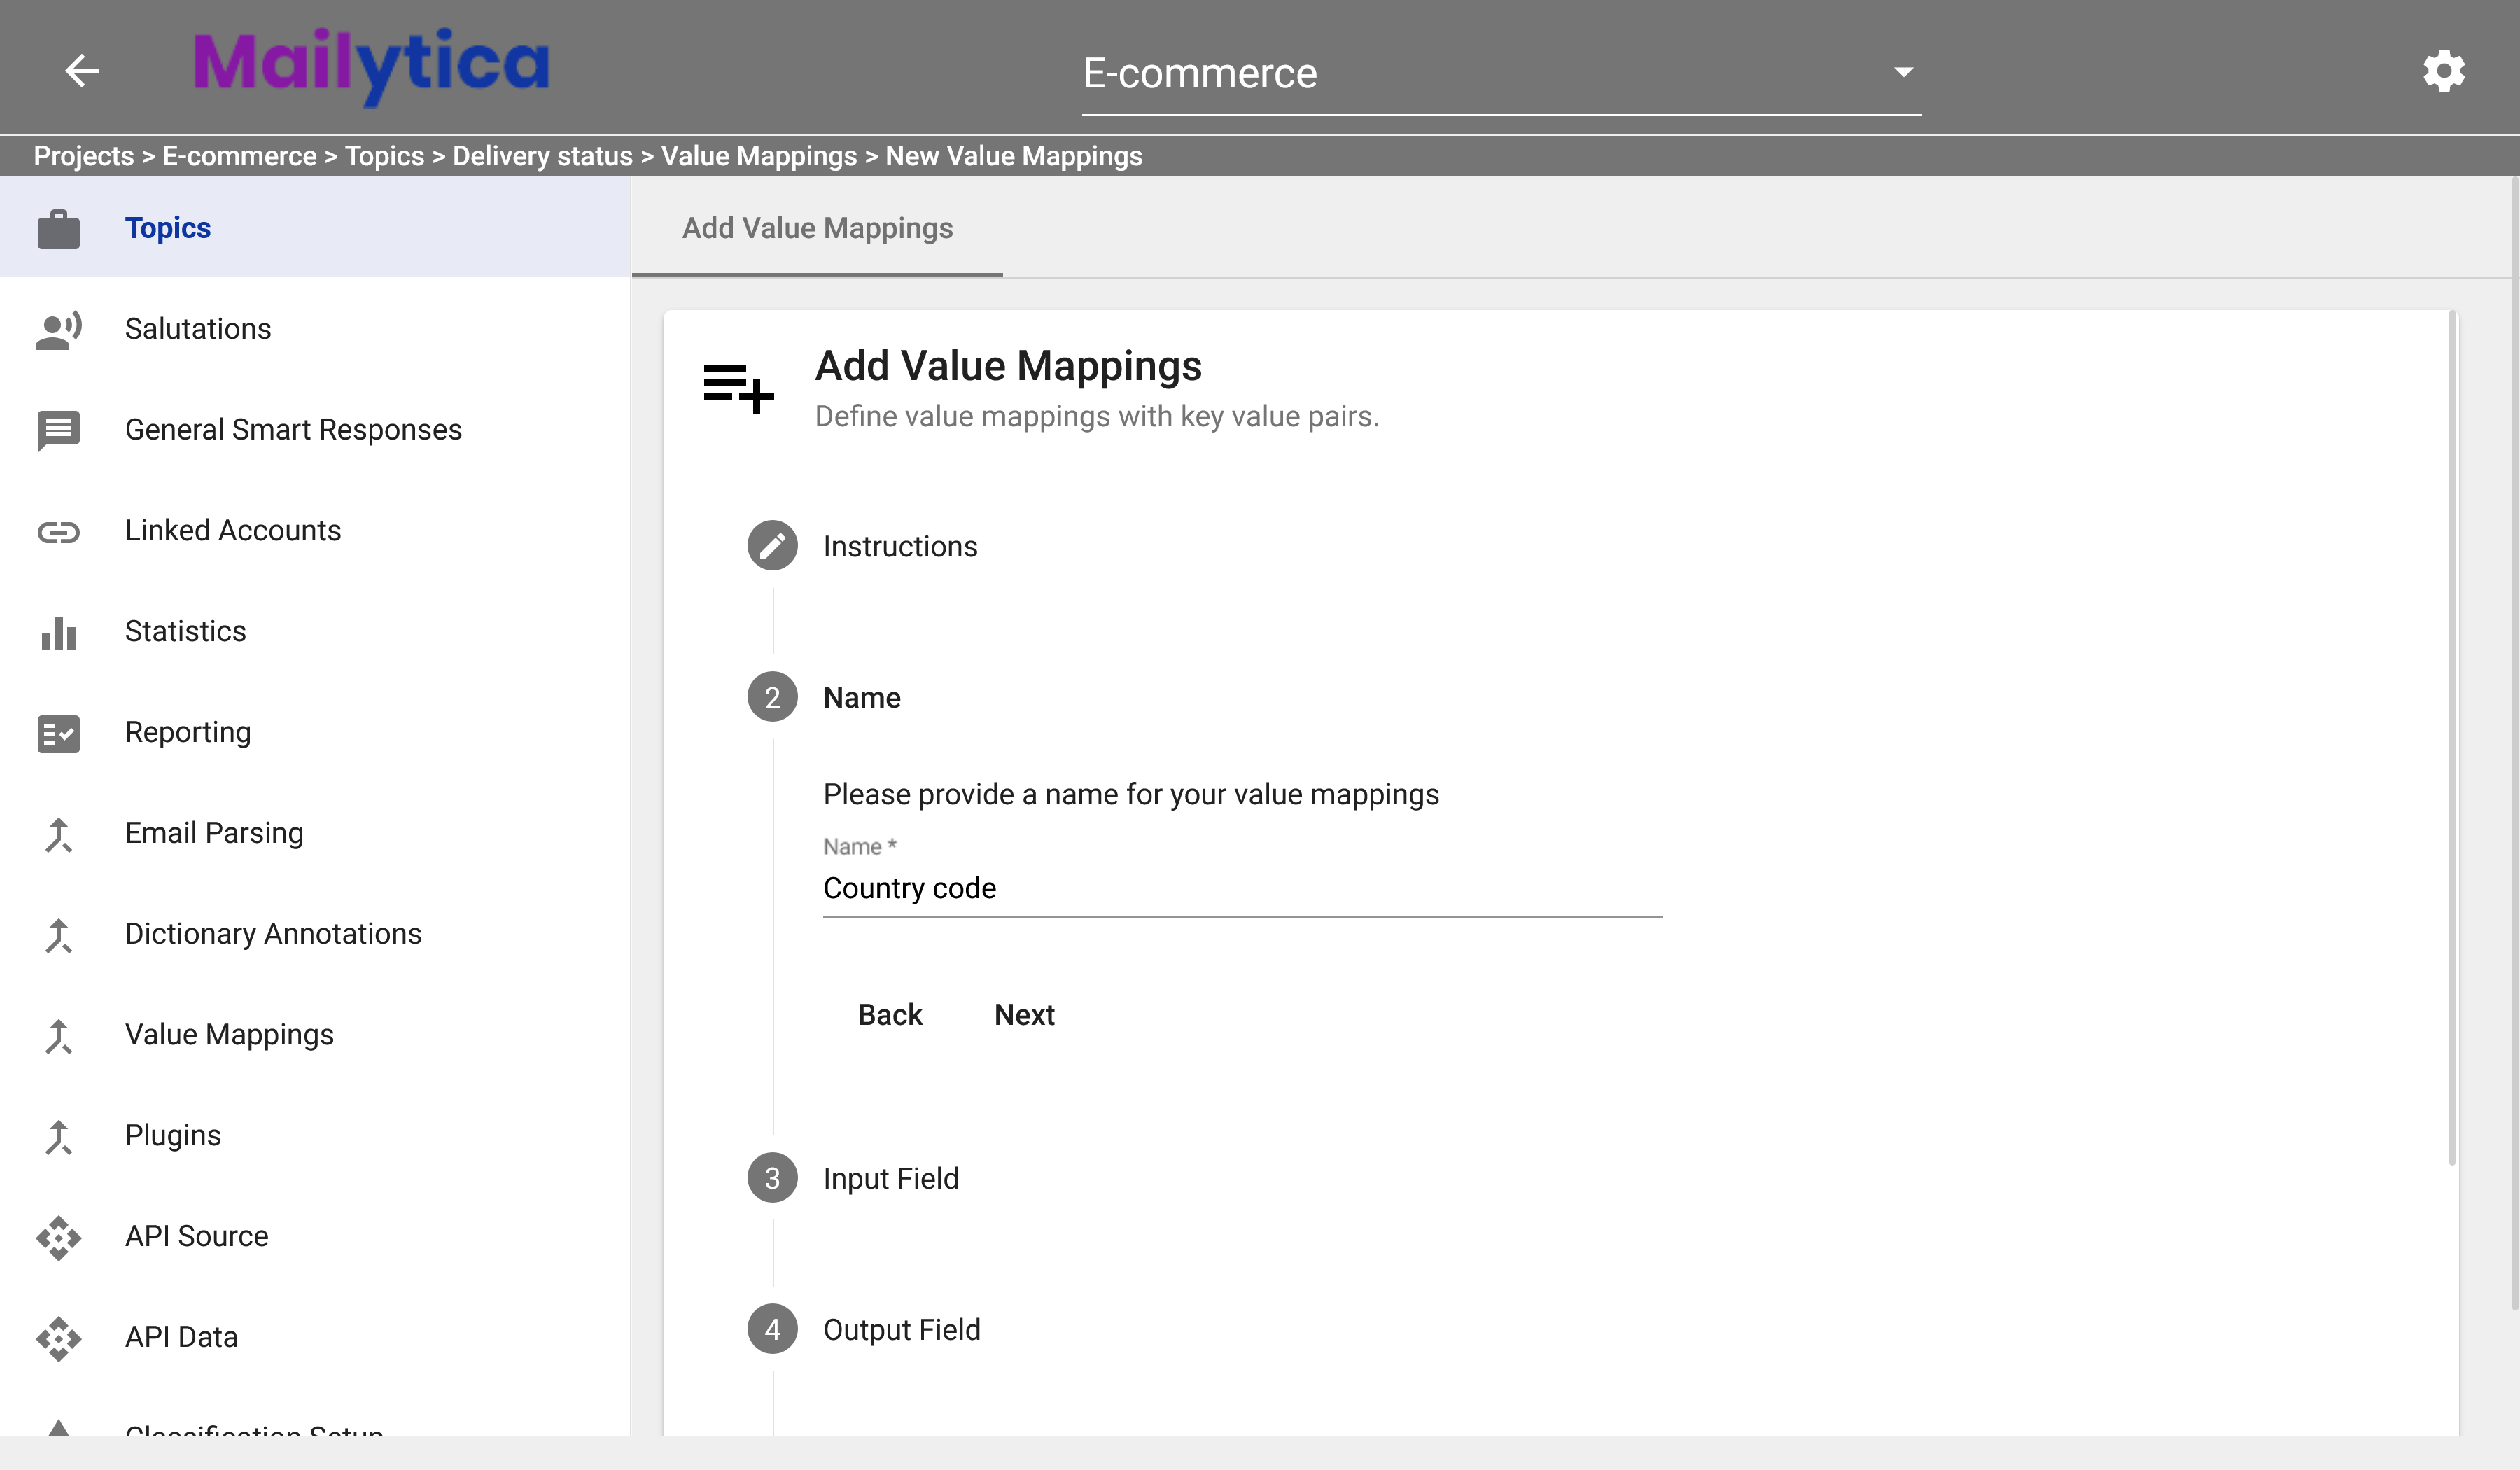
First, you need to have already created a topic as explained in the Add a New Topic section. Then, in the Edit section of your topic, select Email Parsing from the top tab bar. Click on the button in the Add Value Mappings card. The Add Value Mappings section will show you the instructions on how to define your mapping rules. Click Next.
Next, in the Name section, give the value mapping a descriptive name. This name should make it easier for you to find it later. For example, if you receive delivery addresses via email in multiple languages, you can create a value mapping named Country code that transforms country names to their corresponding codes (e.g., United States -> US).
Then, in Input Field, choose which section of the email messages Mailytica will use to find the data. The recommended value is cleaned_email_message, since it contains only the text in the message’s body but excluding unnecessary information.
Note
For more information on Input Fields, please visit the section Mailytica’s Email Data.
Afterwards, in Output Field just write the name of the variable which will store your mapped values. In this case, we’ll name it country_code.
The next step is to specify the Key Value Pairs for the mapping. Key refers to the target word or phrase that Mailytica will search for in your messages, and Value refers to the new value that Mailytica will use to replace the key. In this example, we’re mapping country names to their corresponding codes. And we’ll tell Mailytica to look for the
keyGermany, and then replace it with thevalueDE.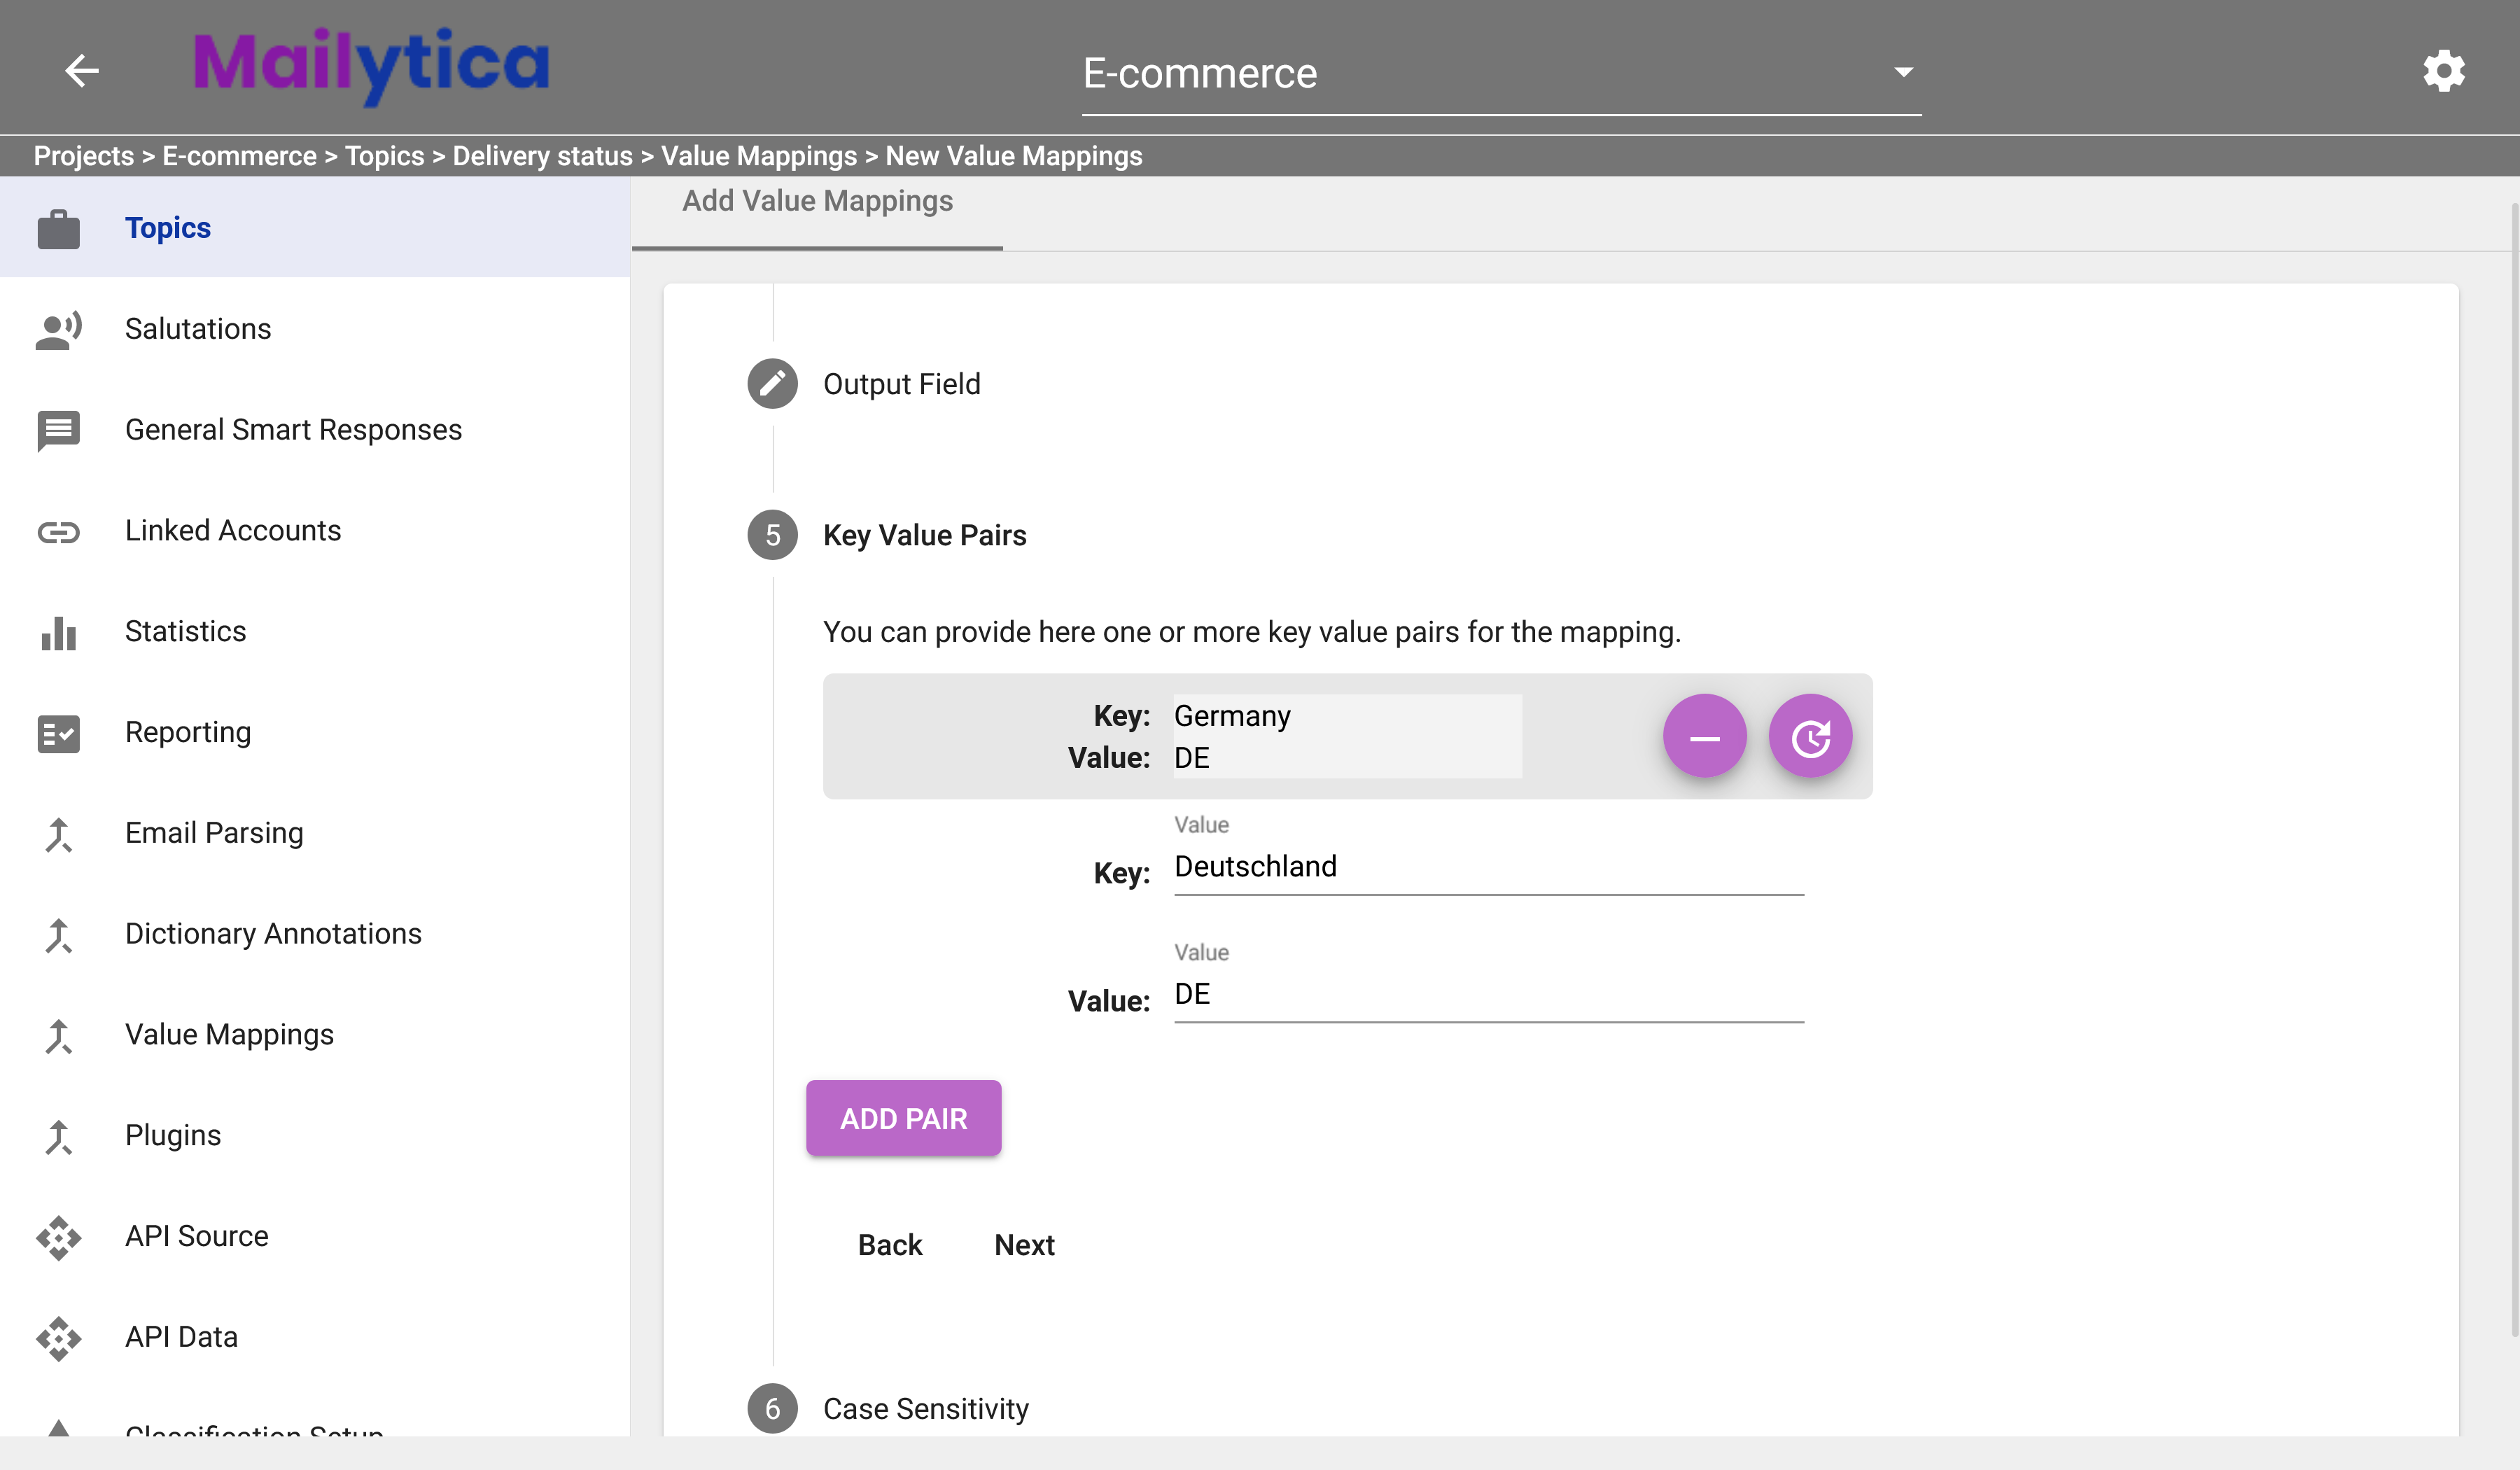
Tip
You can add as many key value pairs as necessary, and you can edit existing pairs by clicking on the button or remove them entirely with the button.
In Case Sensitivity, you can choose whether the recognition of keys is case-sensitive or not. The recommended value for this setting is Inactive, which means Mailytica will recognize the target words regardless of whether they’re uppercase or lowercase. If you want to be more precise, however, you may set it to Active.
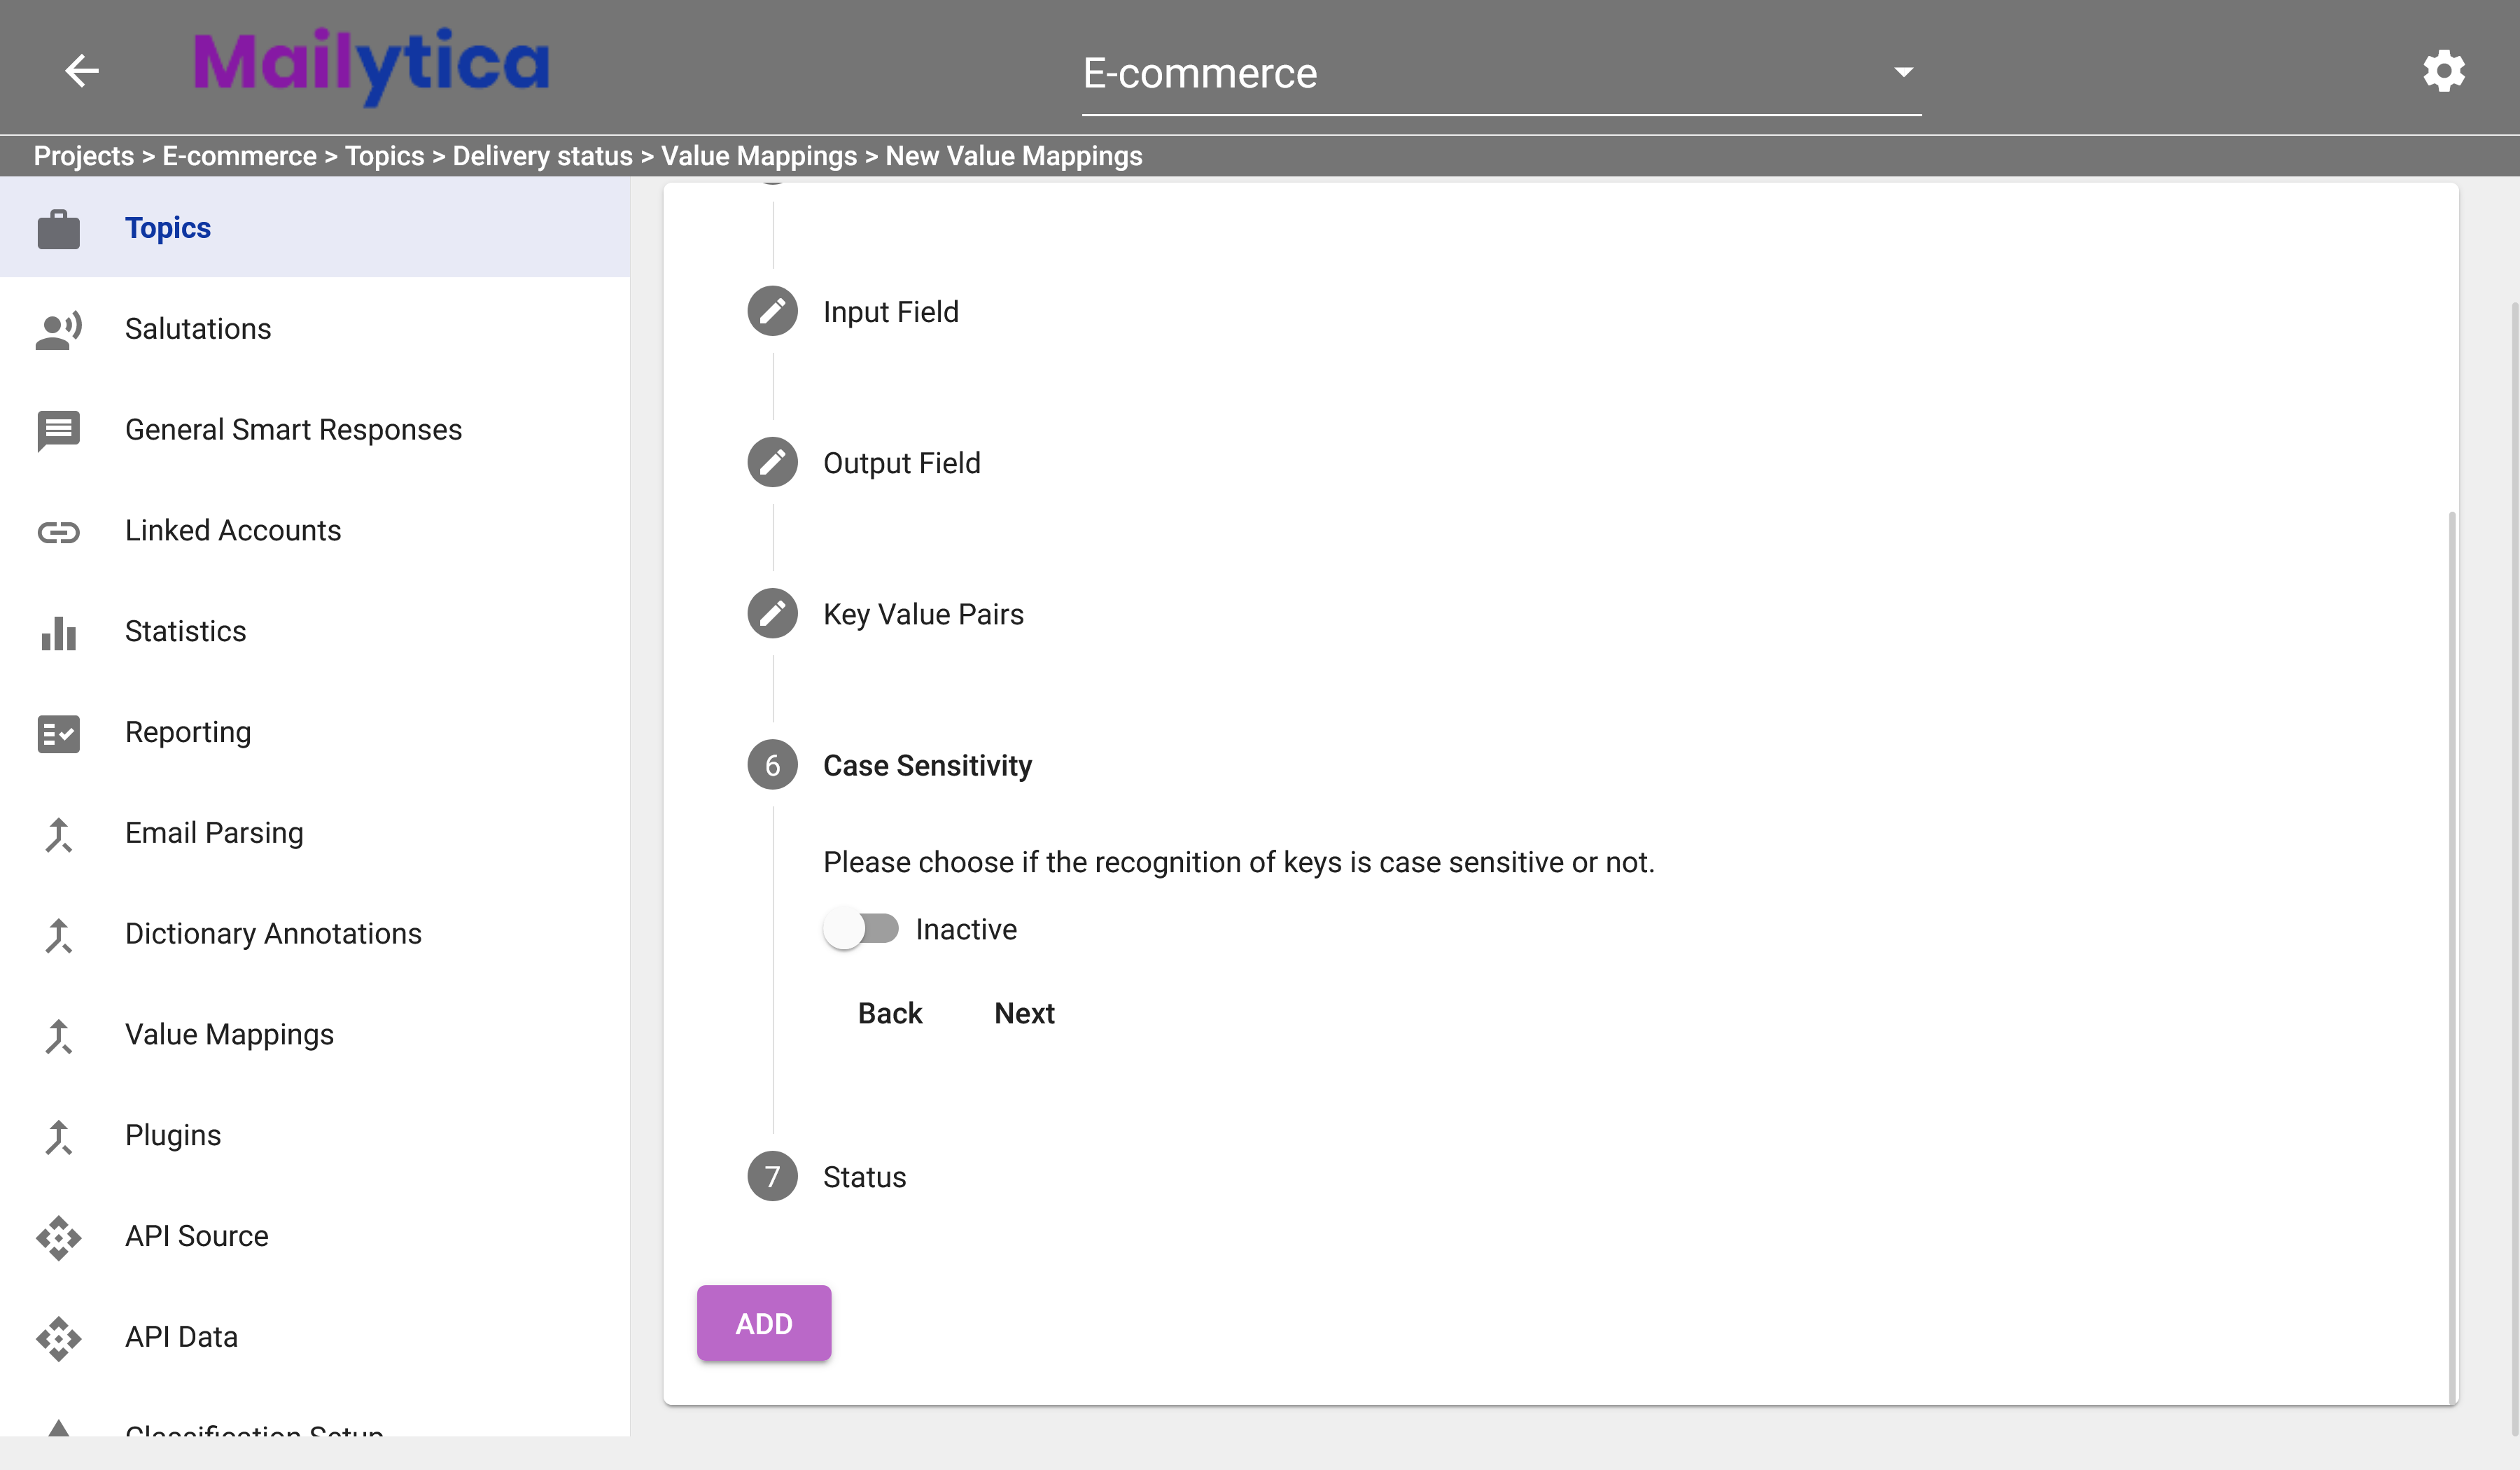
To finish, in Status, toggle the Active button and then click Add. Your Value Mappings should now be activated and saved. If you don’t want your new value mappings to modify any data from your emails, you can set the Status option to Inactive.
Add Dictionary Annotations#
Dictionary Annotations are a feature of Mailytica that allows you to extract information from emails. Dictionary Annotations are similar to email parsing rules but instead of creating rules to extract data, they can be used to directly extract specific variables.
For instance, you can use Dictionary Annotations to extract a person’s profession from an email message form. To do so, add a Dictionary Annotations called profession and enter a list of occupation names. When Mailytica matches one of your terms, it will store it in a variable called profession.
To add Dictionary Annotations to your email messages, follow these steps:
First, you need to have already created a topic as explained in the Add a New Topic section. Then, in the Edit section of your topic, select Email Parsing from the top tab bar. Click on the button in the Add Dictionary Annotations card. The Add Dictionary Annotations section will show you the instructions on how to define your annotations. Click Next.
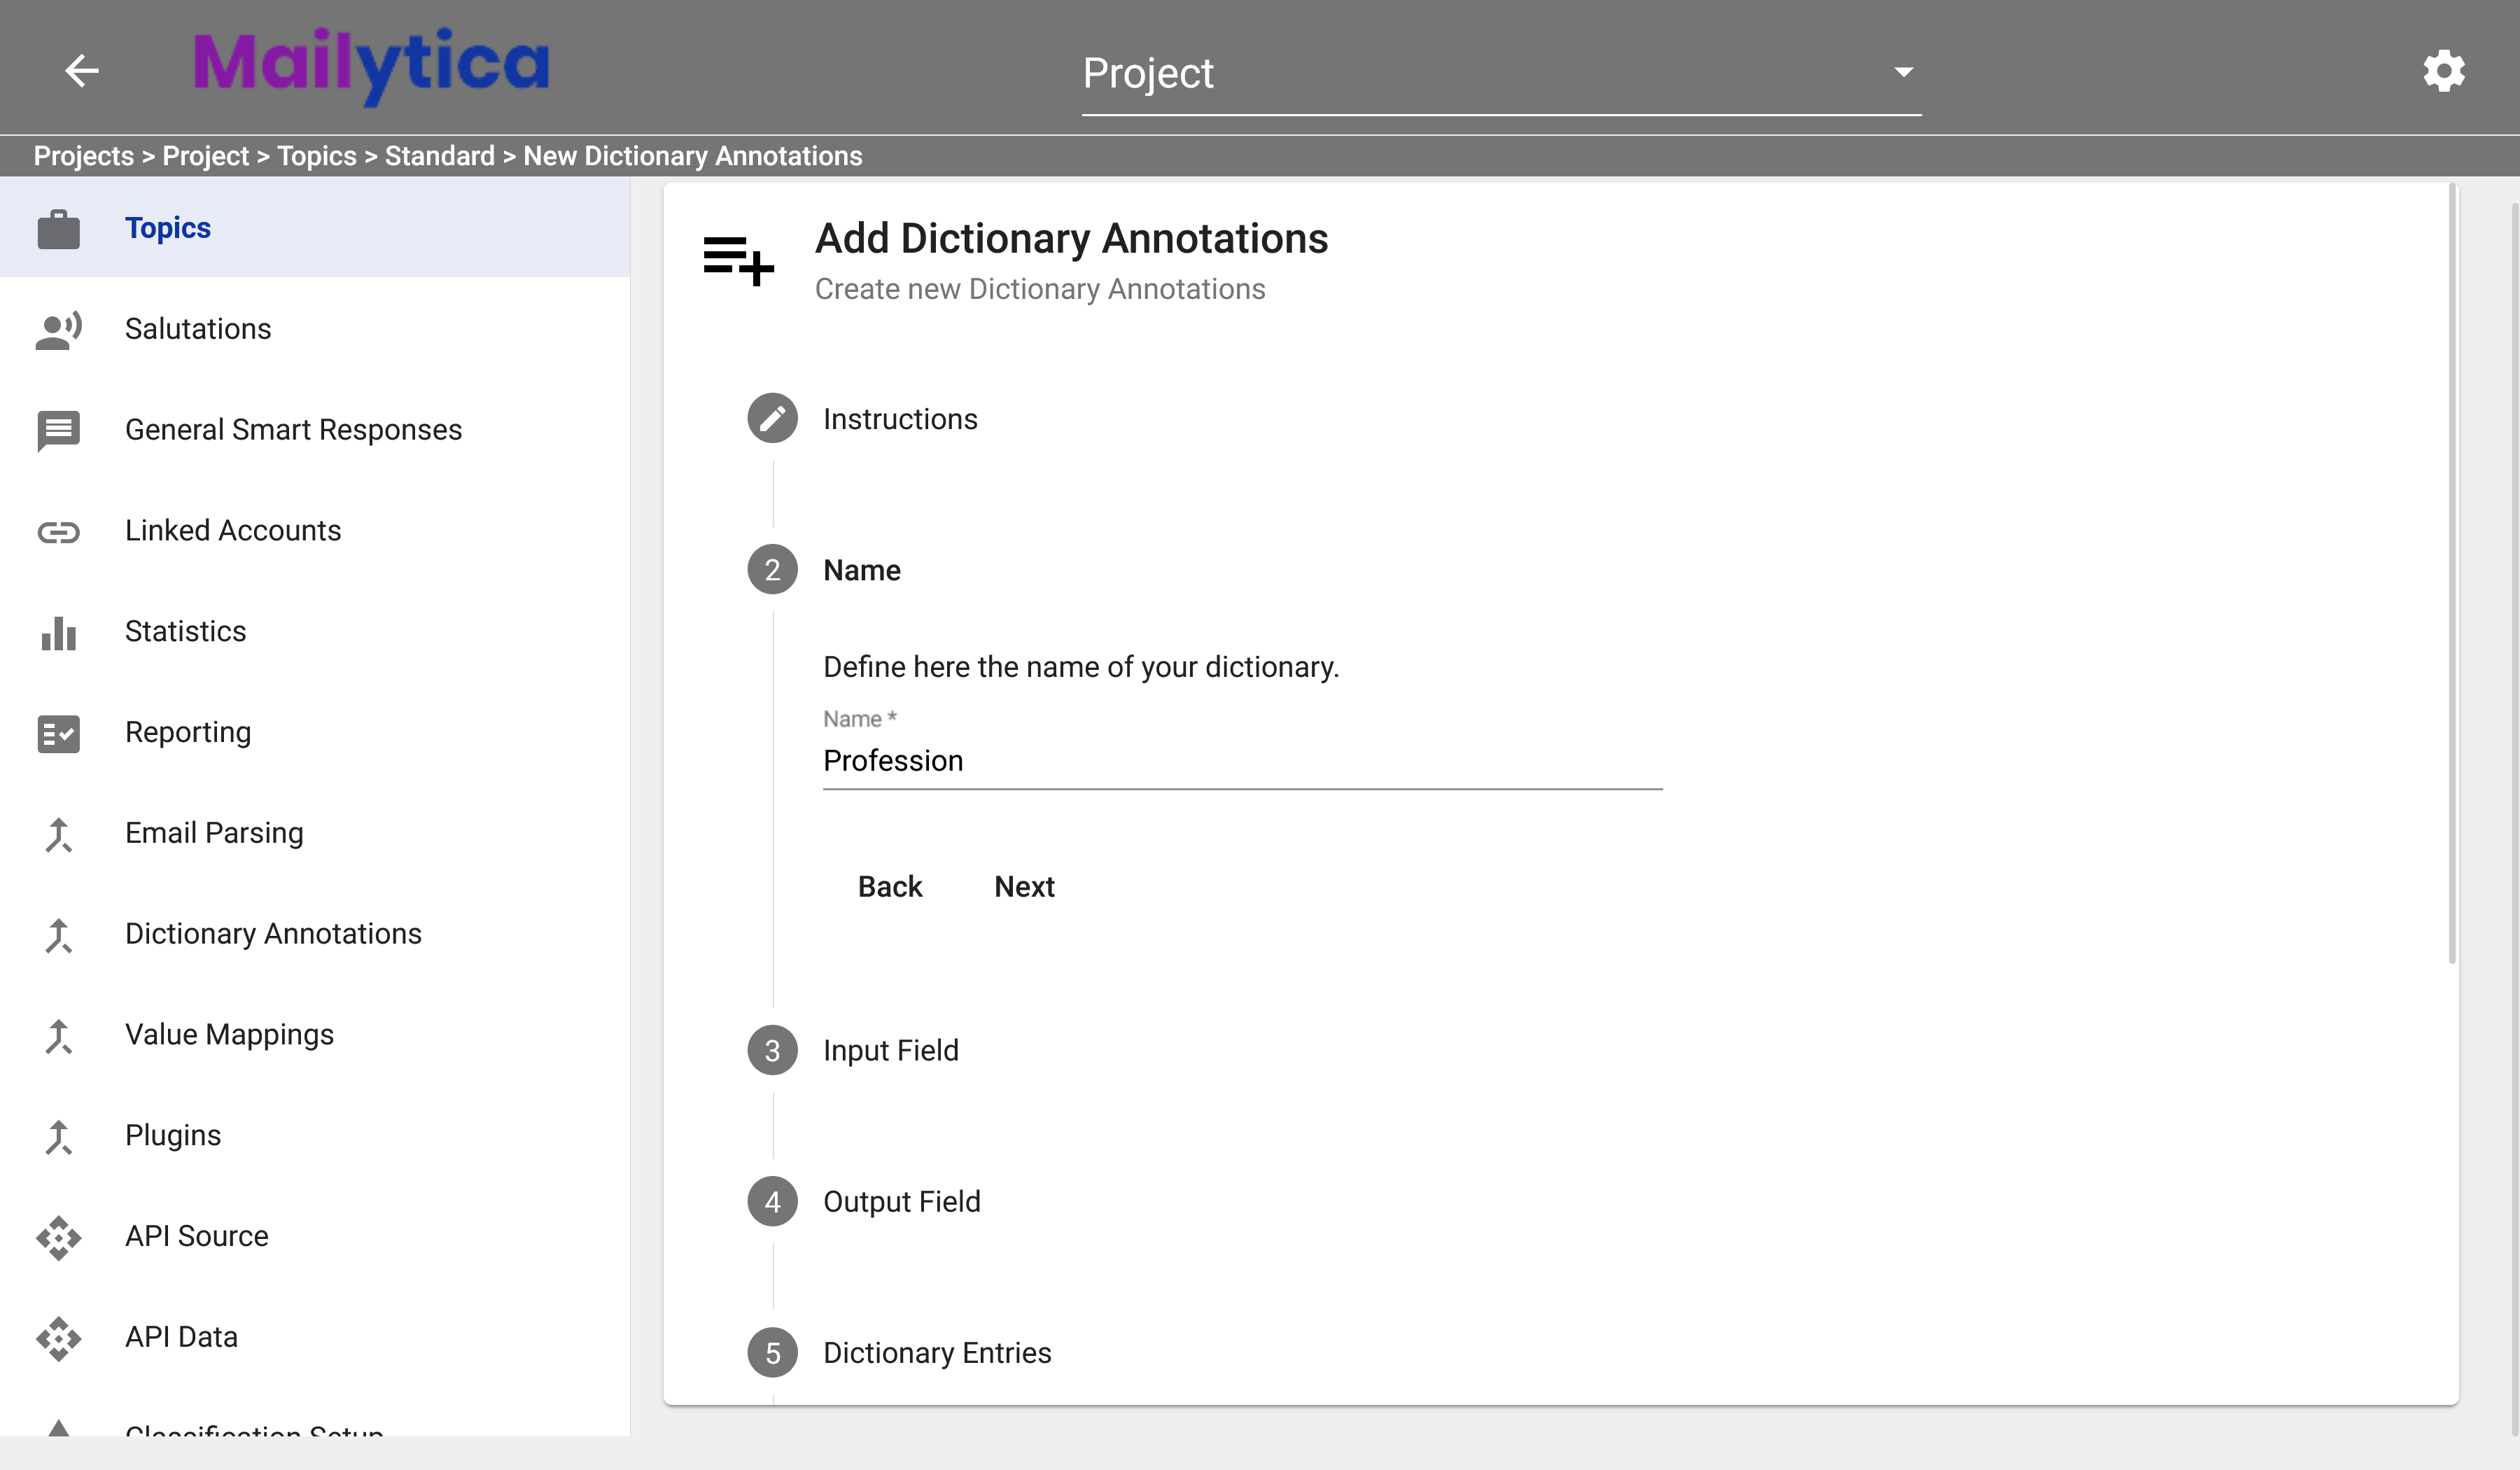
Next, in the Name section, give the dictionary annotation a descriptive name. This name should make it easier for you to find it later. For example, in this case, you could name the dictionary annotation Profession.
Then, in Input Field, choose which section of the email messages Mailytica will use to find the data. The recommended value is cleaned_email_message, since it contains only the text in the message’s body but excluding unnecessary information.
Note
For more information on Input Fields, please visit the section Mailytica’s Email Data.
Following, in Output Field just write the name of the variable which will store your values. In this case, we’ll name it profession.
In Dictionary Entries, you can list the words that Mailytica should look for in your messages. There are two different options to add your Dictionary Entries. The first option is to upload a
.txtfile with each word separated by a semicolon. The second option is to add them manually, to do so simply write each entry in the text box and press enter after each one. For example, for our Profession annotation we will add the entriesTeacher,Doctor,Architect,Chef,Accountant,Electrician, etc.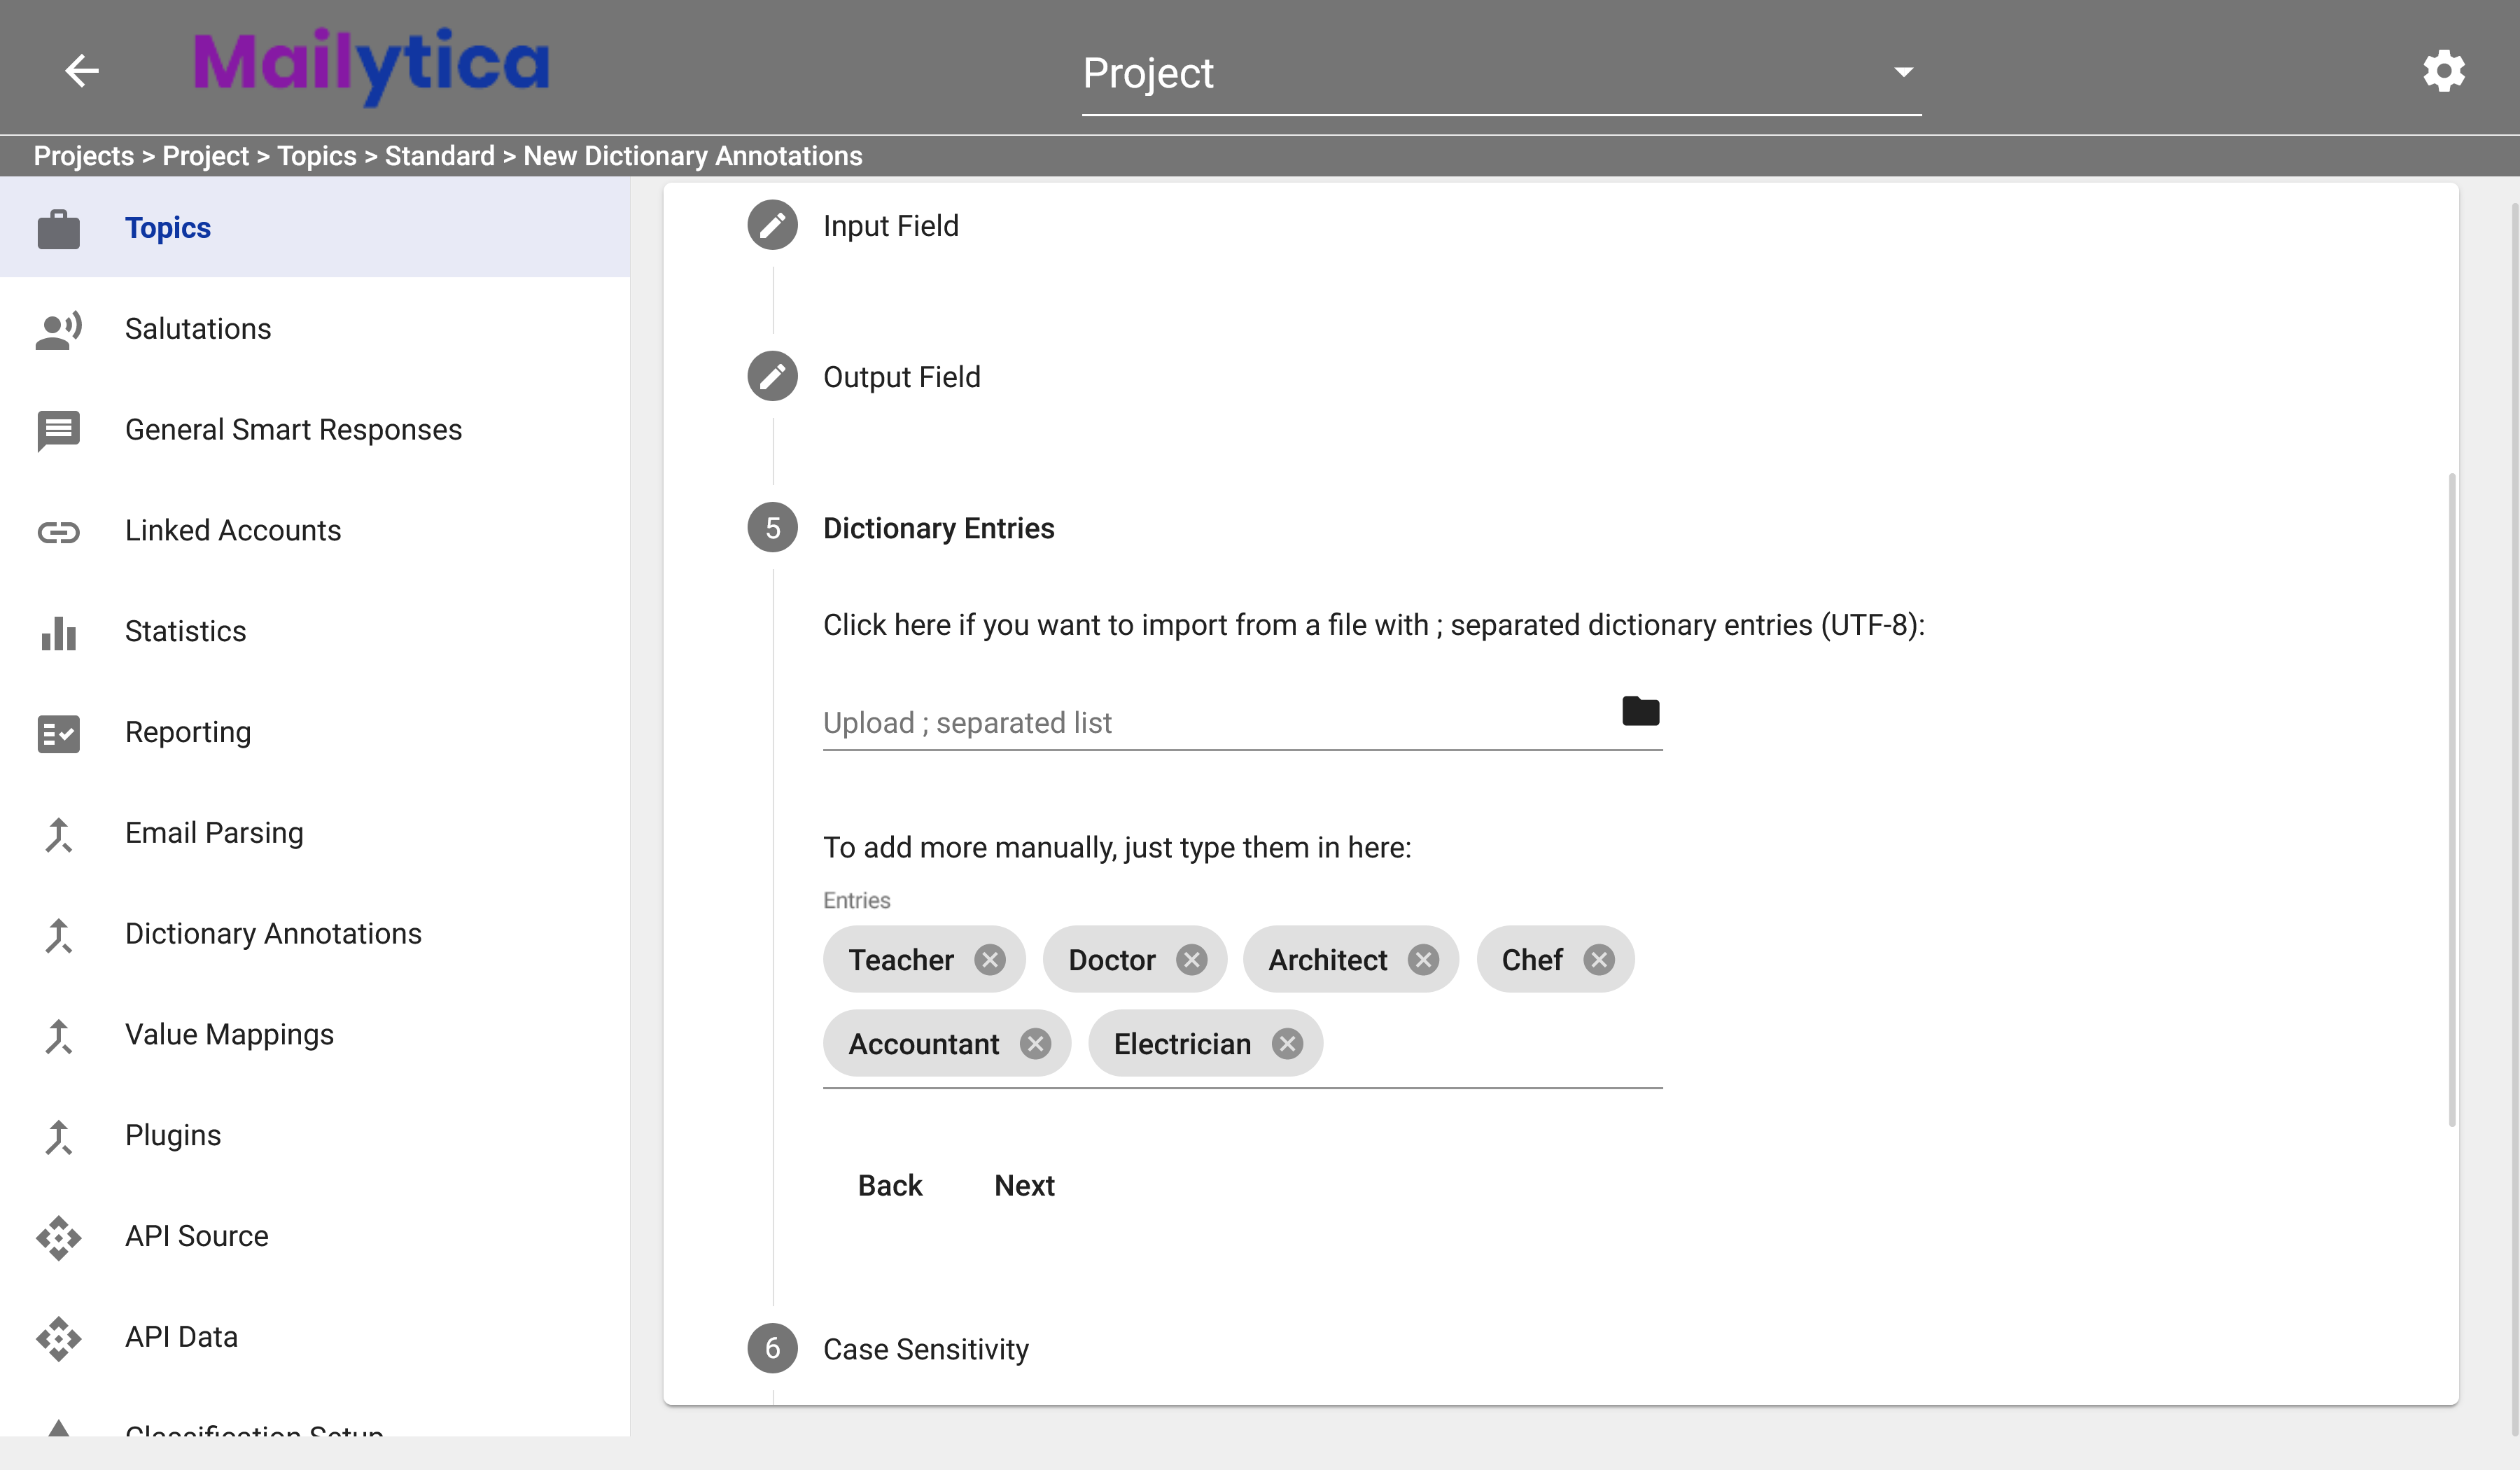
In Case Sensitivity, you can choose whether the recognition of dictionary entries is case-sensitive or not. The recommended value for this setting is Inactive, which means Mailytica will recognize the words regardless of whether they’re uppercase or lowercase. If you want to be more precise, however, you may set it to Active.
Next, in the Match Type dropdown you have two different options to choose from. First will retrieve only the first occurrence of your dictionary entries, while All will show all matching instances. For example, if you select First and your email message contains the words Teacher and Doctor, Mailytica will only retrieve the word
Teacher. Alternatively, if you select All, Mailytica will save each job title in the email as separate entries.To finish, in Status, toggle the Active button and then click Add. Your Dictionary Annotations should now be activated and saved. If you don’t want your new dictionary annotations to extract any data from your emails, you can set the Status option to Inactive.
Tip
In addition, you can also import and export dictionary annotations between Mailytica accounts.
Export: To export a parsing rule, navigate to your dictionary annotation list. Expand the title box of the dictionary annotation you want to export, then click on the Export button. The dictionary annotation data will be immediately downloaded to your local computer as a .zip file.
Import: When you want to import the previously exported dictionary annotation, return to your list and click on the button at the top of the page next to Add Dictionary Annotations. Locate and select the .zip file you exported earlier. The Mailytica dictionary annotation, along with all its contents, will be imported into your new account. This feature makes it easy to transfer dictionary annotations between accounts and collaborate with team members.