Supervised Learning Process#
Mailytica’s classification process relies on its powerful machine learning capabilities, which are further refined through supervised training. While Mailytica’s email classification pipeline operates automatically, certain situations may call for manual fine-tuning to achieve optimal results — this process is known as supervised learning or supervised training.
Supervised learning is a type of machine learning where the model learns from input data annotated with correct answers. In the context of email automation, supervised learning might involve manually sorting a set of emails into their correct classification, which the AI then uses as a guide. For instance, if you receive a lot of emails about shipping statuses, you might read and sort these into a topic labelled Shipping Status. Mailytica’s algorithm then uses this information to better recognize and classify future emails of that nature.
This manual intervention is often necessary because, while machine learning is powerful, it doesn’t always understand the nuances of human communication. It can misinterpret slang, sarcasm, and other subtle language features. By manually guiding the Mailytica through some examples, you can enhance its comprehension and improve its classification accuracy over time.
This documentation section will walk you through Mailytica’s supervised training process, highlighting its significance and benefits.
Supervised Learning Prerequisites#
Before initiating the supervised training process in Mailytica, ensure that you have met the following prerequisites:
Data preparation: Mailytica requires a minimum of 10 incoming emails per topic to accurately classify messages. However, for better results, we recommend at least 30 or more messages per topic, as this will make the training metrics more robust and produce better results.
Optional:
Classification models: To speed up the manual classification process, consider setting up classification models to analyze your messages during import. The Dictionary Classification model, which searches for keywords in your messages’ subject or body, is particularly useful in this case.
Tip
When using a classification model, consider importing only a few emails at a time (10-30) to ensure the model works as intended.
Inbox folders: If your inbox already has a folder structure, the process will be more straightforward, as you can match the folder to the target topic. For instance, if you store all complaint messages in a Complaints folder in your inbox, Mailytica can detect this folder. Simply create the target topic Complaints, and all your messages will be classified during import.
Supervised Learning Workflow#
Email Import#
Account Import#
Follow these steps in Mailytica’s Online Portal to import your email account data:
In Mailytica’s Online Portal, navigate to Email Imports on the left side panel, click Add New Email Import and select New Account Import.

In Account, choose from the dropdown menu the account from which you want to import the messages. Note that you must first connect and link an account to your project, as specified in the Linked Accounts section.
Important
When selecting your account from the dropdown, Mailytica will begin loading your inbox. Although this process is relatively quick, the duration may vary depending on the size of your inbox. For thousands of email messages you can expect the process to take at least 1 hour.
Next, choose a Target Topic if you’re certain about the topic that your emails fall under. Keep in mind: emails are classified automatically if you have set up classification models in advance. If none exist or an email doesn’t fit into any model, then they will be classified with the Standard topic.
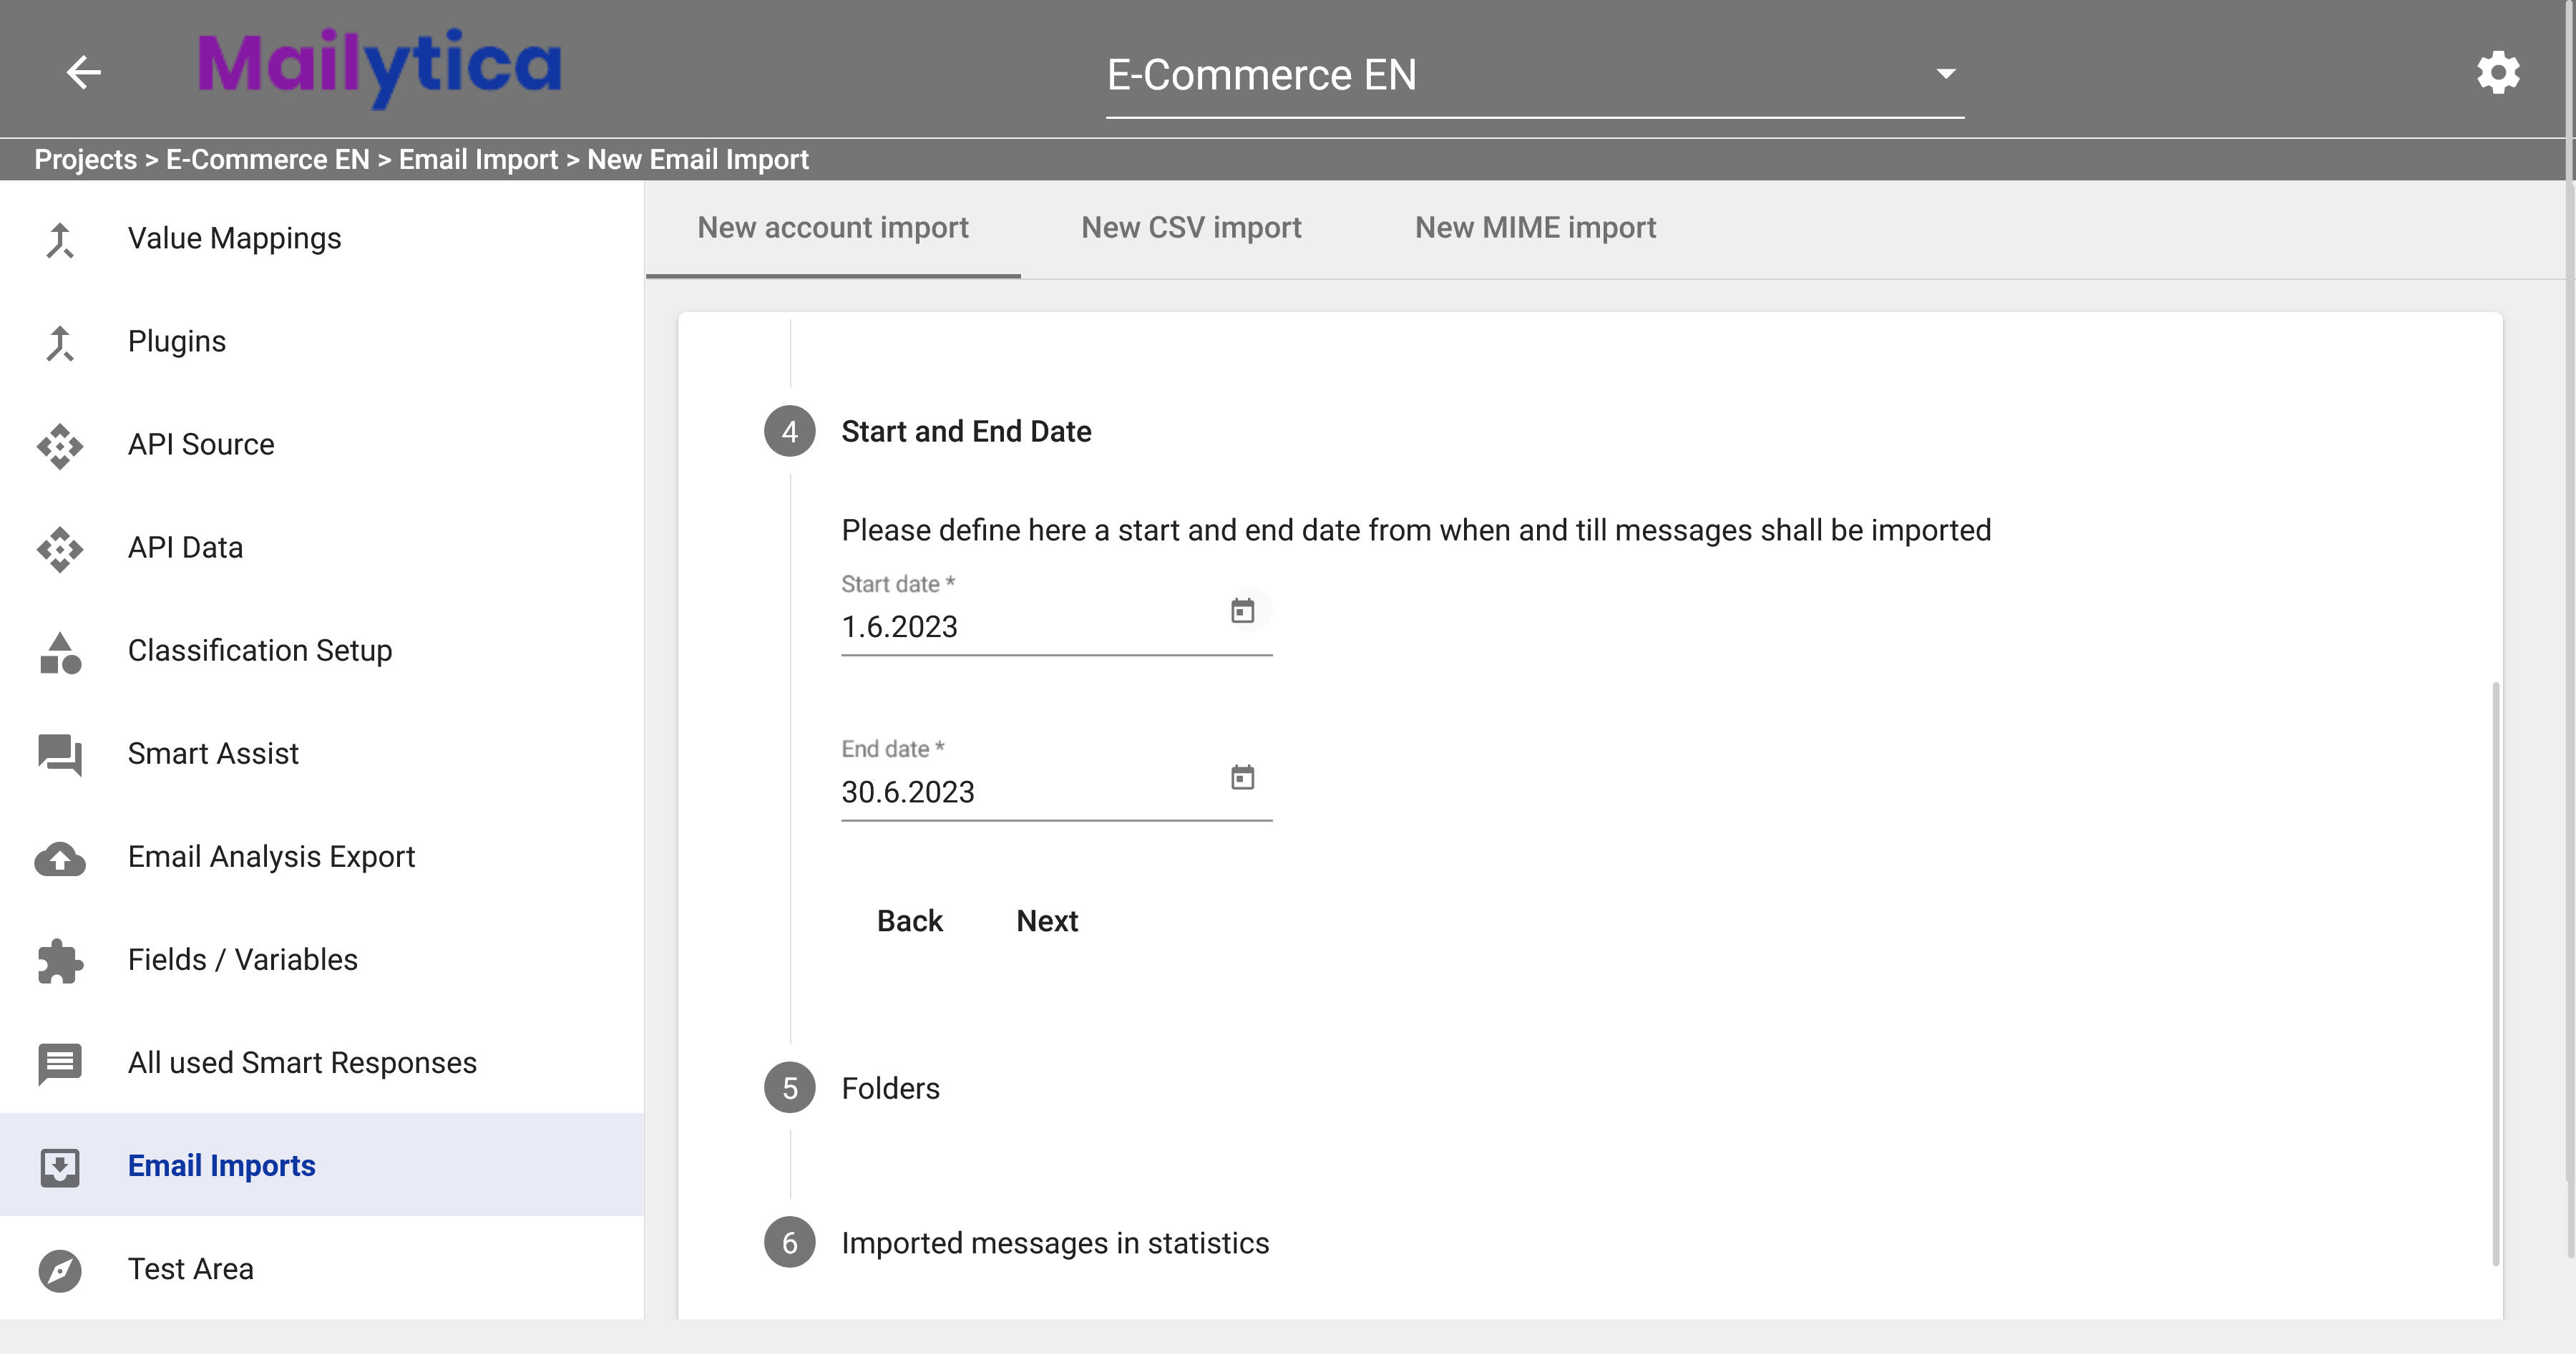
Then, set a Start and End Date for importing the messages. We recommend starting with a 1 month period and not exceeding a maximum duration of 1 year. However, the appropriate time frame will depend on the volume of messages you receive daily. If you receive a large number of messages, consider starting with a few days or one month. Conversely, if you only receive a handful of emails per day, feel free to begin with a one-month period or extend it up to a year.
Note
Importing a larger number of messages helps reduce bias in your classification, leading to more accurate results. For example, if you are focusing on order confirmation emails, having a diverse range of messages from different customers, products, and time periods will help Mailytica understand the variations and nuances of order confirmations, ultimately improving the classification process.
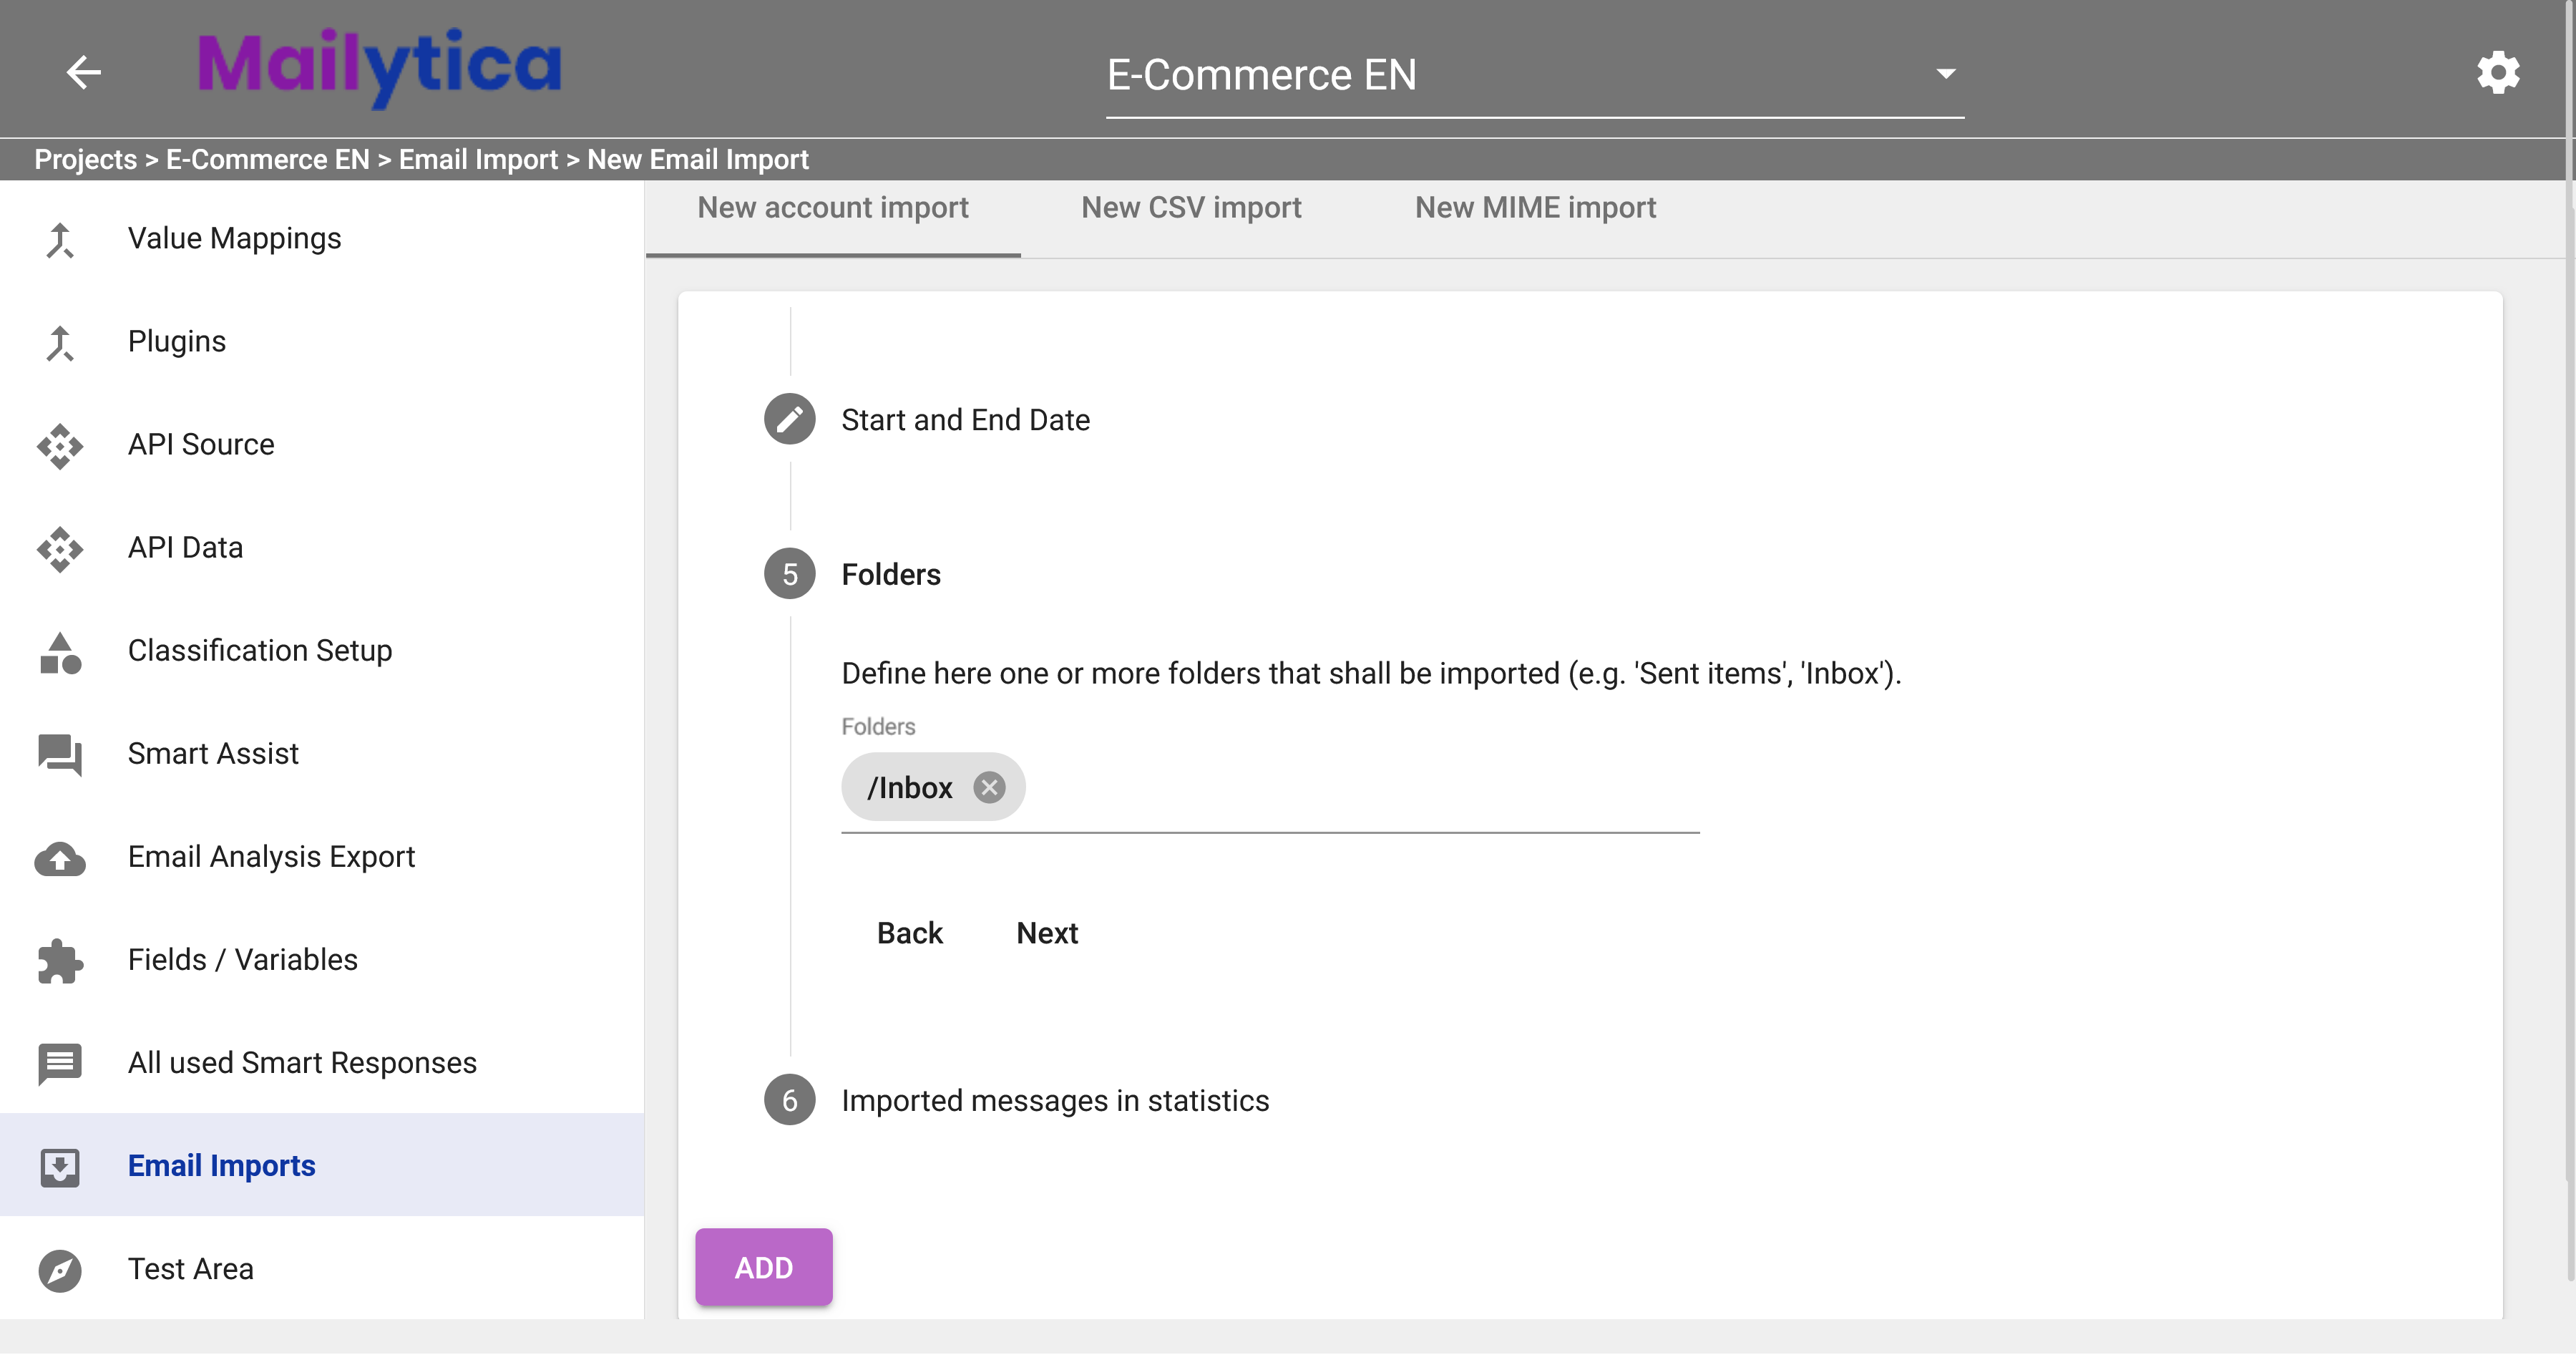
Next, select one or more Folders to import from the list, such as Inbox. To ensure Mailytica can properly find and analyze your emails, you need to at least designate the Inbox folder for analysis, regardless of whether you want to specify any other folders. If the Inbox folder isn’t selected, Mailytica won’t be able to access any of your messages.
In Imported Messages in Statistics, decide whether the imported messages should be considered in statistics and reporting. We recommend to leave this option Inactive. To prevent misleading statistics, especially for sent items, this option should be deactivated.
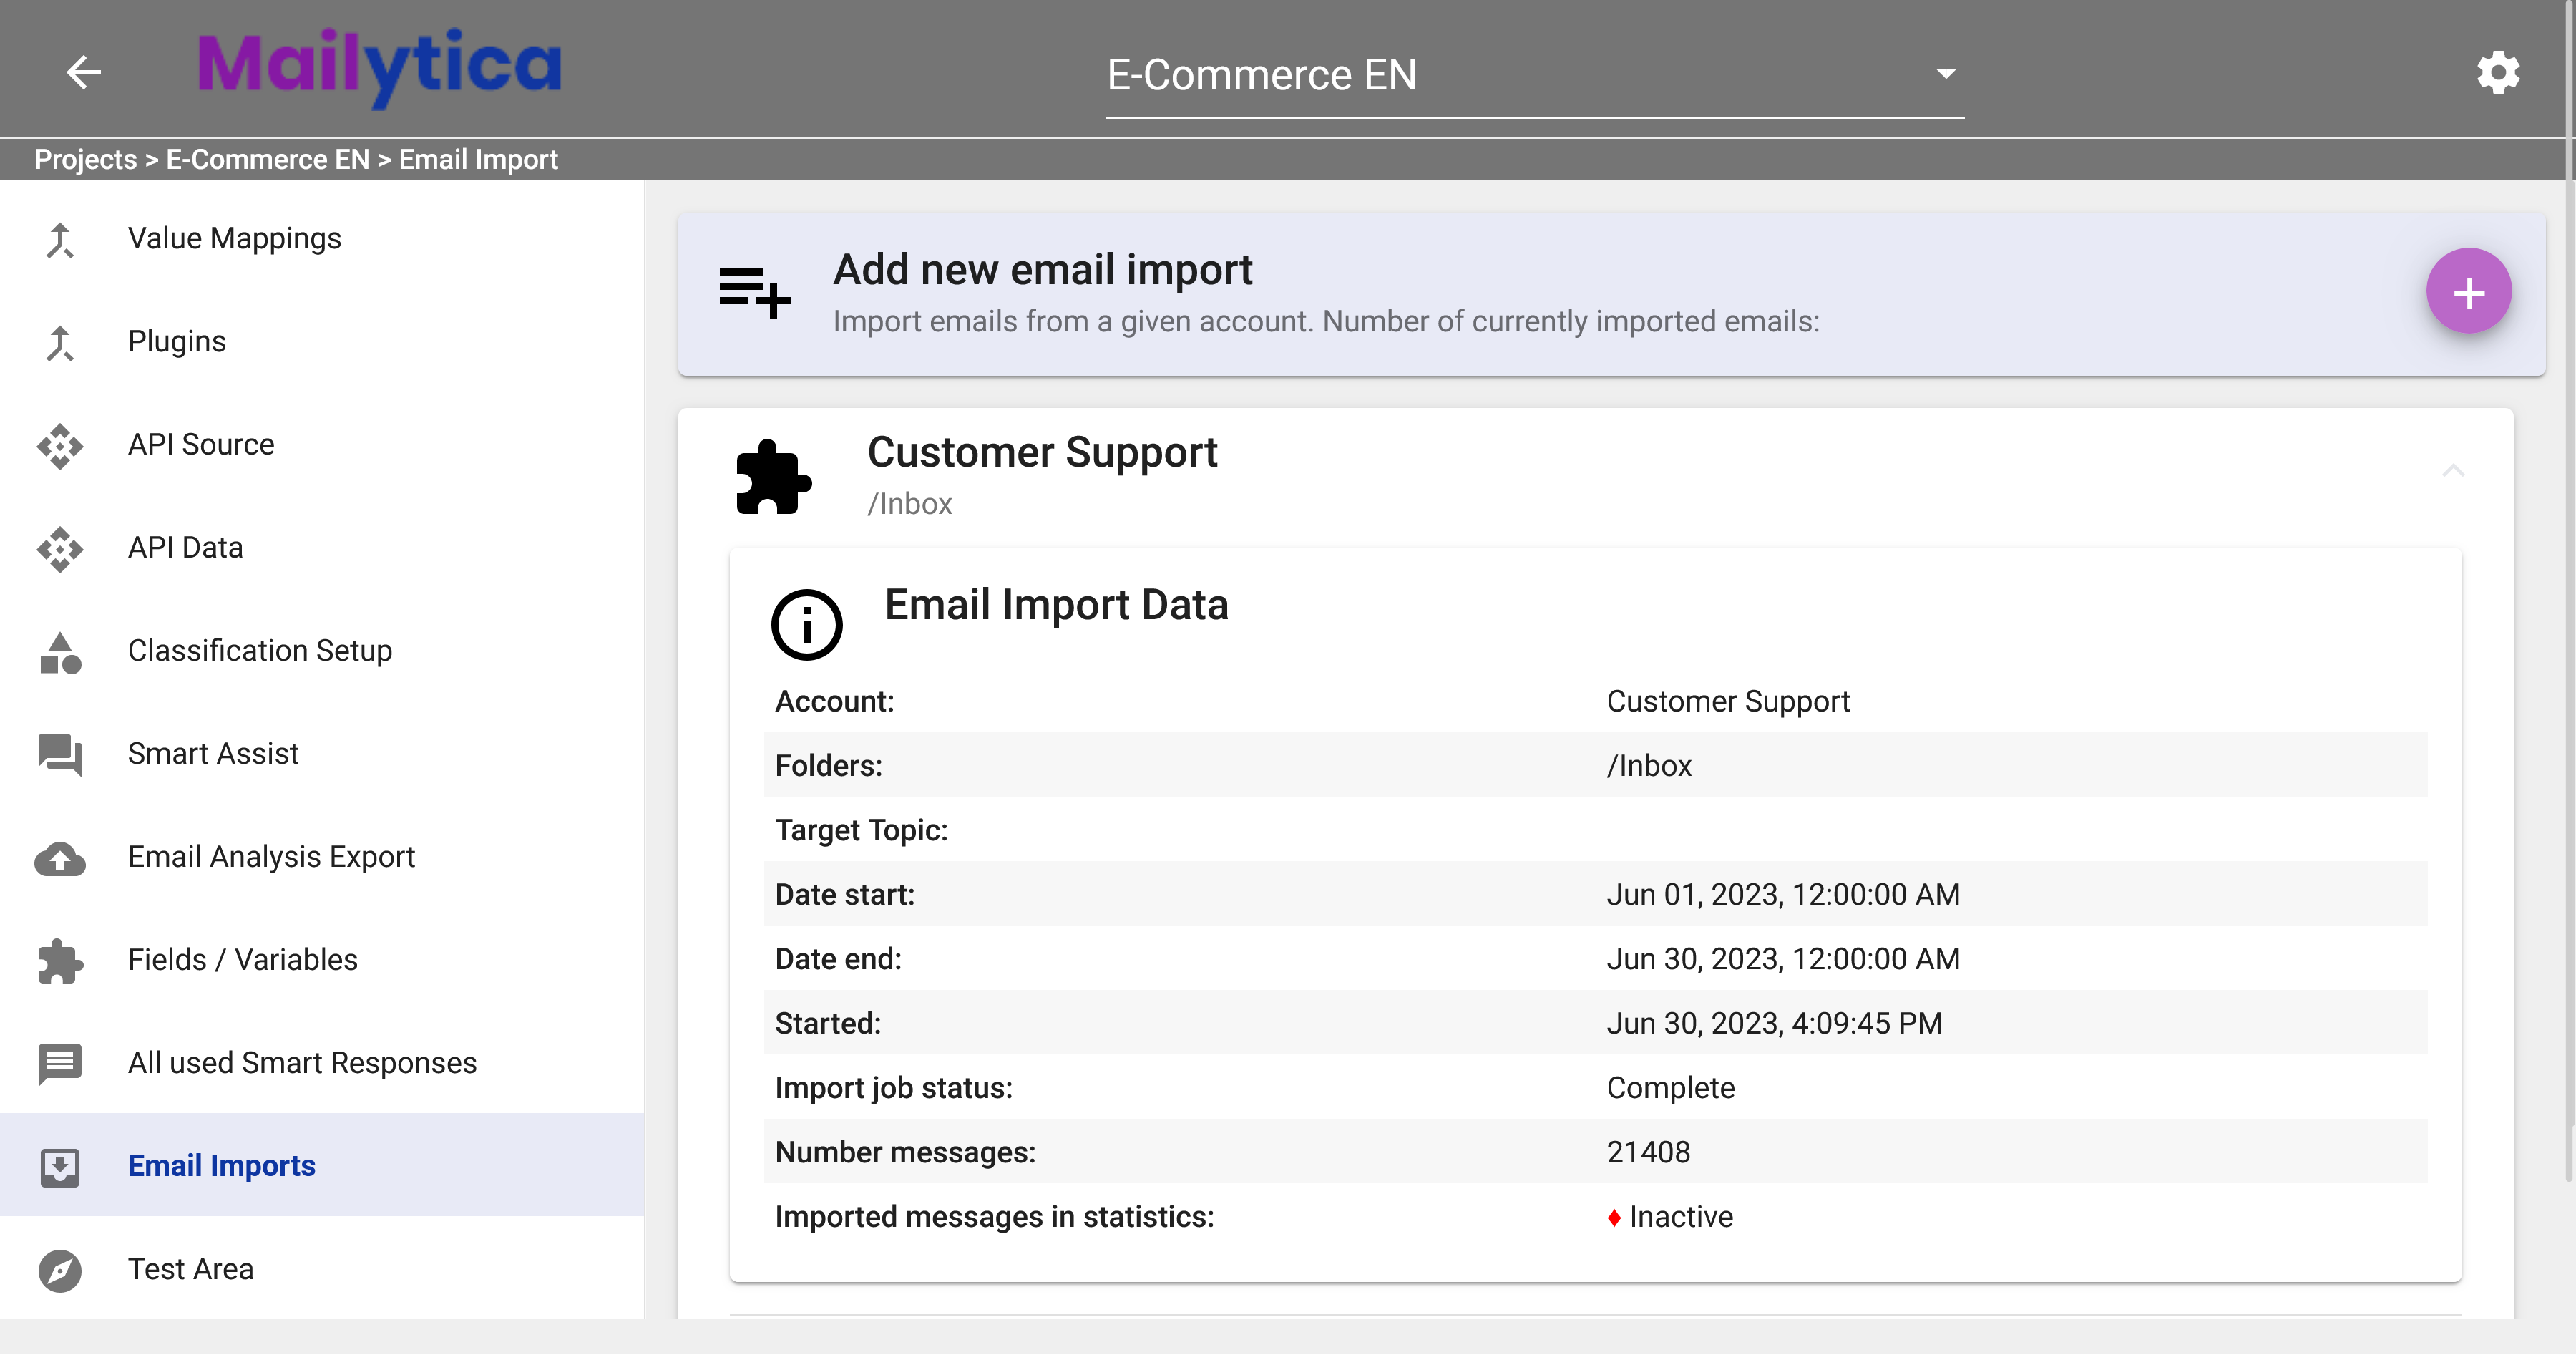
Finally, click Add and Mailytica will begin importing your email messages to train your topics. Navigate back to the Email Imports screen and select the newly configured account. You’ll see the Import Job Status as Importing during email processing, which will change to Complete once finished. The Number of Messages field shows the total emails imported. By keeping an eye on the import status, you can stay informed about the progress and know when the data will be ready to use.
Important
Deleting an Email Import only ends the import process without removing processed emails in Mailytica. To delete them, visit the Messages section.
Project Import#
To import messages from one project into another in Mailytica, follow these steps:
Log in to Mailytica’s Online Portal and select the project you wish to add the messages to.
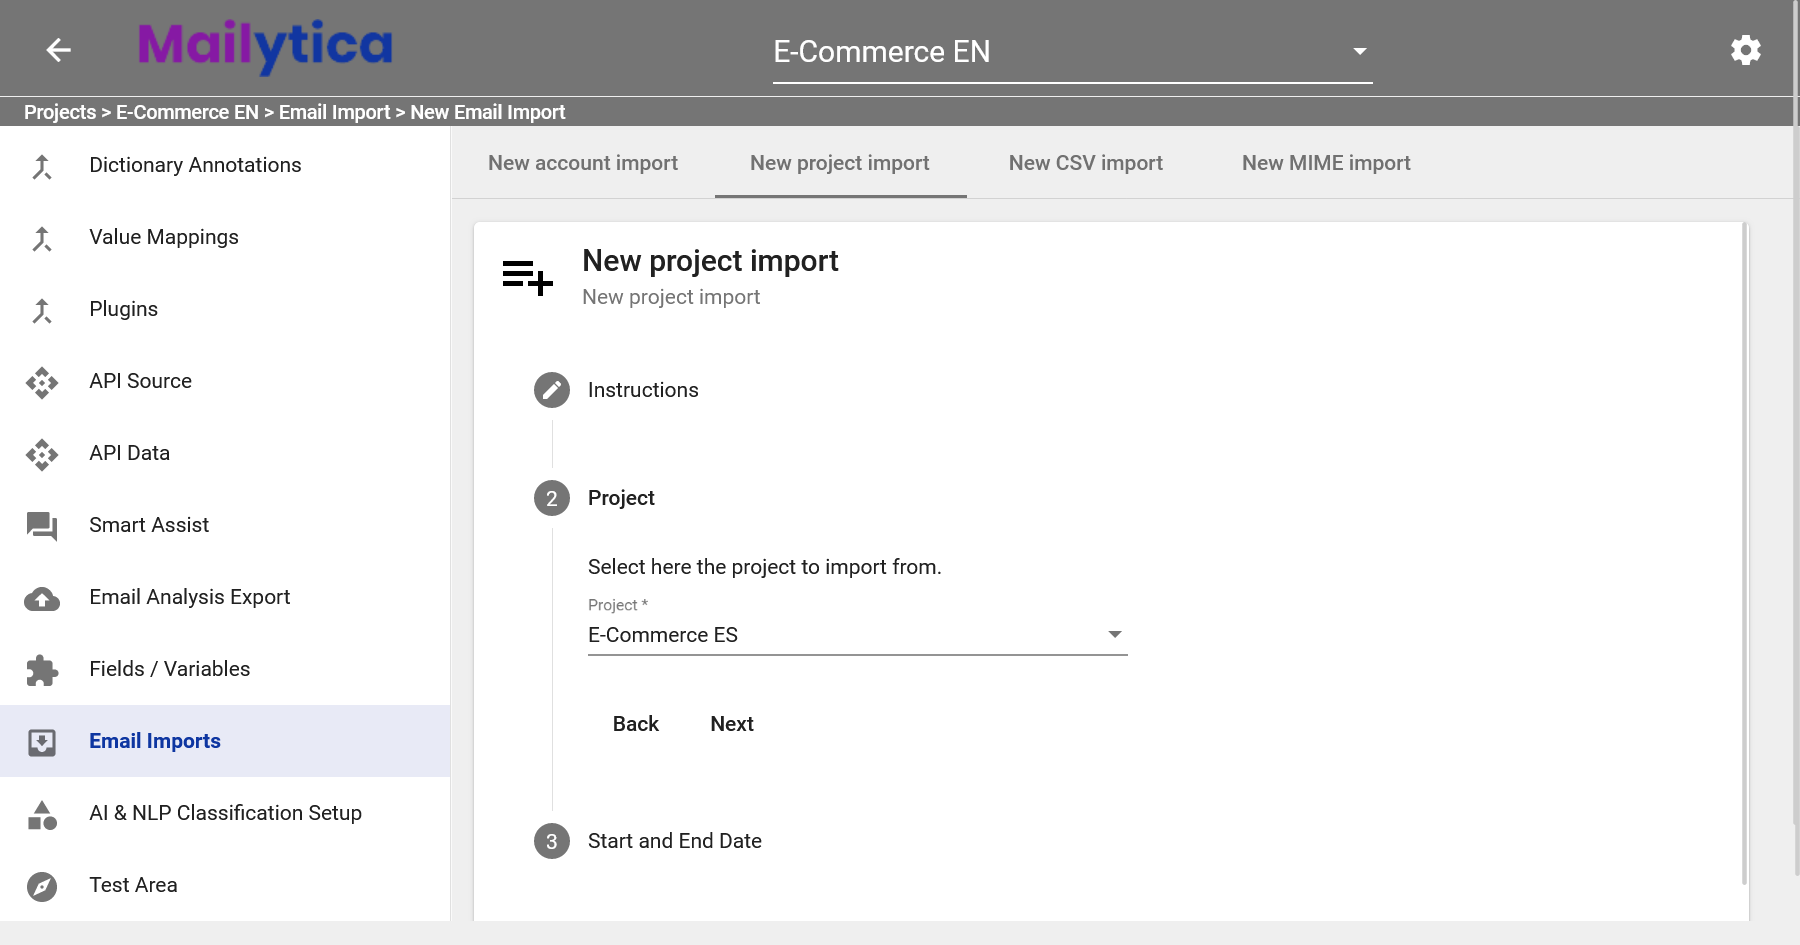
Navigate to the Email Imports section in the left side panel. Click Add New Email Import and select New Project Import.
Next, in Project, choose the project you want to import messages from.
Tip
Selecting the project you’re currently in allows you to easily overwrite existing classifications. This is particularly useful for updating or correcting your project’s classifications. Use this practice to keep your project data accurate and up-to-date.
Then, under Start and End Date, define the time period for importing messages by selecting a start date and an end date.
Click the Add button to begin the import process. The messages from your chosen project, within the specified date range, will then be accessible in your current project.
CSV Import#
For users who prefer to manually control the import operation, Mailytica also offers the ability to import messages via CSV files.
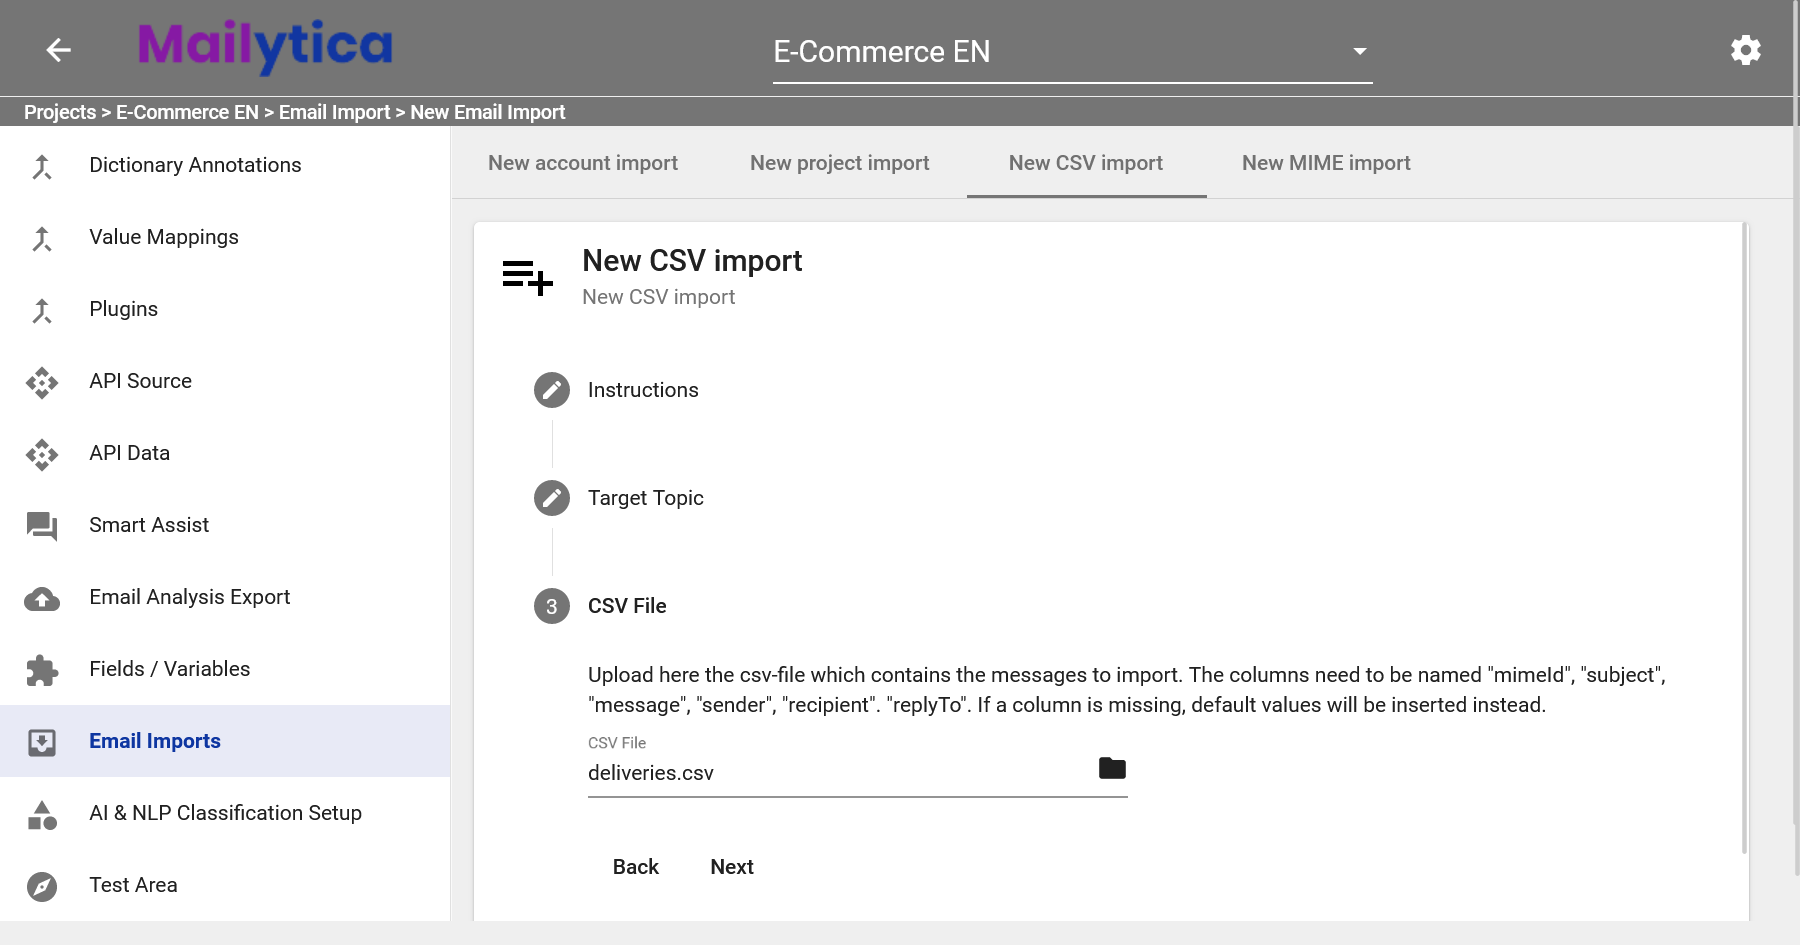
Log in to Mailytica’s Online Portal and navigate to the Email Imports section in the left side panel. Click Add New Email Import and select New CSV Import.
Then, in Target Topic, choose a topic for your imported messages. If you leave this field empty, the AI will auto-assign a topic according to the predefined rules and training.
Under CSV File, upload your CSV file, ensuring it contains all the relevant message details. Please note that your CSV file should contain the following columns: mimeId, subject, message, sender, recipient, and replyTo. If any column is missing, Mailytica will insert default values.
Important
If any of these elements: subject, message, sender, recipient, or replyTo are missing, Mailytica will add an empty string as a default. If mimeId is missing, Mailytica will assign an arbitrary id as a default.
However, for optimal classification results and quality, we highly recommend adding as much information as possible. Missing data may result in less accurate classifications.
Here is a basic example of how your CSV file should be structured:
mimeId
subject
message
sender
recipient
replyTo
1234
Shipping Inquiry
Where is my package?
5678
Order 2356
I wish to return an item
Click Add, and the import process will begin.
Once you’ve uploaded your CSV files, the complete data from your email - including components like the subject, recipients, and attachments - will be integrated and immediately accessible in your Mailytica account.
MIME Import#
Importing emails into Mailytica can also be done using MIME (Multipurpose Internet Mail Extensions) files. These files store the complete information of an email message, including details such as subject, sender, recipient, and even any attachments, making it easy to import entire email data into Mailytica.
Tip
- Extracting a MIME file (using Gmail):
Open the email message in Gmail you want to convert to MIME.
Click on the three vertical dots near the top right of the email (next to the reply button).
From the dropdown menu, click Show original.
In the new window, click Download Original. Doing this will save the email as an .eml file, which is a type of MIME file.
- Extracting a MIME file (using Outlook):
Open the email message in Outlook that you want to convert to an MIME file.
Click on File in the top left corner, and then click on Save As.
In the Save As dialog, make sure to change the Save as type option to .mht from the dropdown list.
Choose the desired location to save the file, and click on Save. This process will convert the email into an .mht file, which is a specific MIME file format.
To import MIME files to Mailytica follow these instructions:
Log into Mailytica’s Online Portal and navigate to the Email Imports section in the left side panel.
Click Add New Email Import and select New MIME Import.
Under Target Topic, you can choose to specify a target topic or you can leave it blank for the AI to assign one according to the pre-defined rules and training.
In the MIME Zip Archive section, upload all your MIME files compressed as .zip.
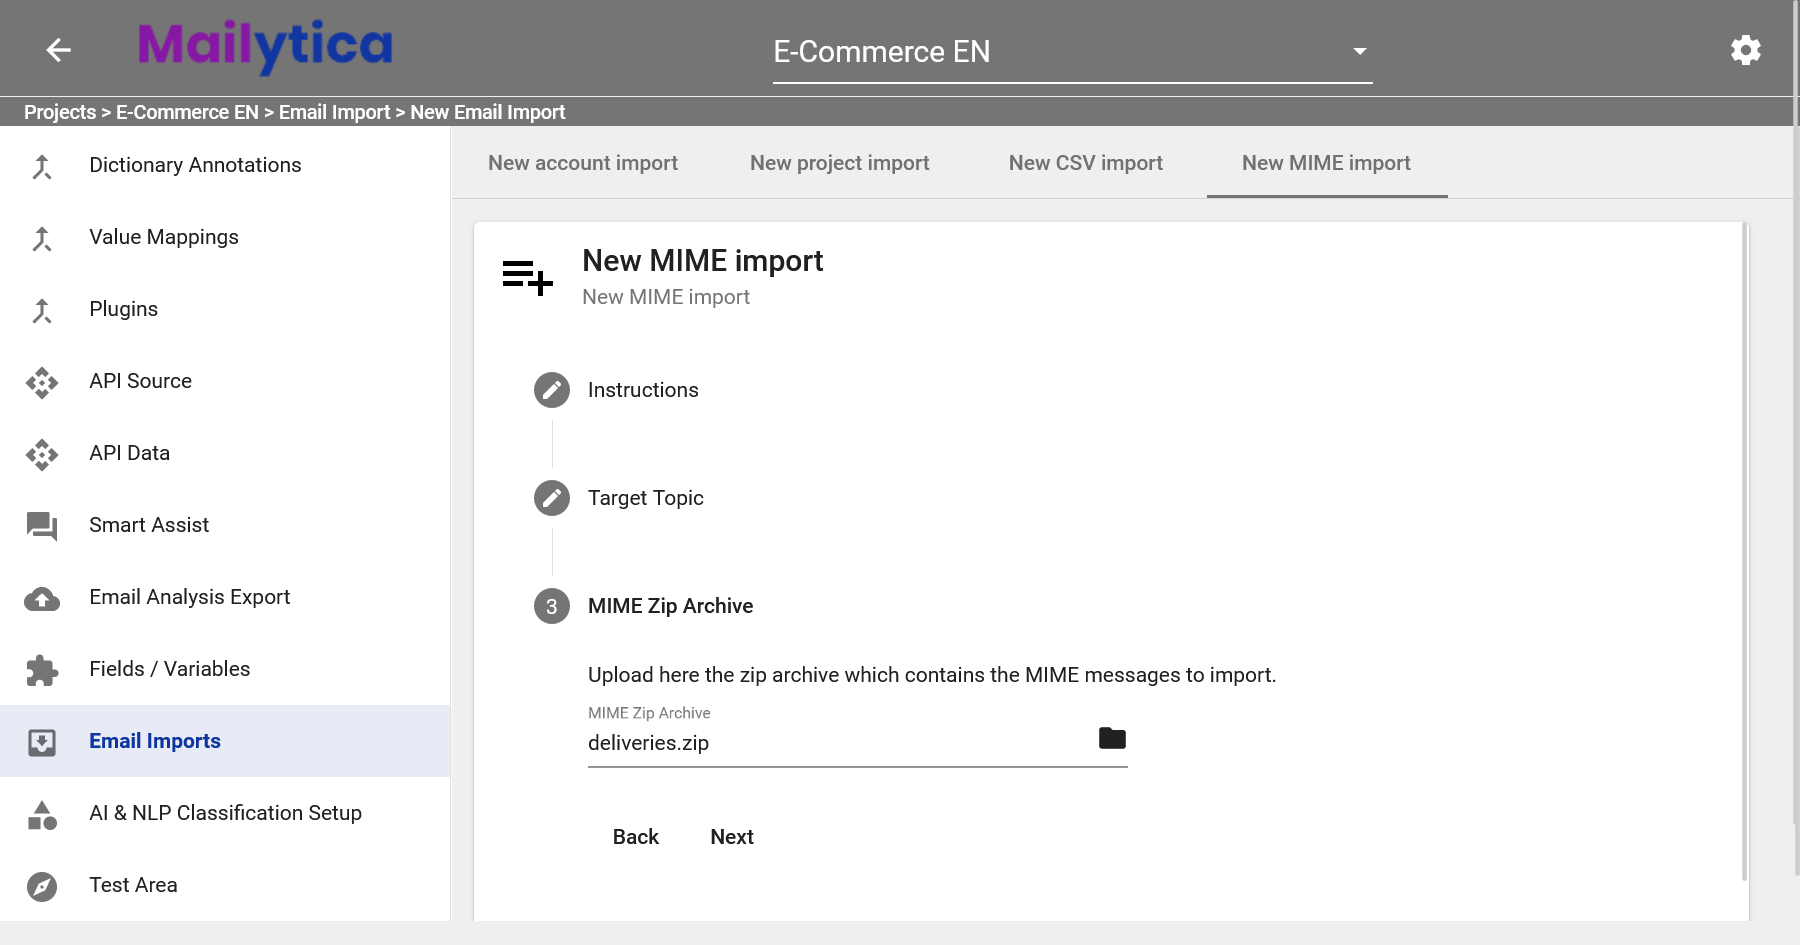
Click Add, and the import process will begin.
After uploading your MIME files, Mailytica ensures every piece of your email information, such as the subject, recipients, and attachments, becomes readily available for your review directly within your account.
Classify Training Messages#
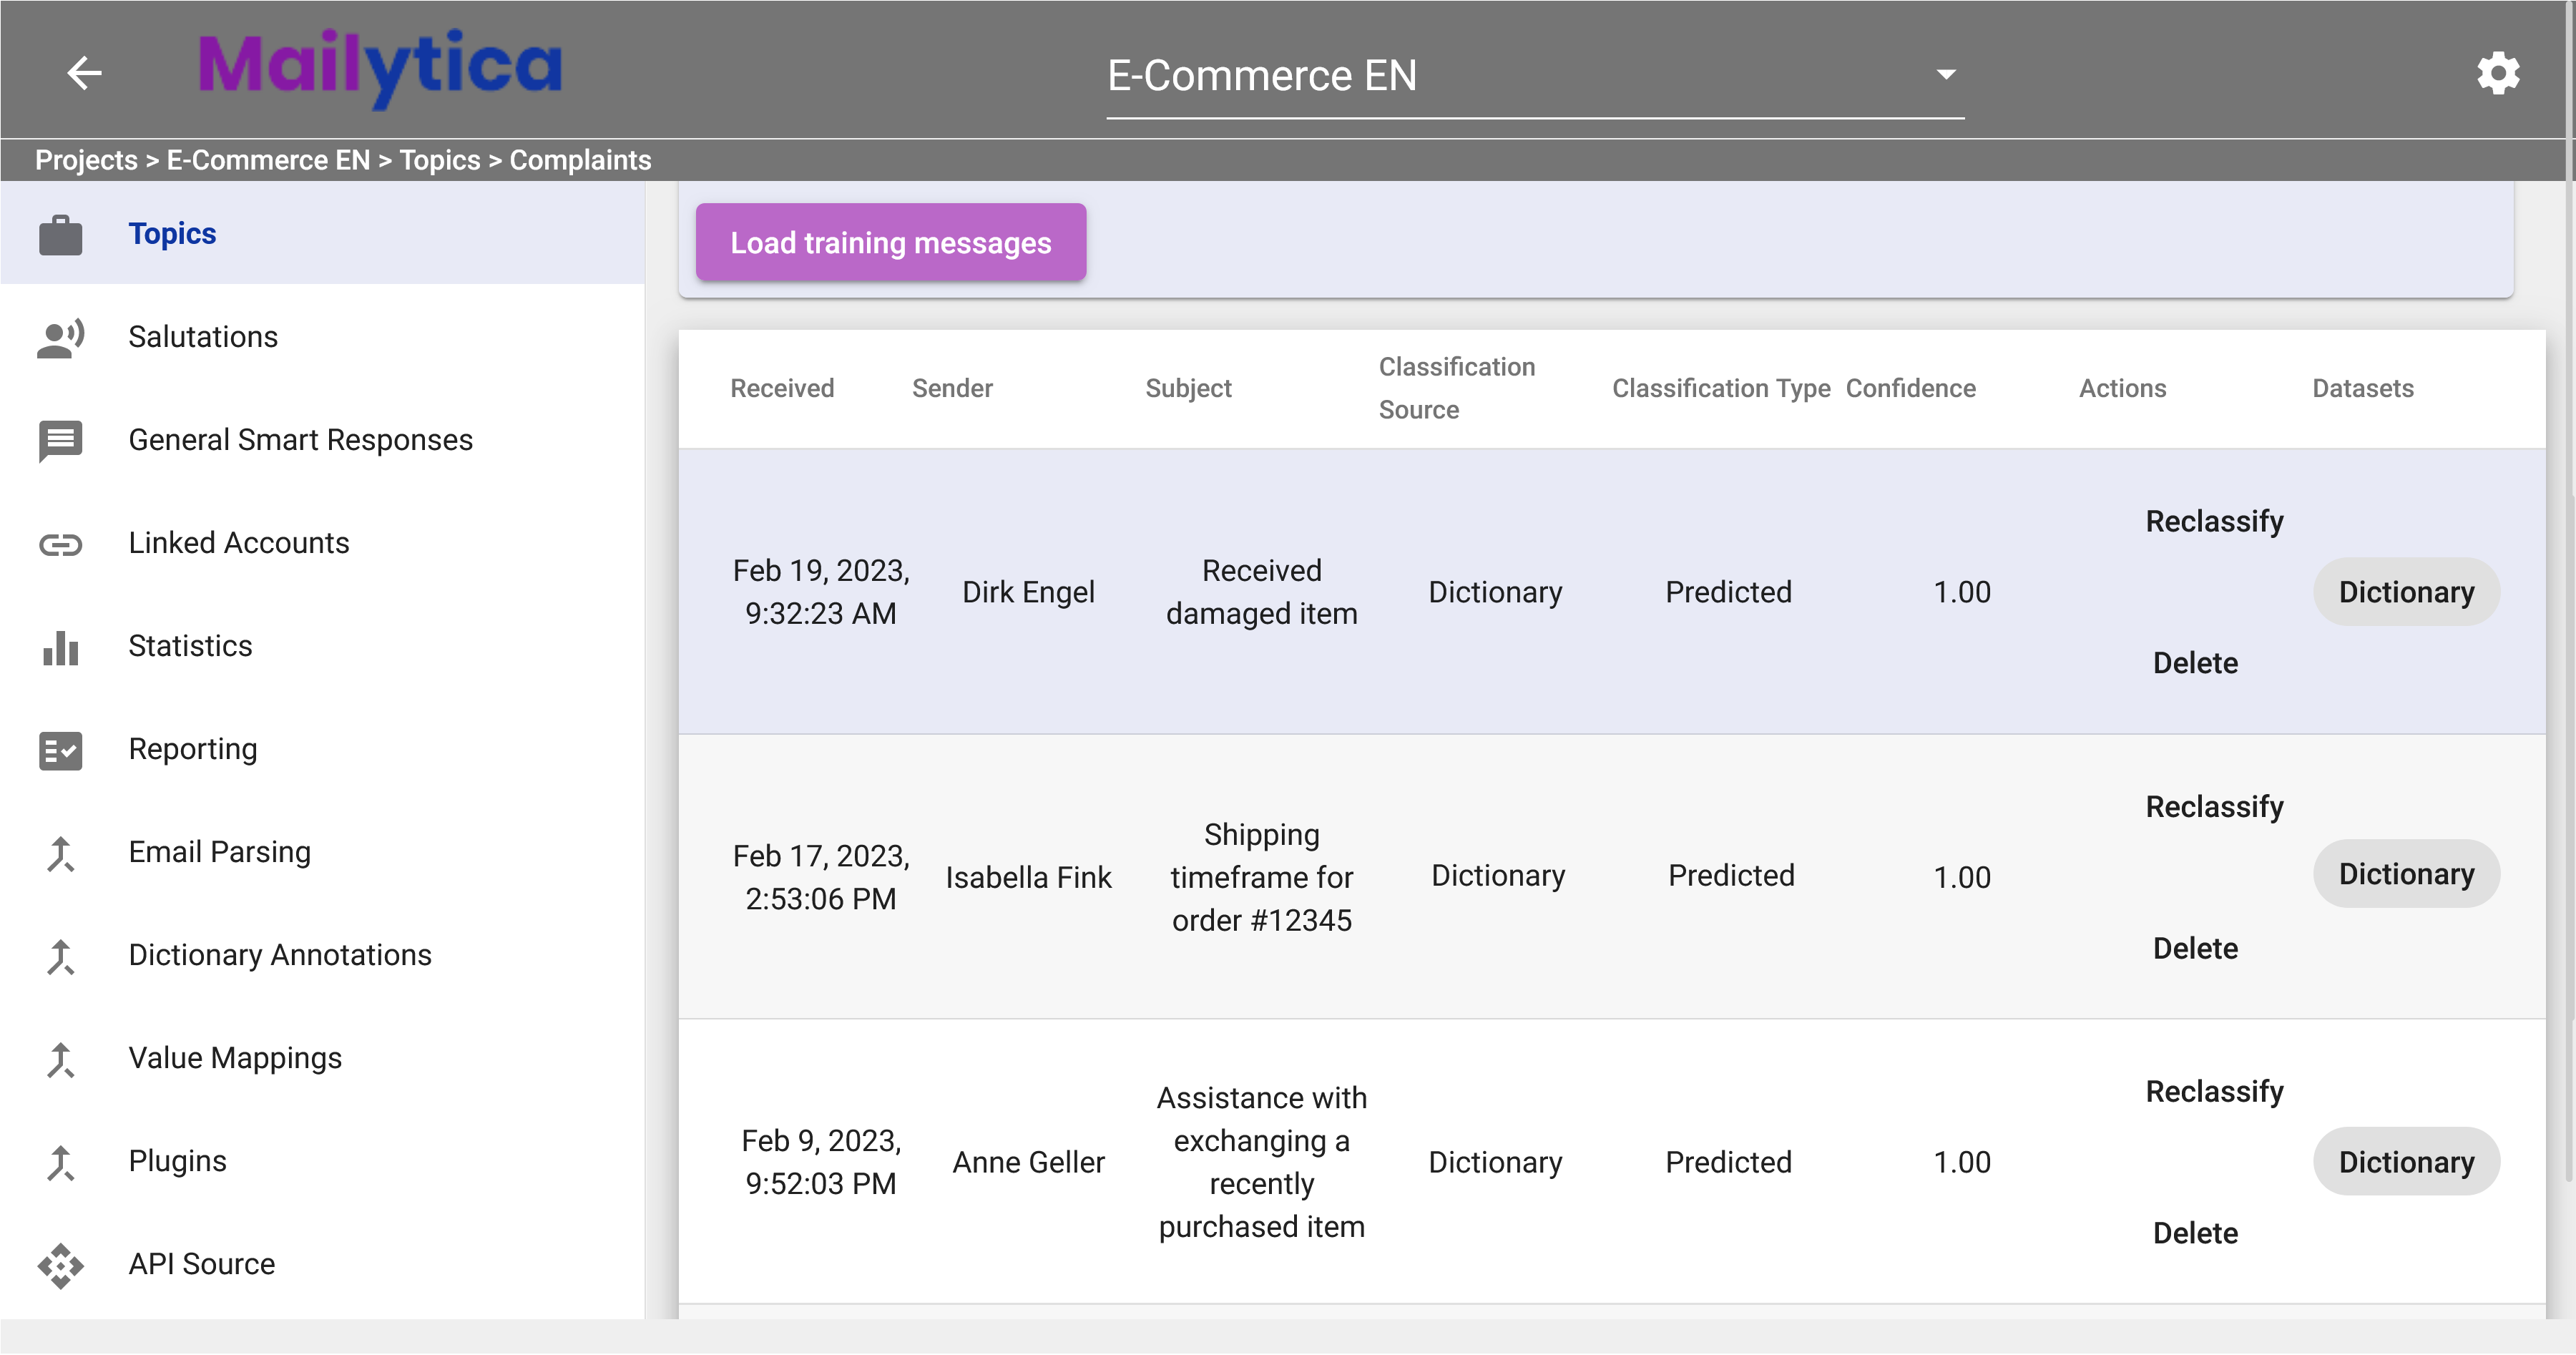
To view your imported messages, go to the Topics section in the Online Portal. From there, choose either your target topic or the Standard topic, and then click on Messages in the top tab bar. Within the Messages section, select the time period and click on Load Training Messages to display a list of all your imported messages.
Although optional, it is recommended to create a new training dataset that includes all your imported messages for better organization. To do this, click on the first message in the message list, and a new dialog screen will appear. Under Training Datasets, you’ll see a list of available datasets, and at the bottom, there’s a field called New Training Dataset where you can enter a name for your new dataset. Choose a descriptive name so that it’s easily identifiable if you need to refer to it later.
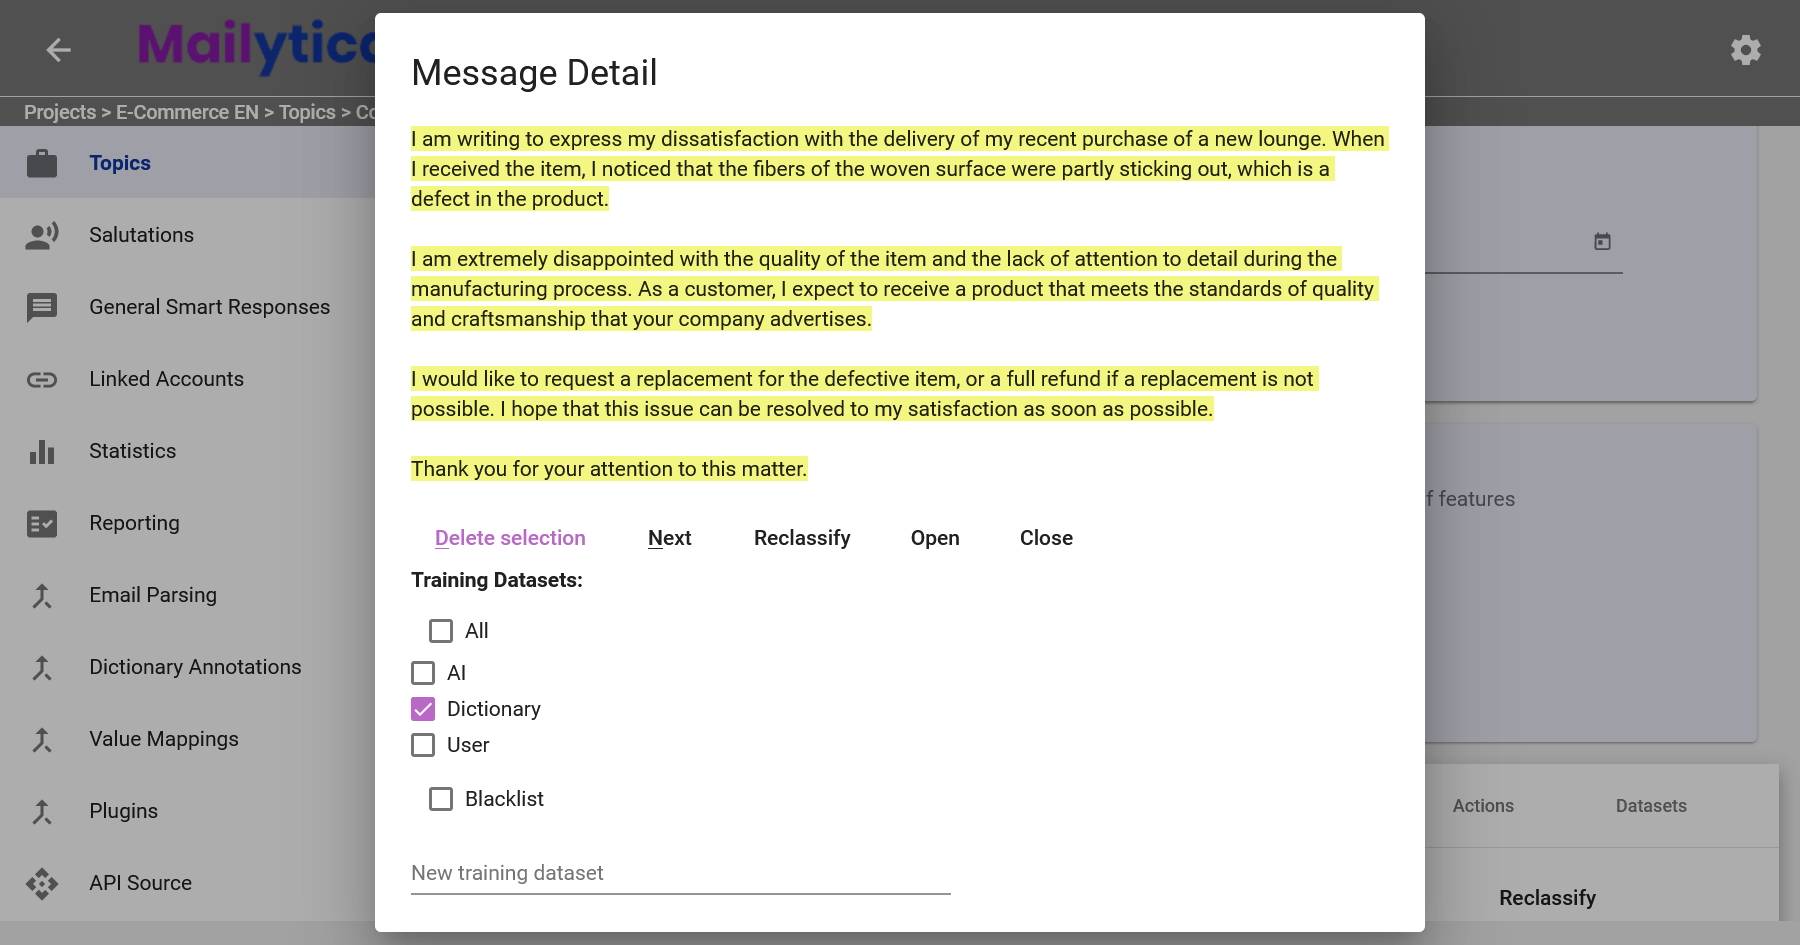
In specific situations, you may need to determine the specific parts of an email message that should be considered for in training. This is particularly useful when dealing with lengthy emails or messages that address multiple topics.
To do this, start by clicking the Delete Section button or simply right-click on the text and choose Delete Section.
Next, use your cursor to highlight the text you wish to use for training the AI models.
After highlighting, right-click again and select Confirm Selection. This action marks the text in green, indicating that only the highlighted sections will be considered in AI training. This focused approach ensures the training is more efficient and effective.
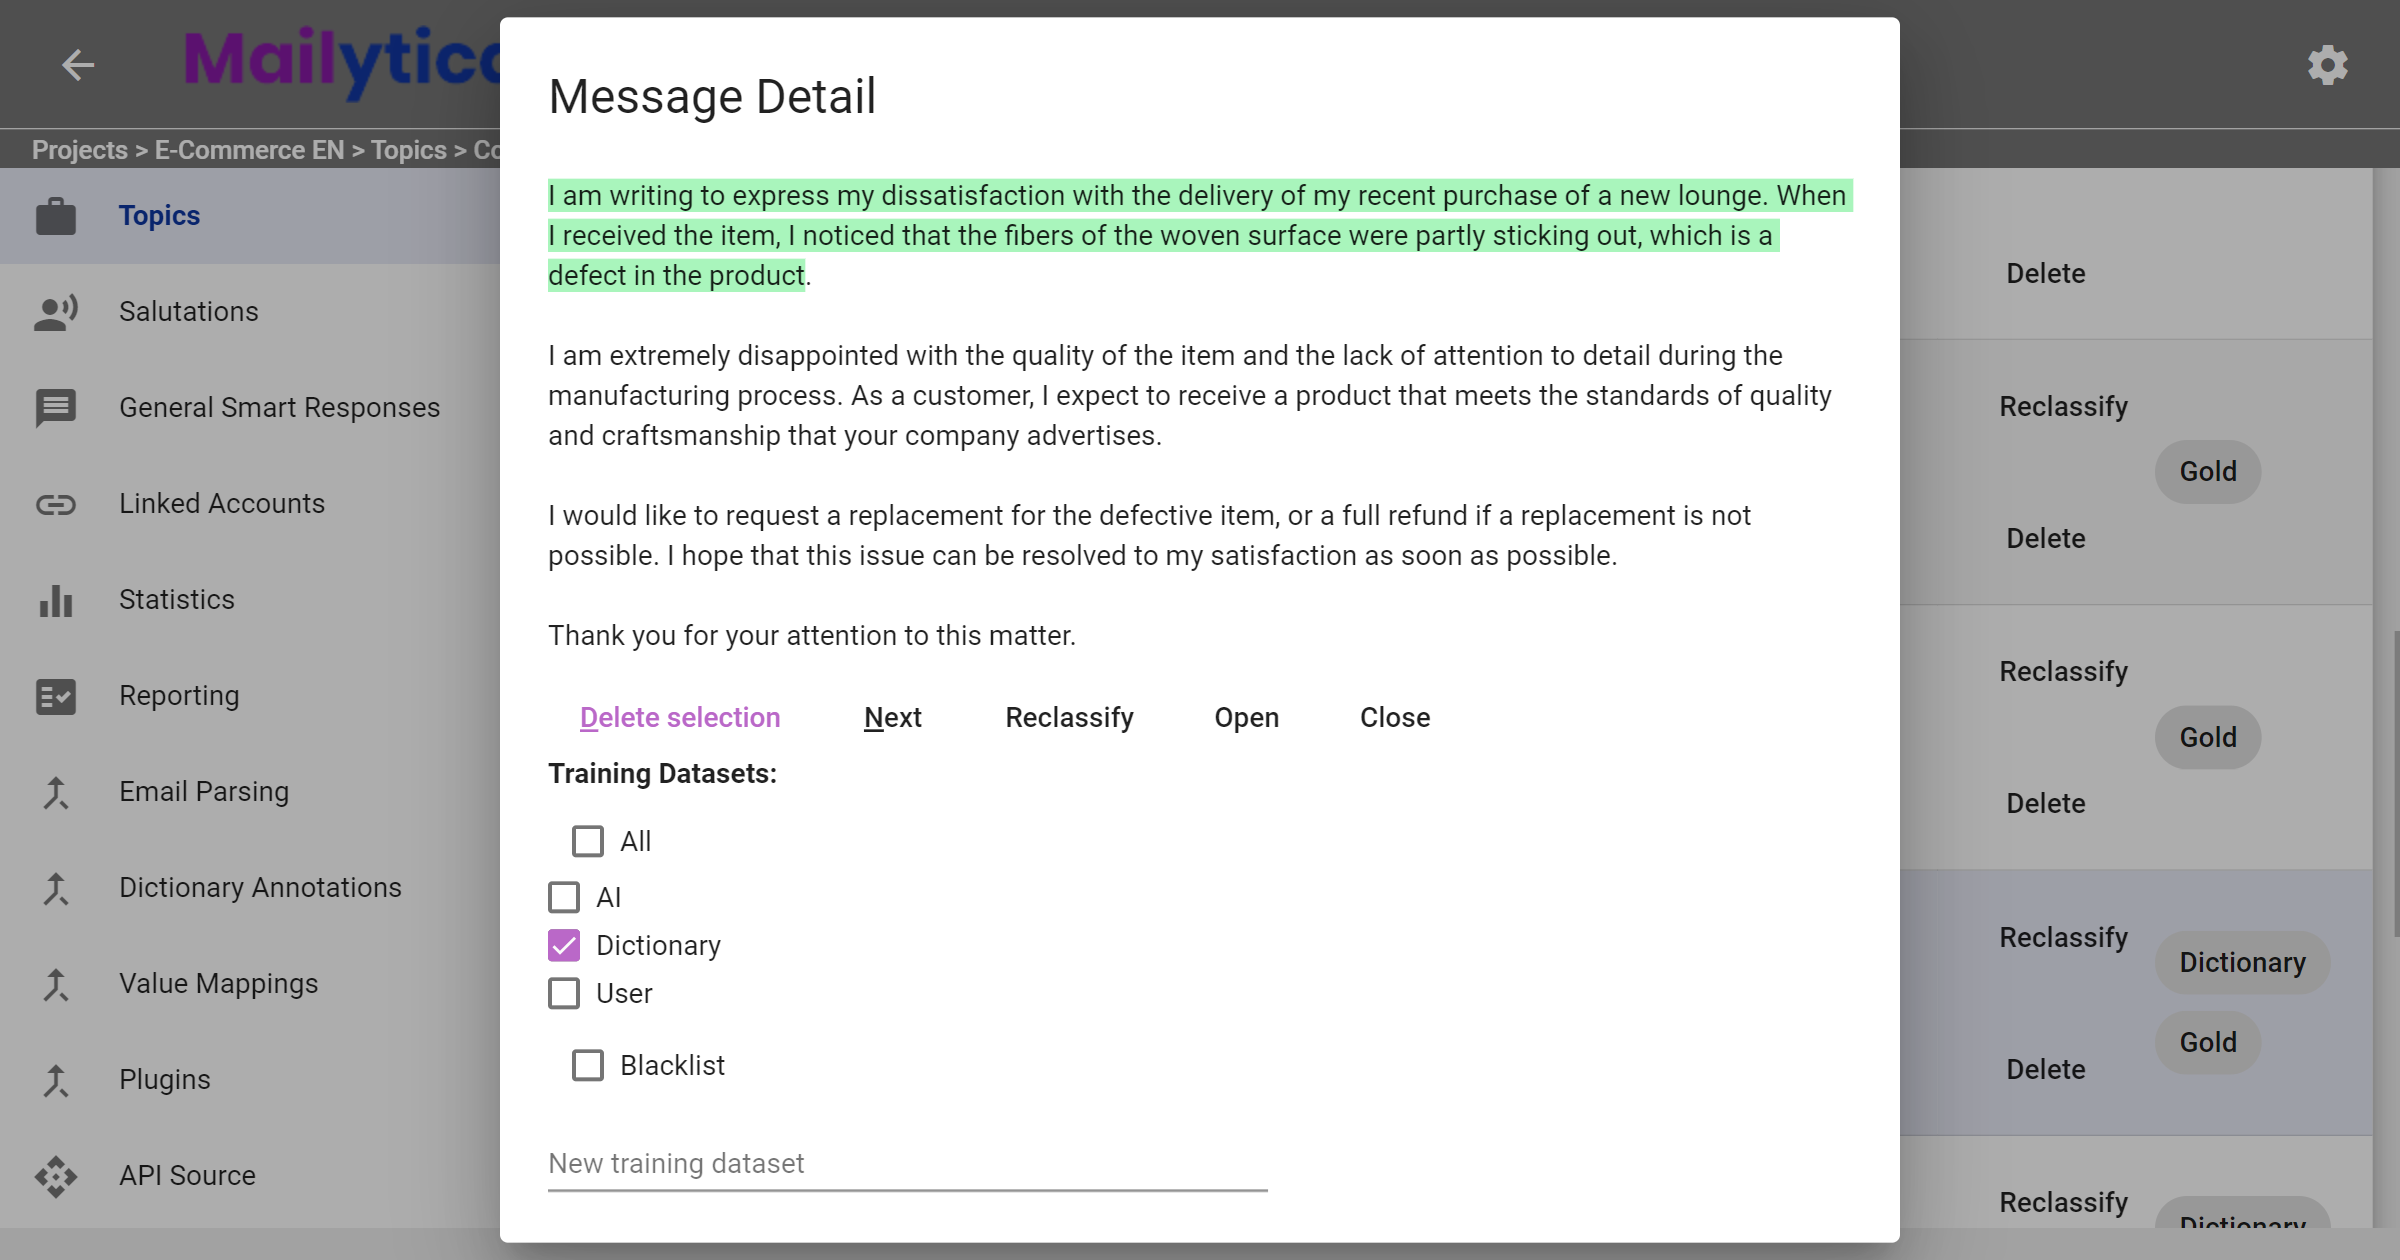
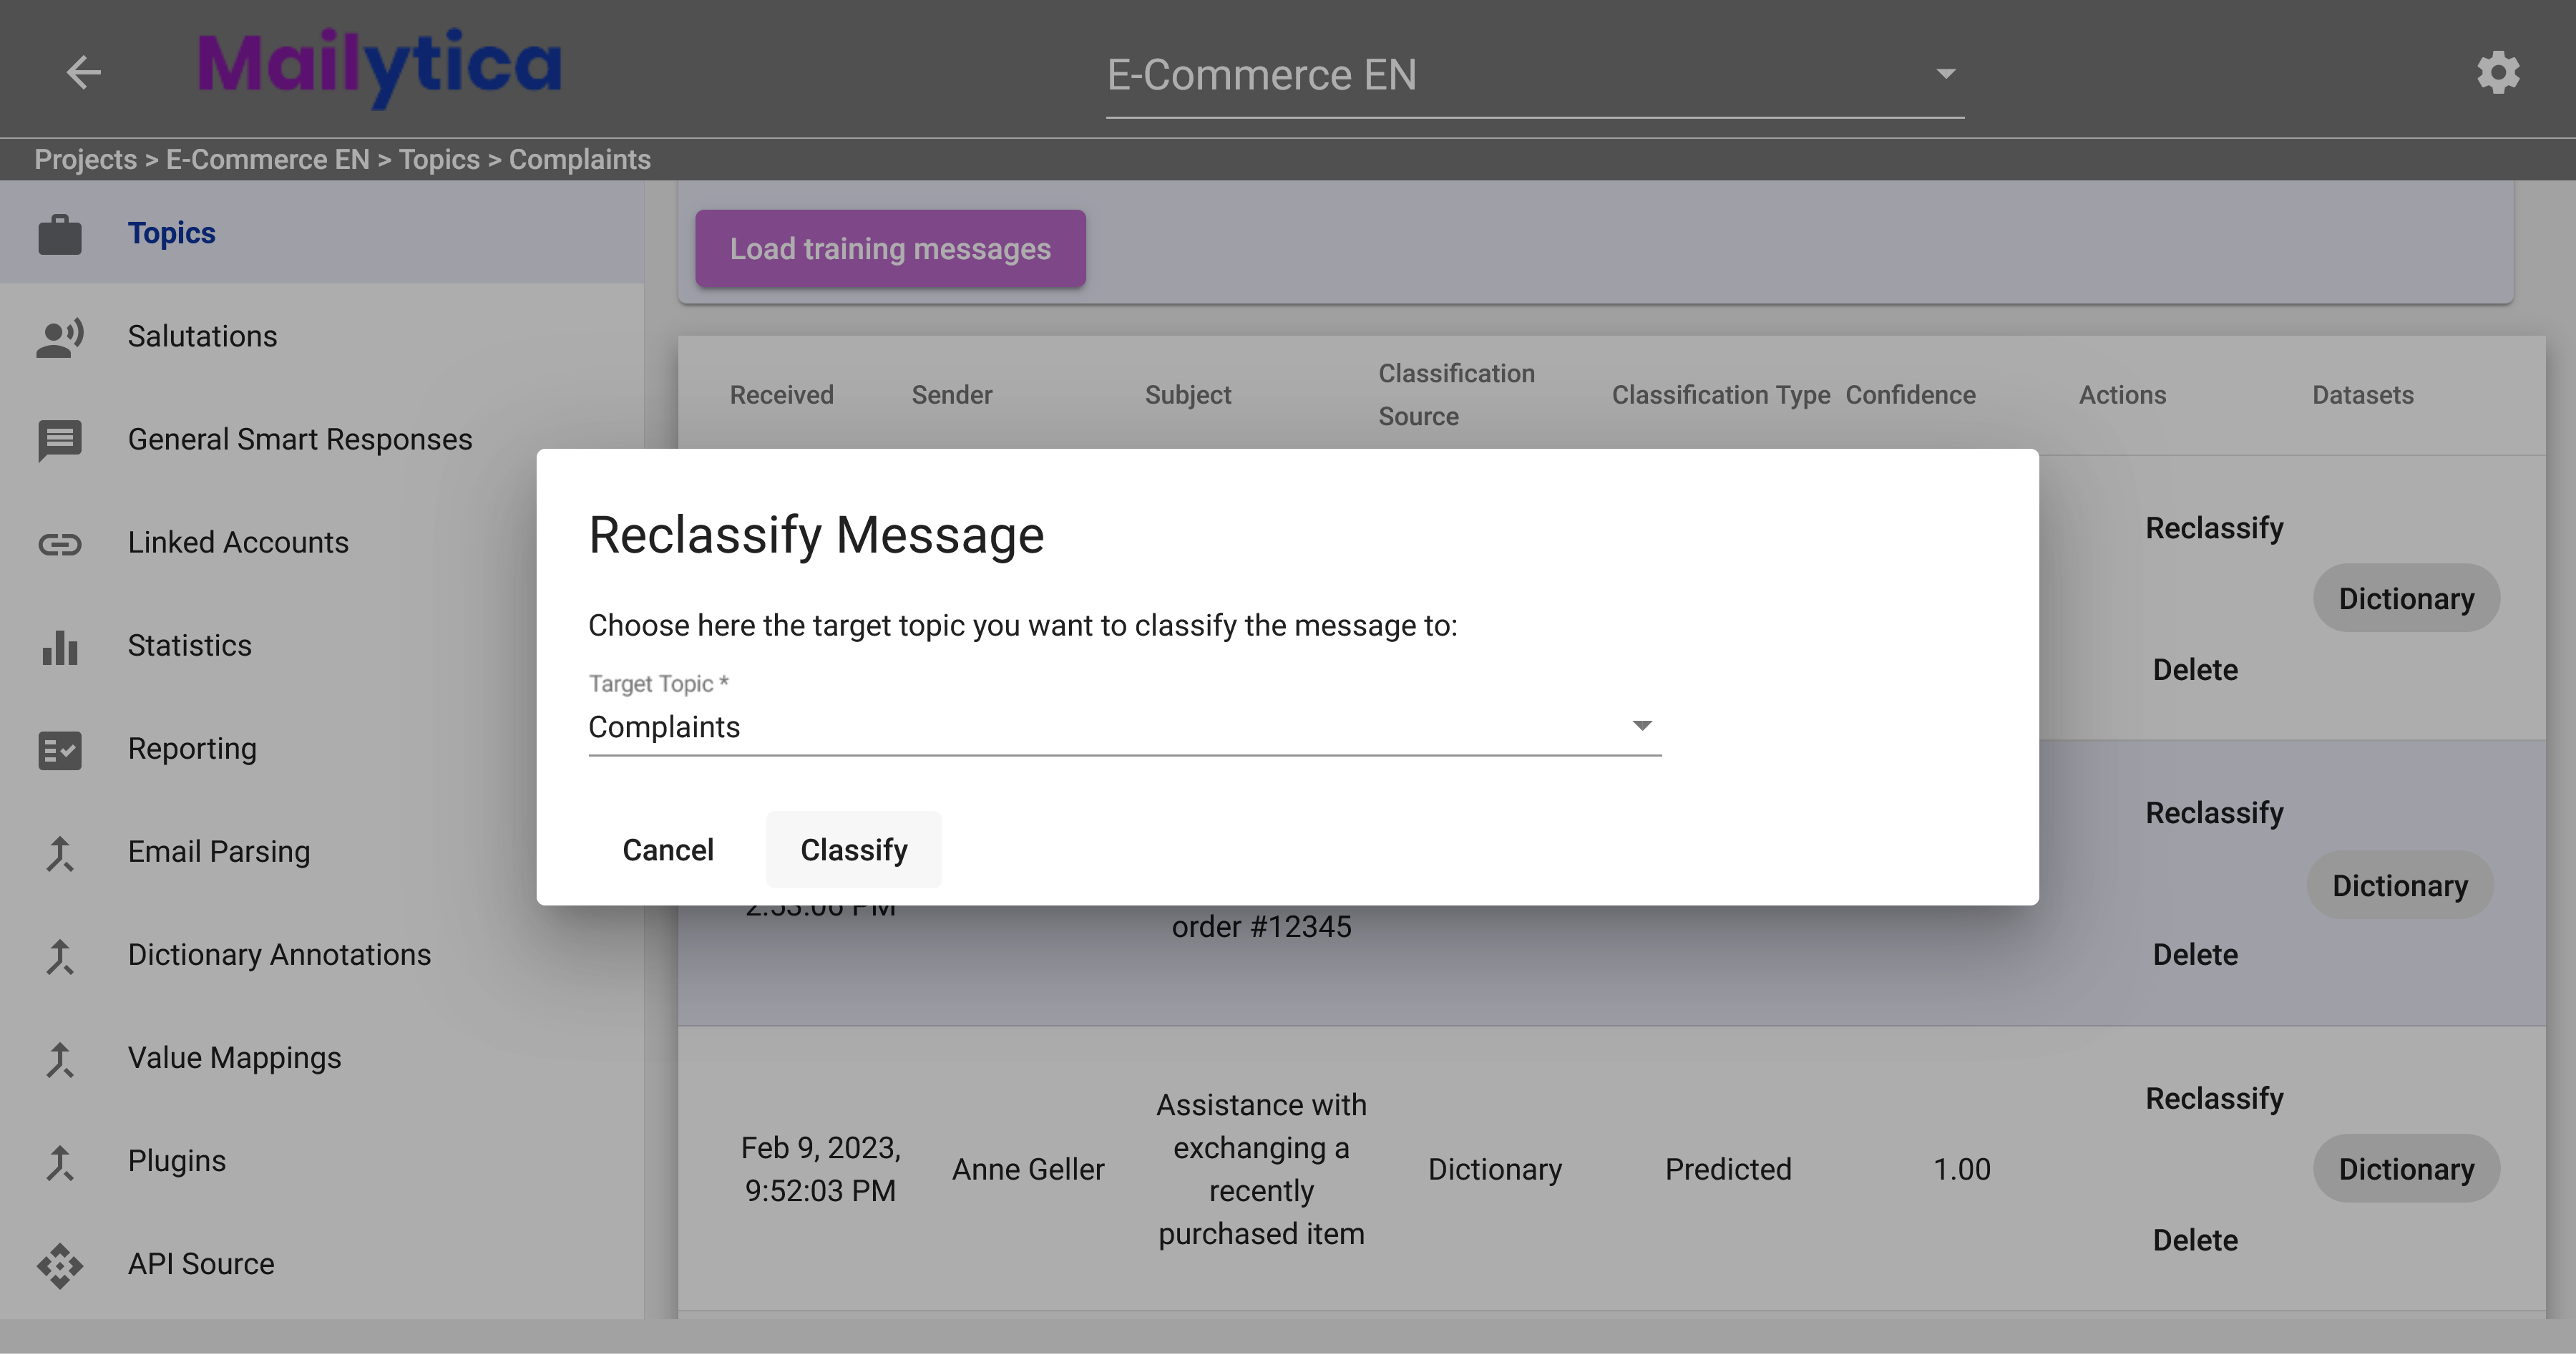
Afterward, in the same dialog box, click the Reclassify button. Begin classifying the messages by selecting the relevant topic in the Target Topic field. For instance, you can classify emails where customers complain about an issue with the topic Complaints by selecting the target topic from the dropdown menu and then clicking on Classify.
Additionally, if you need to exclude specific email messages from the training data, you can easily add them to a Blacklist dataset. The process is similar to creating a new training dataset; simply create a dataset called Blacklist and include all the emails you wish to exclude from training. We recommend excluding messages that are difficult to comprehend even for humans (e.g., complicated writing style, rambling, strange formatting, etc.) or emails with formatting issues due to excessive forwarding. This step is optional but can help improve the quality of your training data.
Supervised Learning Example#
Follow this step-by-step walkthrough of supervised training using the Complaints topic as an example:
Ensure your email account is connected to your project, as specified in the Linked Accounts section.
Develop a Dictionary Classification model to detect keywords related to complaints in the subject and body of the imported emails. For example, you can add keywords such as issue, problem, refund, damaged, or return. By doing this, the supervised training process becomes more efficient, as Mailytica will classify your imported emails as soon as it detects those keywords.
Navigate to Email Imports and select Add New Email Import.
Choose your Account from the drop-down menu.
Keep the Target Topic field empty, so all emails are classified under the Standard topic.
Define a Start and End Date for the messages to be imported. In this example, select a period of exactly 1 month.
Select the Folders containing complaint emails, such as the Inbox folder in this case.
Click Add to begin importing the email messages.
Go to the Topics - Standard - Messages section in the Online Portal, and click Load Training Messages.
Generate a new training dataset called Complaint Emails – Initial Dataset for easy identification of the dataset’s contents. Then, click Save to save the recently imported emails to this new dataset.
Click Reclassify on each message, and classify them with the Complaints topic in the Target Topic field. For example, if you find an email from a customer complaining about a damaged item, classify it under the Complaints topic.
By following these steps, you will have created a training dataset for the Complaints topic. This dataset will help Mailytica better understand and categorize future complaint emails, making the classification process more accurate and efficient.
Supervised Learning Troubleshooting#
Here are some common issues that can occur during supervised training, along with some troubleshooting tips and solutions:
- Issue: No account showing up during the email import process.
Solution: Ensure that you have connected and linked your account to your project, as specified in the Linked Accounts section.
- Issue: Can’t see imported messages after completing the email import process.
Solution: As a general rule, imported messages without a target topic will be found under the Standard topic.
- Issue: Incorrect topic classification.
Solution: Review the dictionary classification model and update the keywords to improve topic assignment accuracy. You can also adjust the confidence threshold for topic assignment in the model. By increasing the threshold, the model will only assign a topic to an email if it has a high level of confidence in its classification. This can help reduce misclassifications but may also result in some emails not being assigned a topic. In addition, you can increase the size of your training dataset by collecting more examples of emails related to the topic. The larger and more diverse your dataset, the better the model can learn to accurately classify emails.
- Issue: Slow or time-consuming supervised training process.
Solution: Create first a classification model to speed up the process by automatically assigning topics based on keywords.
Supervised training plays an important role in enhancing Mailytica’s accuracy and efficiency of email classification. By following the guidelines provided in this section, you can effectively train your models to better understand and categorize your emails, simplifying your inbox management and organization.
If you require additional assistance or have any questions, please don’t hesitate to contact Mailytica’s support team at support@mailytica.com. Our dedicated team of experts is always ready to help you optimize your email classification experience and make the most of Mailytica’s powerful features.