Classification Setup#
Mailytica’s Classification Setup offers various methods to classify messages. You can choose from keyword detection to AI models, depending on your specific needs.
To get started, you need to have already created a topic as explained in the Add a New Topic section. Then, in the Edit section of your topic, select Classification Setup from the top tab bar.
Click on the button to add a classification model. A new screen will appear with all the classification options for your topic.
Tip
In addition, you can also import and export classification models between Mailytica accounts.
Export: To export a classification model, navigate to your classification model list. Expand the title box of the classification model you want to export, then click on the Export button. The classification data will be immediately downloaded to your local computer as a .zip file.
Import: When you want to import the previously exported classification model, return to your list and click on the button at the top of the page next to Add Classification Model. Locate and select the .zip file you exported earlier. The Mailytica classification model, along with all its contents, will be imported into your new account. This feature makes it easy to transfer models between accounts and collaborate with team members.
Artificial Intelligence Classification#
With Mailytica, you can use artificial intelligence to easily classify your emails by topic or business transaction. The ability to learn from unstructured data is one of the major components of artificial intelligence. As a result, Mailytica is designed to learn by itself, by analysing email data for patterns.
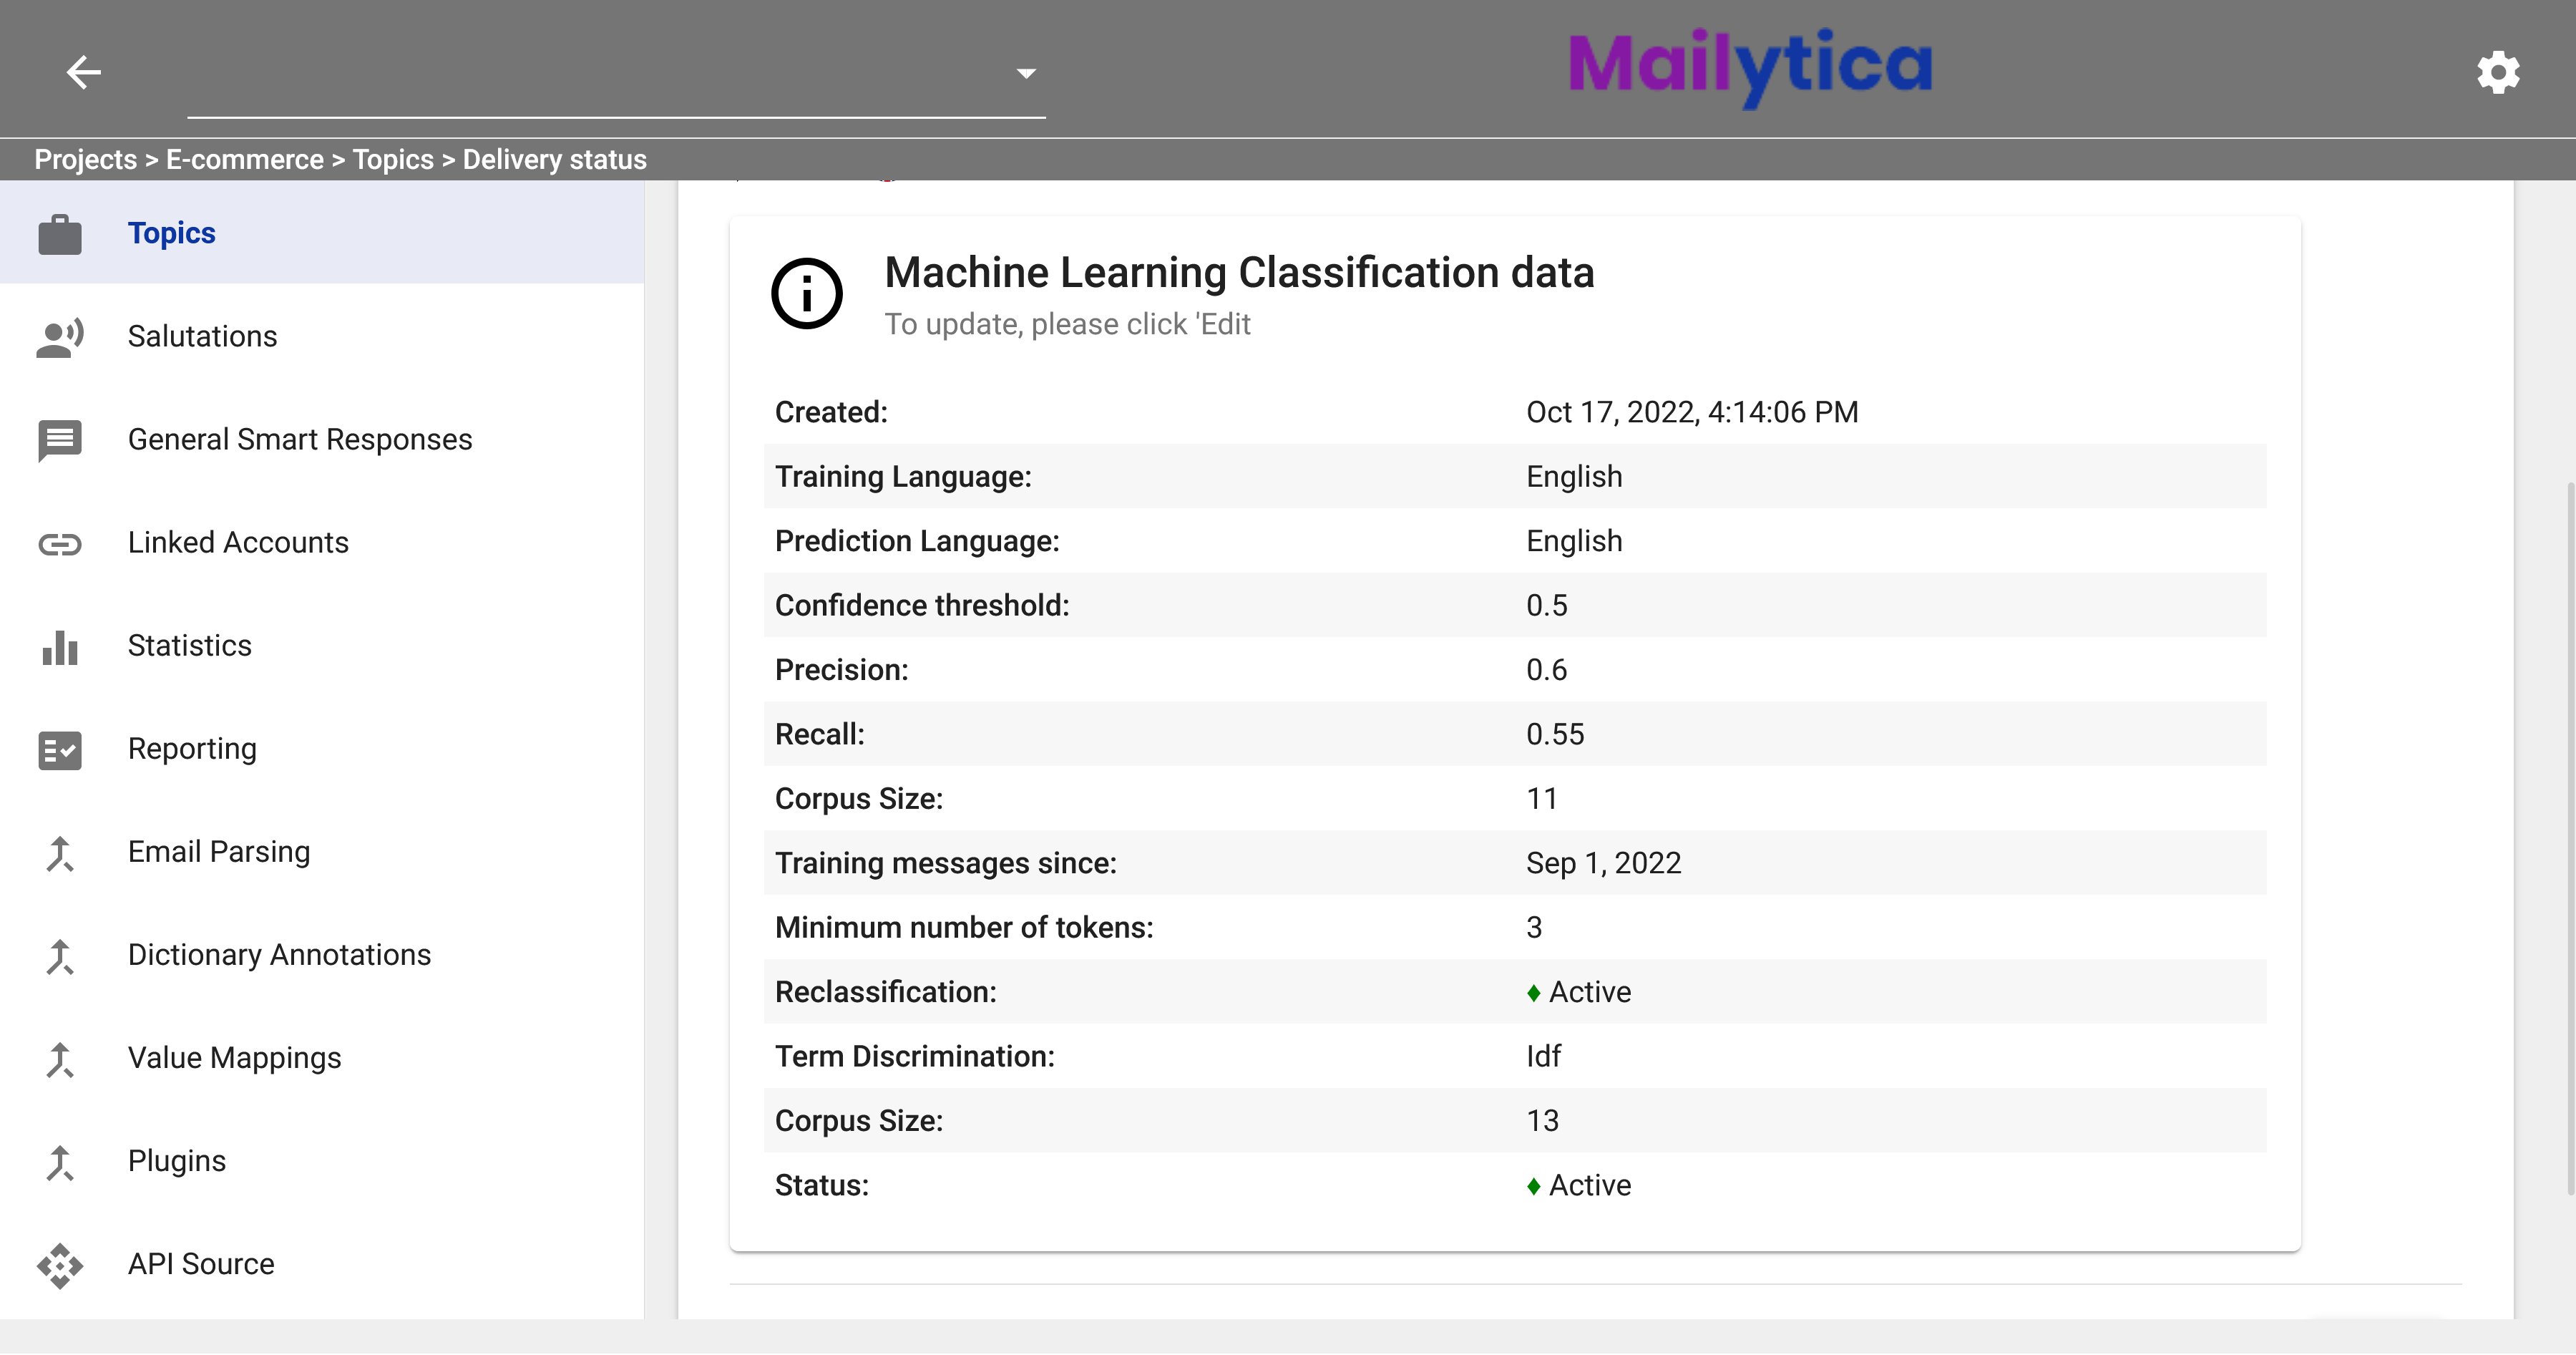
These characteristics make Mailytica’s AI classification system powerful, but it still needs a set of email messages to train the AI model to recognize the email topic. The training process includes using an initial set of at least 10 labelled messages, although the recommended minimum amount is 30 for better results.
Mailytica uses machine learning techniques to generate statistical models from email messages. An important step involved in this process is training the AI model, so that it understands which type of messages should be labelled as that particular topic or business transaction.
Once trained, the model will be able to automatically classify incoming messages into pre-established topics.
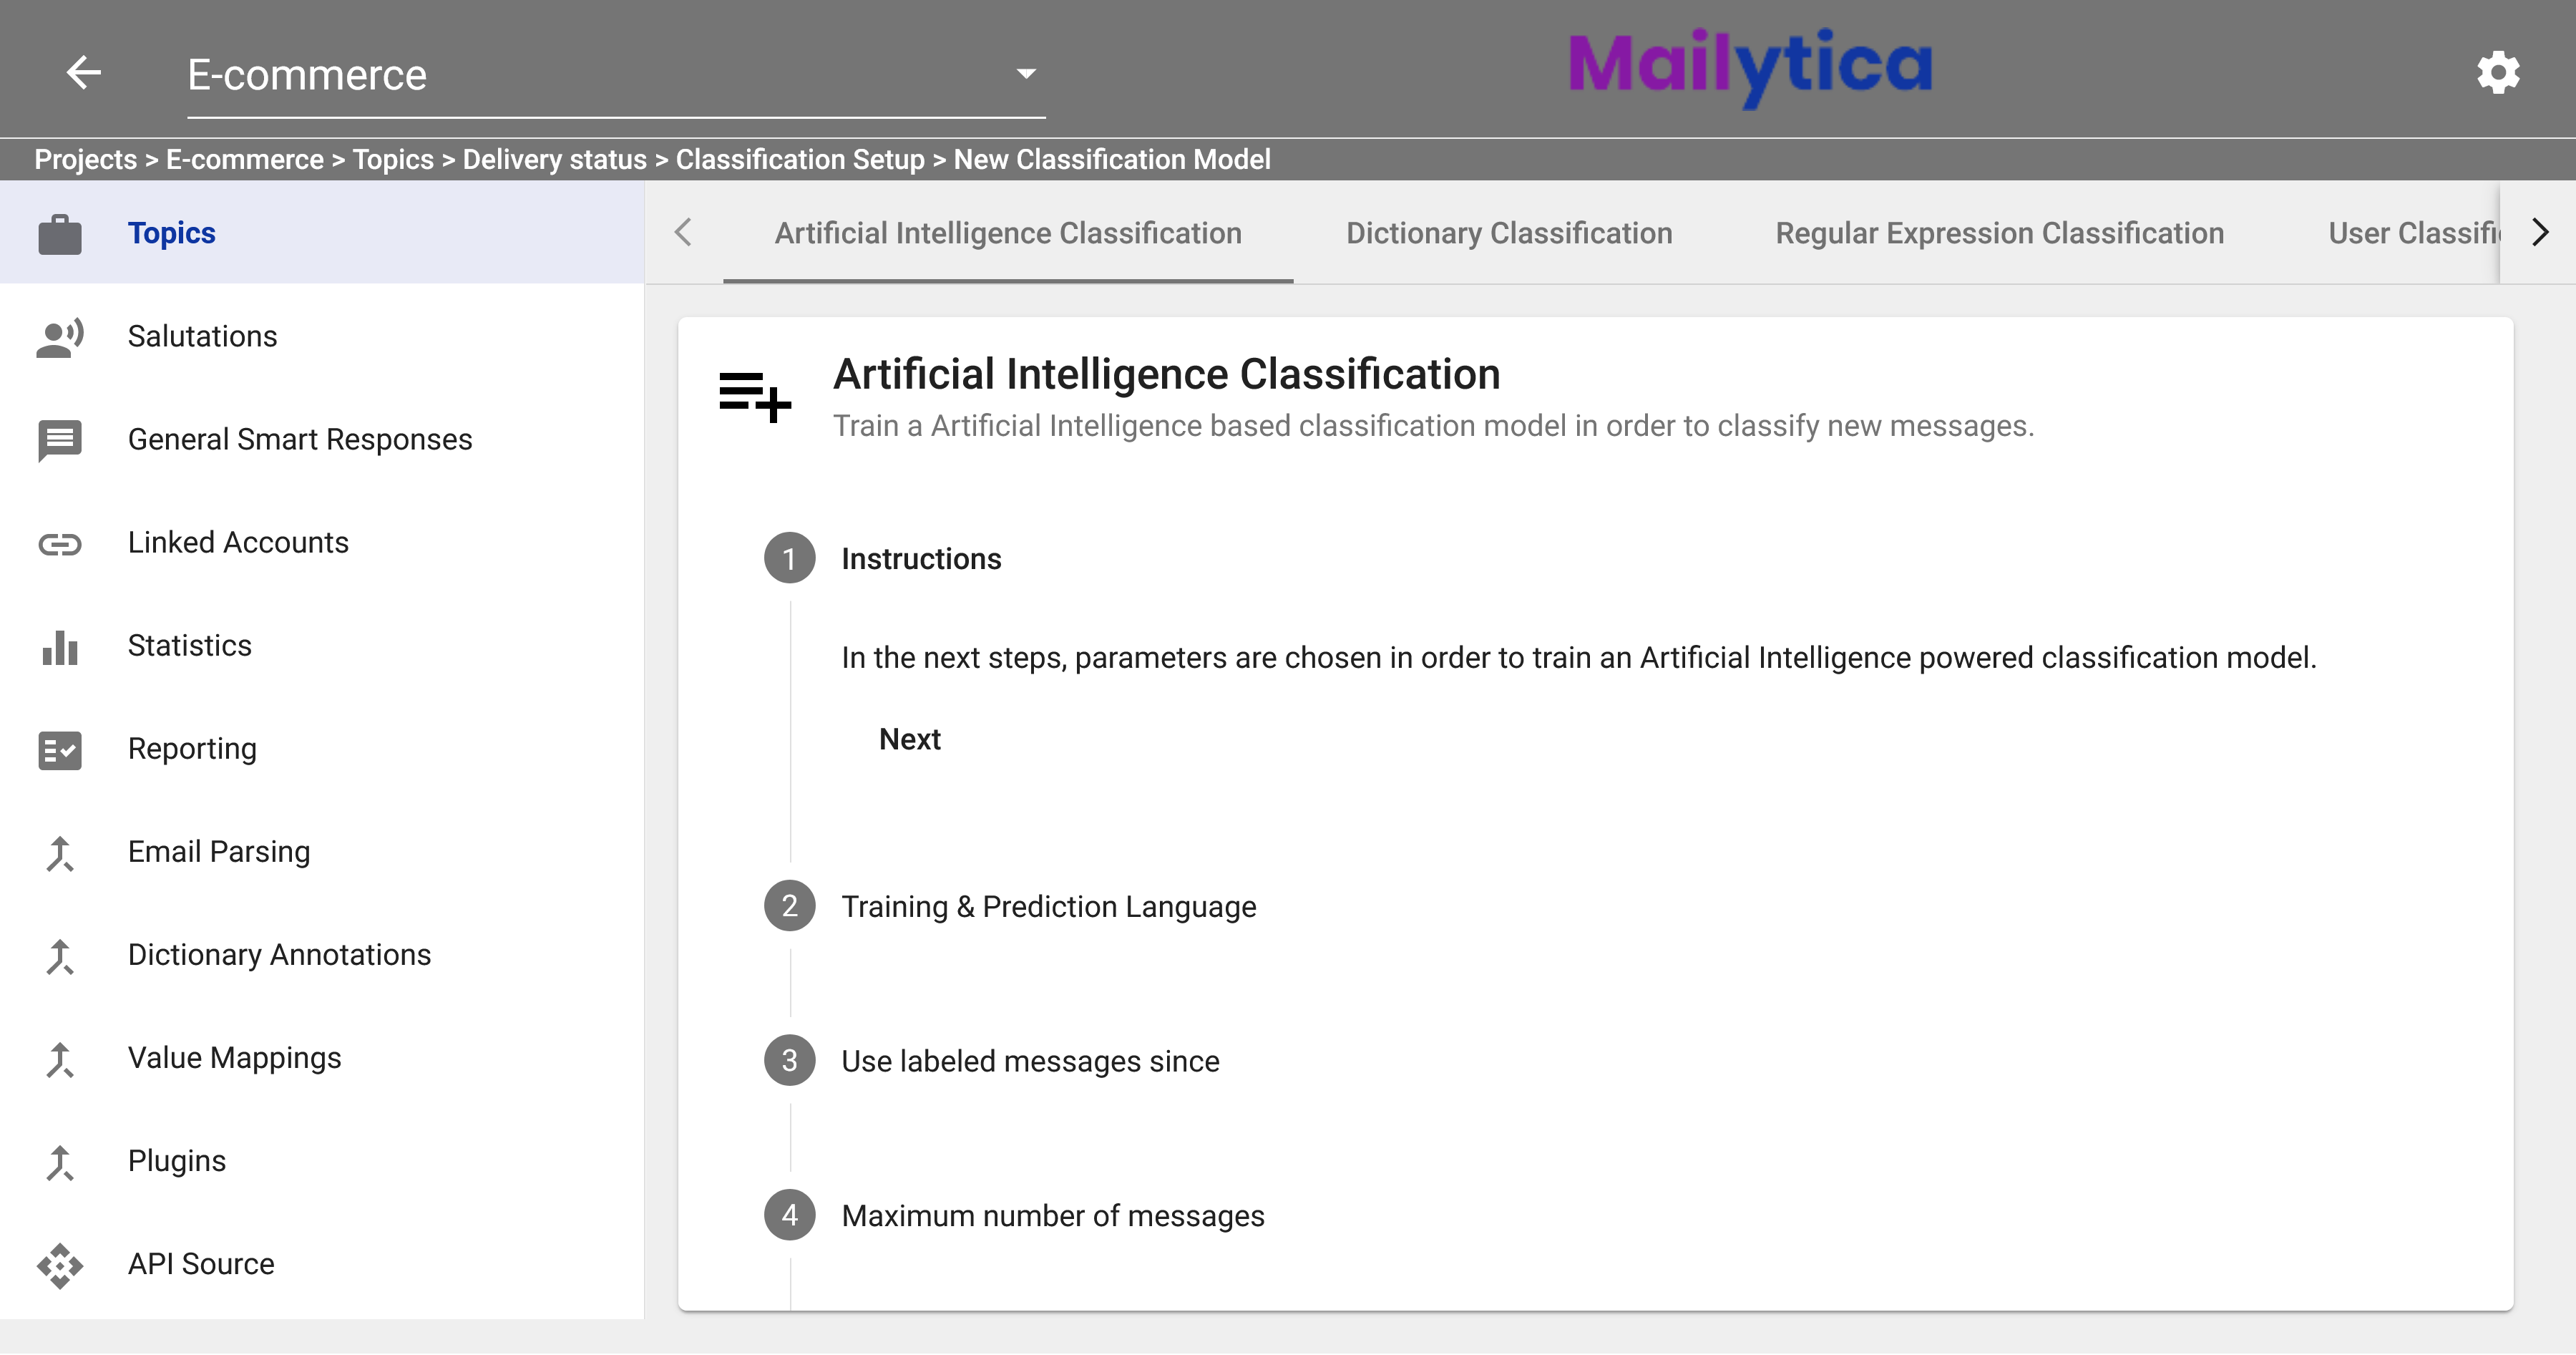
The following steps are required to create an Artificial Intelligence Classification model:
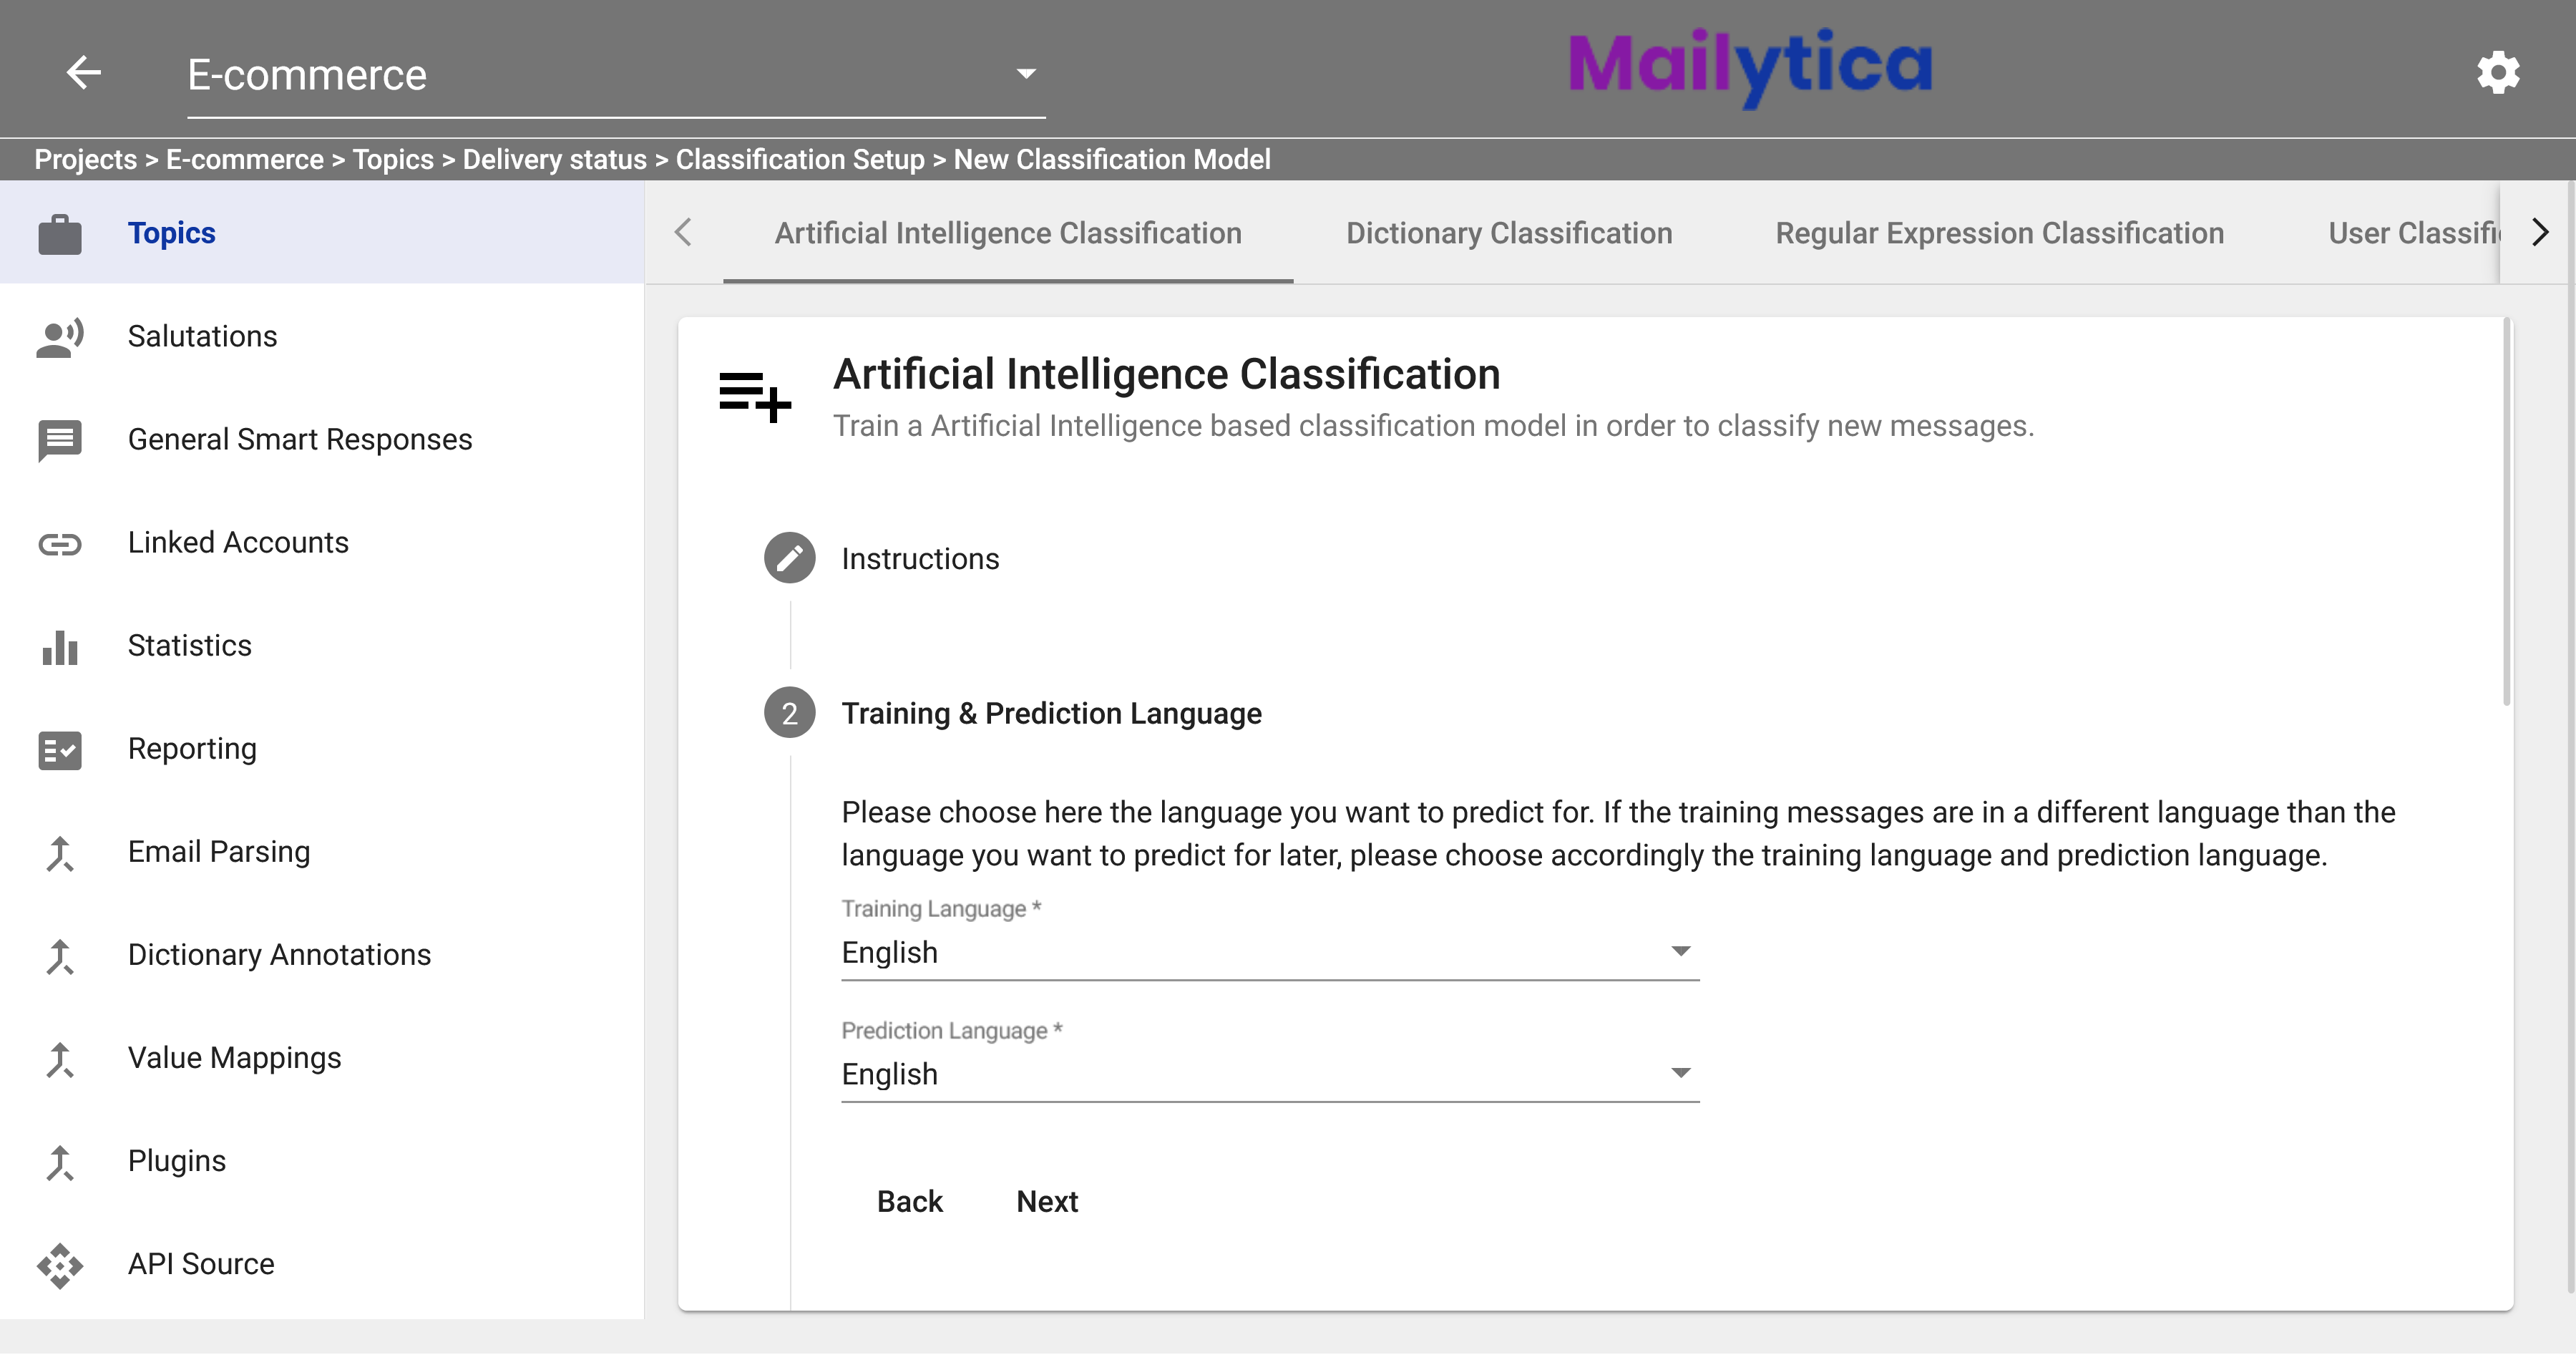
First, in the Classification Setup section, select Artificial Intelligence Classification from the top tab bar. The Artificial Intelligence Classification tab will show you the instructions on how to define your AI model. Click Next.
Under the Training Language section, you can select the language of your labelled messages. Mailytica will use these messages to understand the topics and then provide labels and predictions for new emails. For example, if you have a sample of emails already labelled in English with the topic Delivery Status, your training language would be English.
The Training Datasets section allows you to choose which messages Mailytica will use when training the model. Typically, training datasets are defined during the supervised training or manual labelling process. But with Mailytica, datasets can also be automatically created. For example, if you manually label your email messages, they will be saved to the Gold dataset. Similarly, if you use a dictionary model to classify your messages, they will be saved in the Dictionary dataset.
Note
If you’d like to learn more about training datasets, please see the Supervised Learning Process section for additional information.
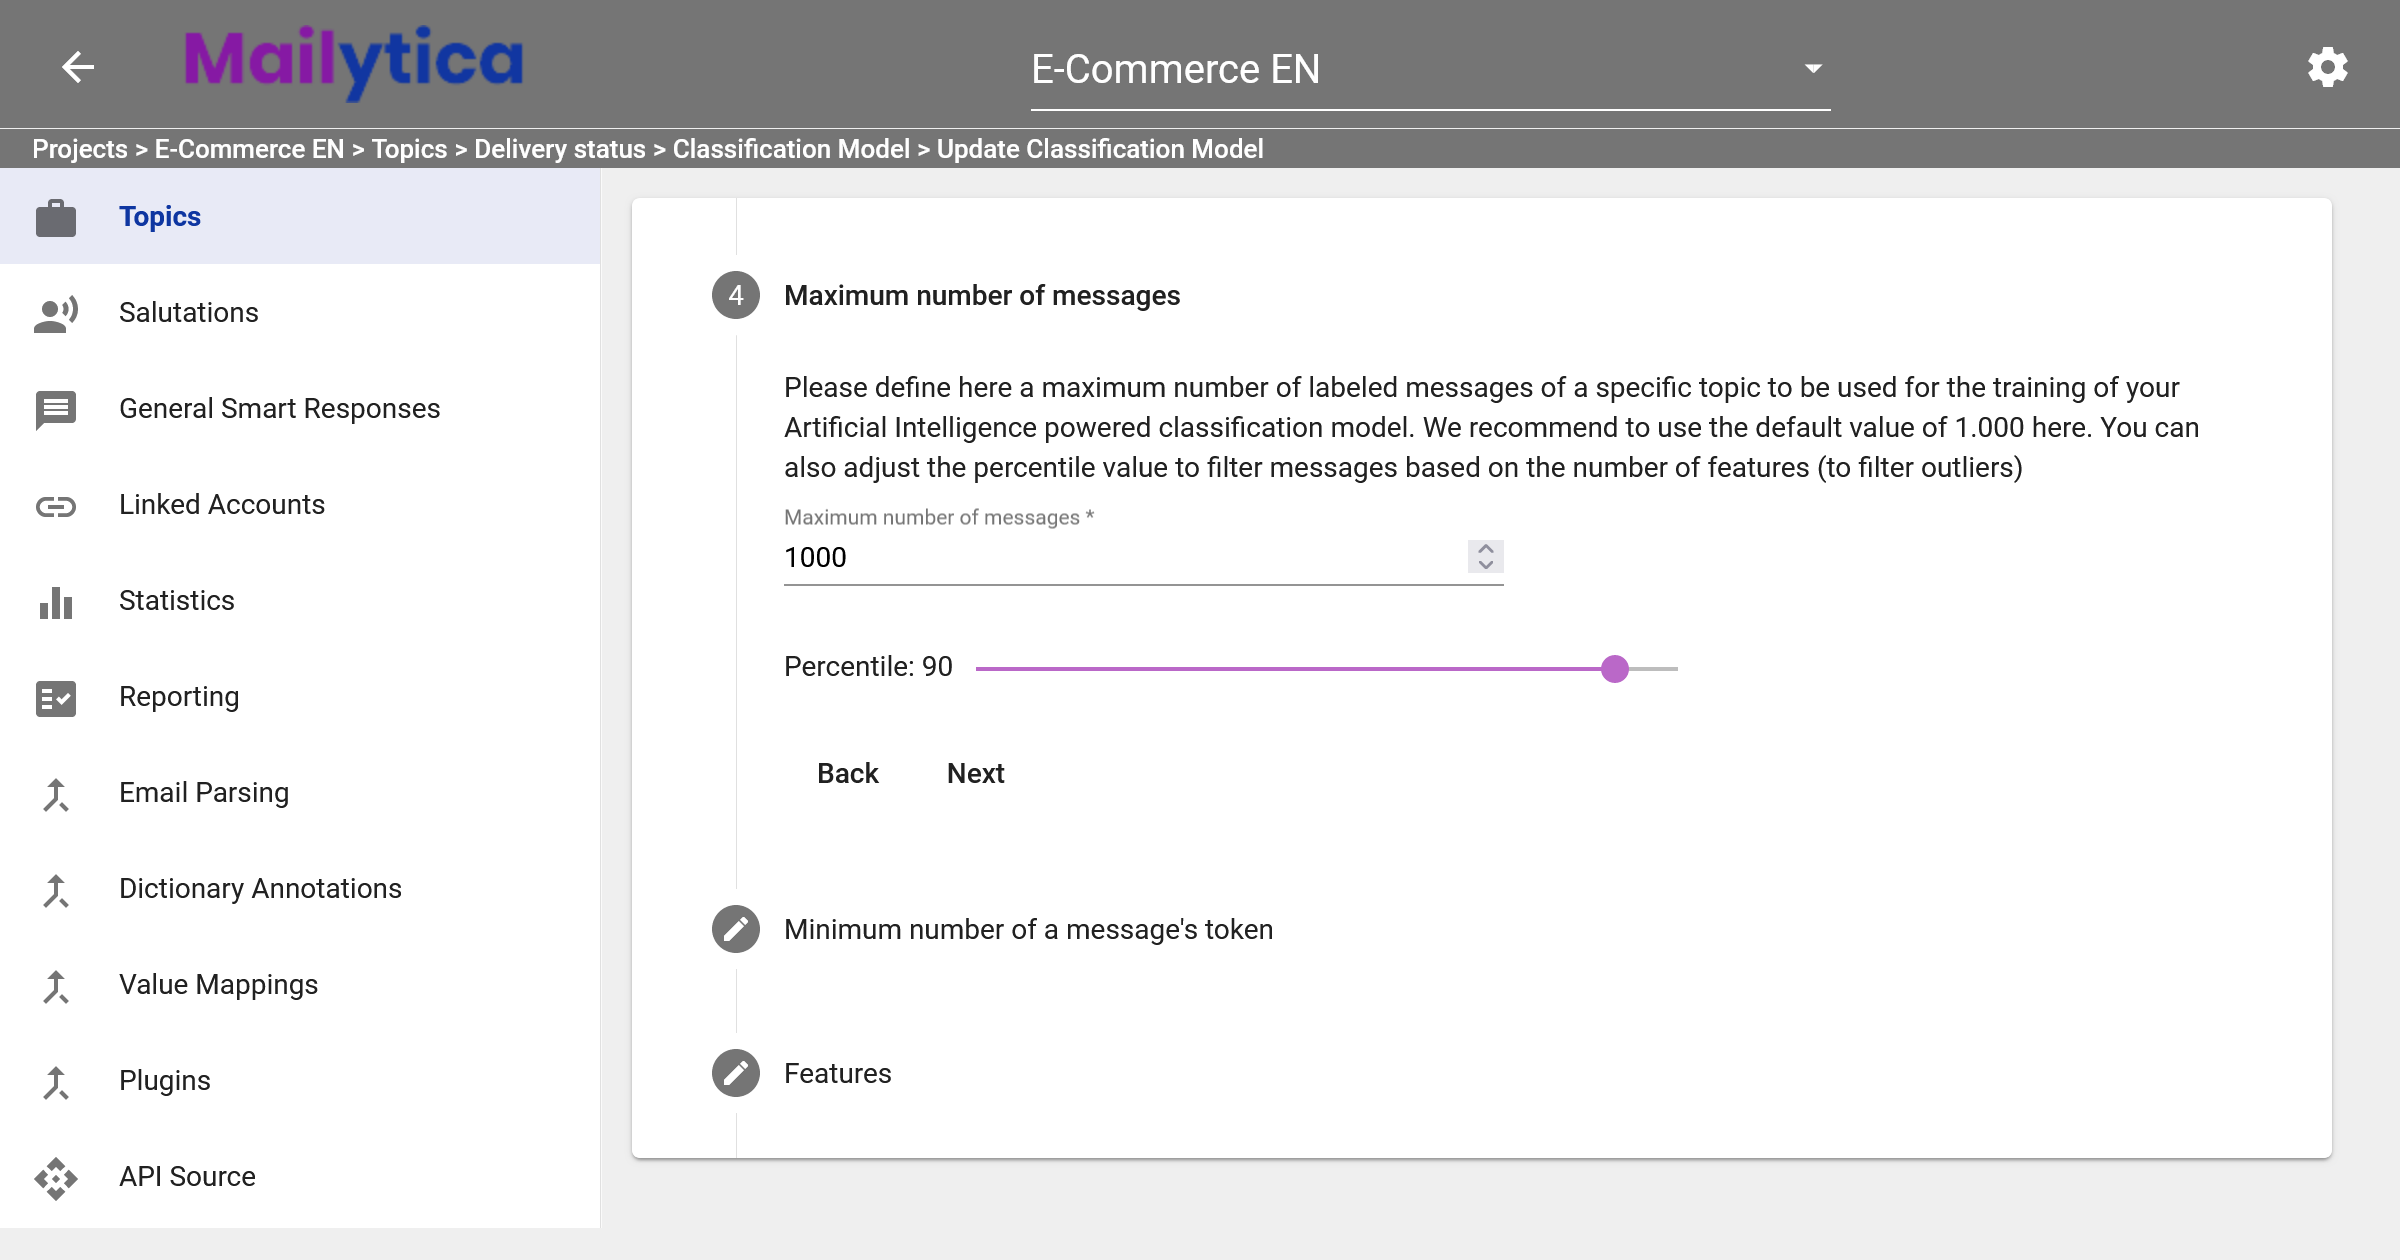
Next, under Maximum number of messages, you can define how many labelled messages will be used to train the AI classification model. The recommend default value is 1000. Additionally, you have the option to further refine the selection of messages using a percentile value. Setting this percentile value can be useful for discarding outlier data that might negatively impact model predictions. For more information on how to detect outliers, please visit the Messages section.
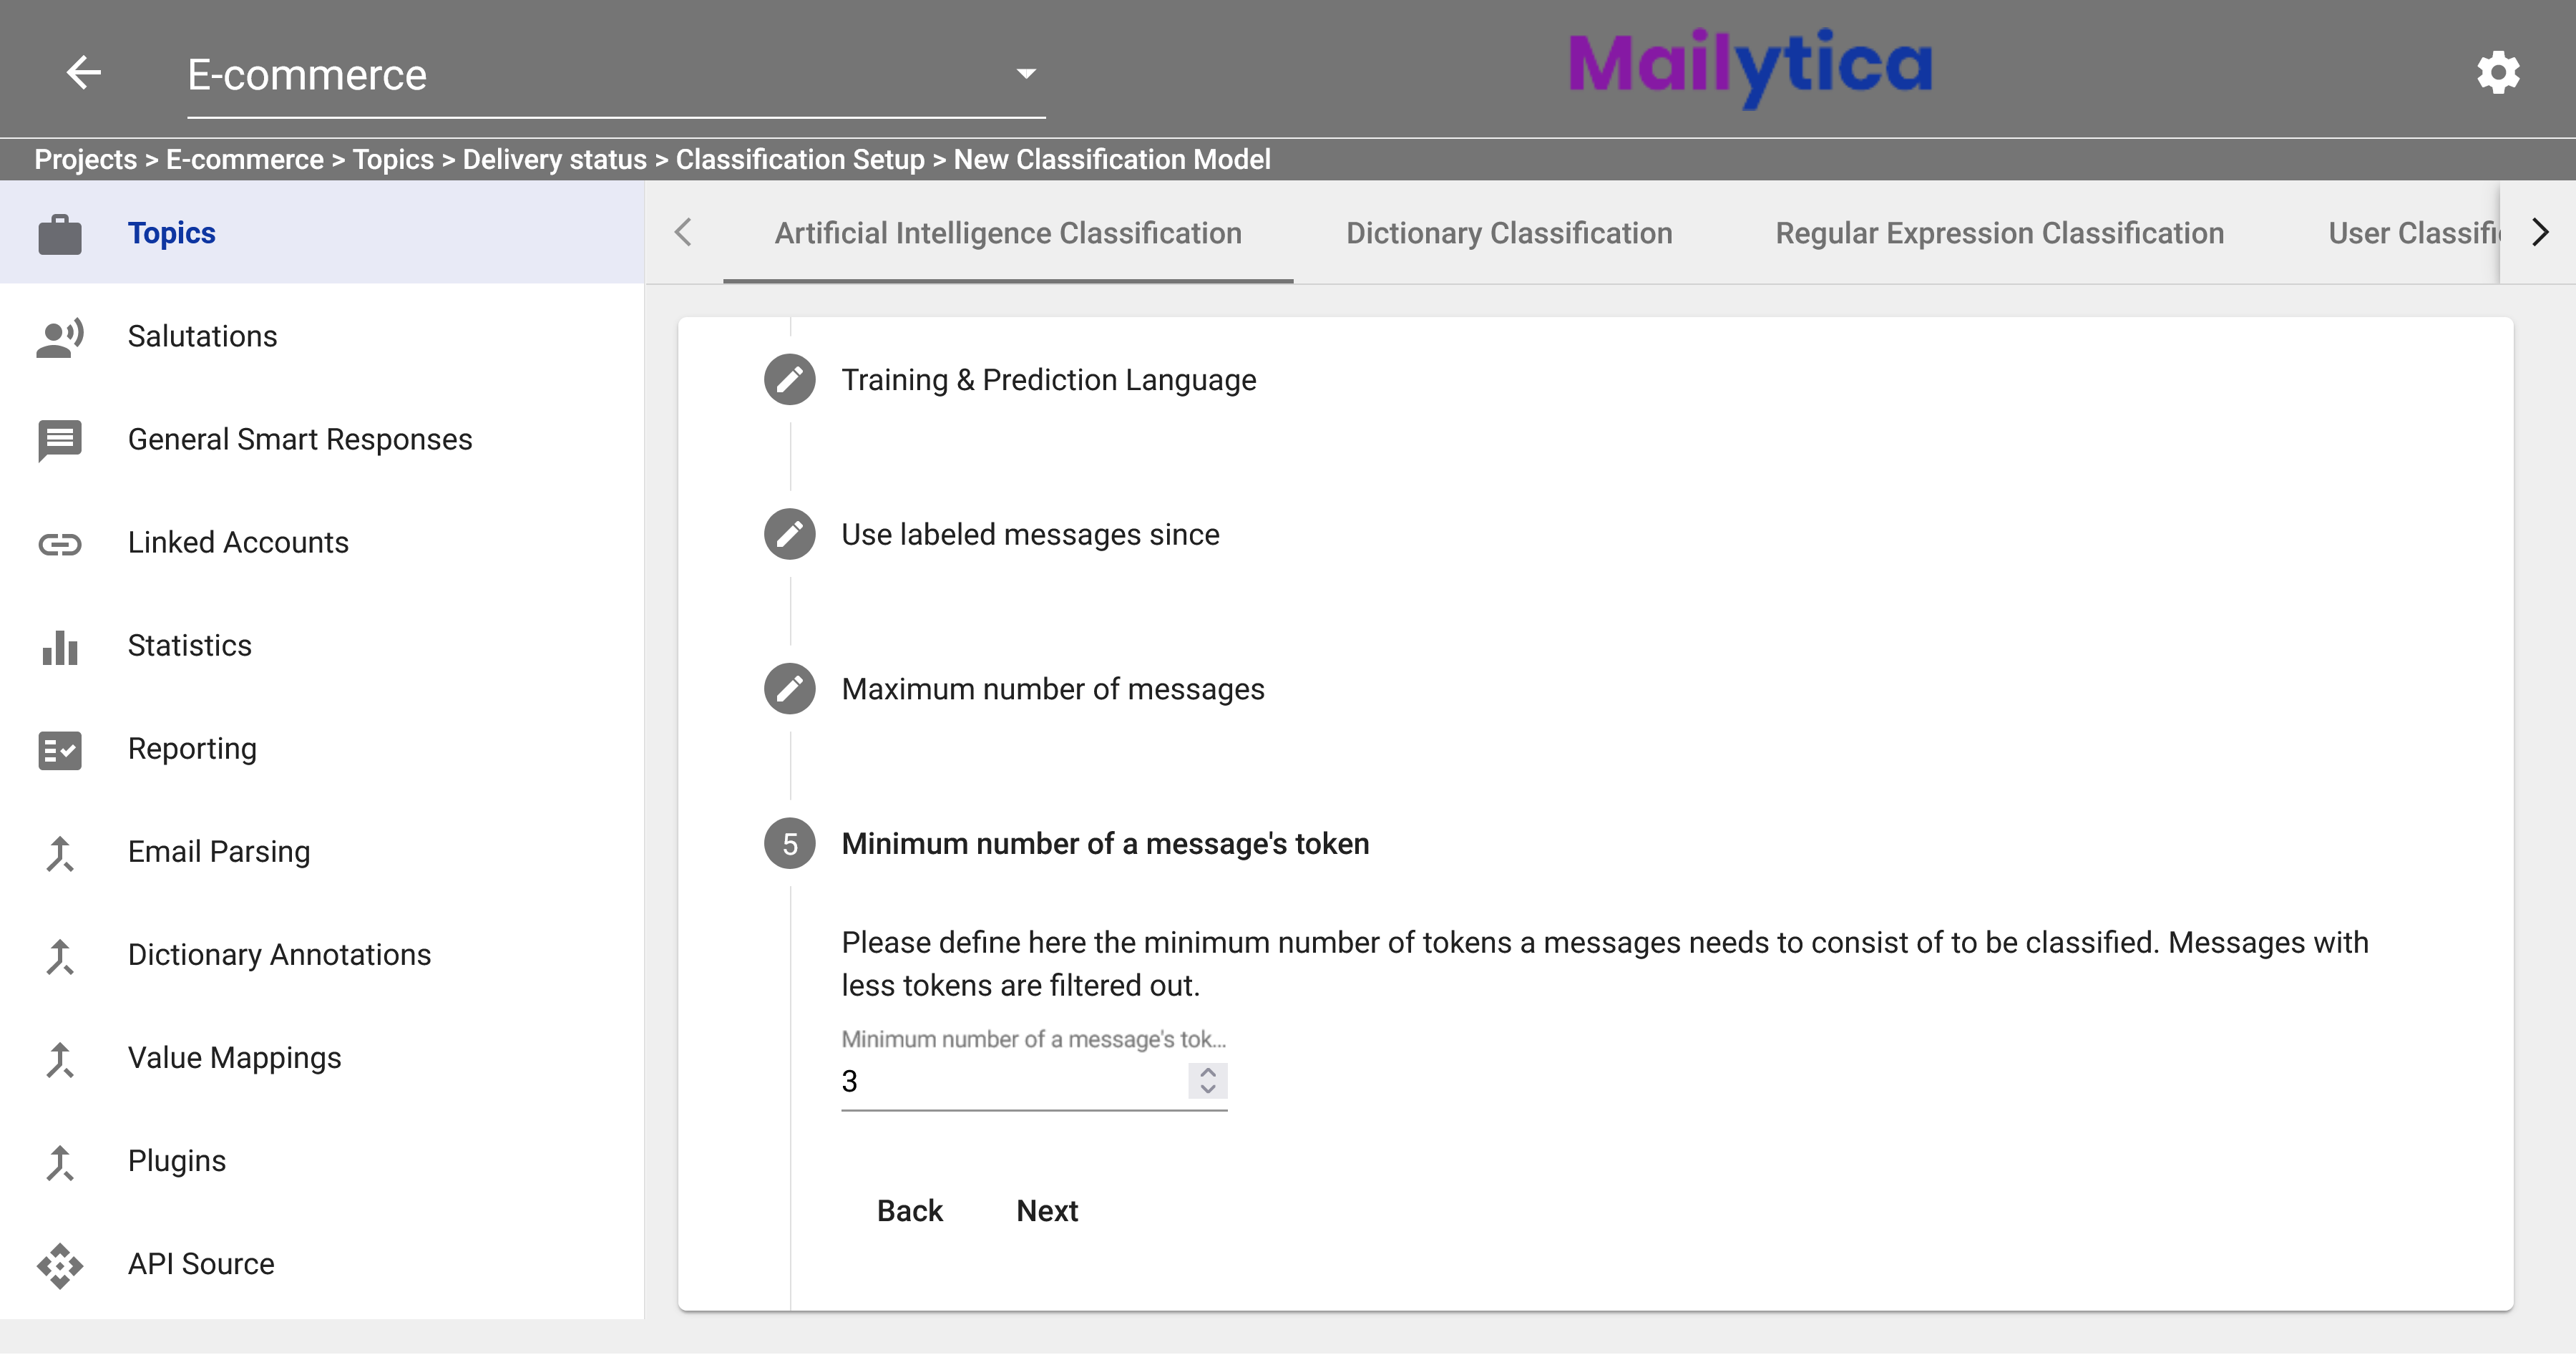
Then, in Minimum number of a message’s token, you can establish a minimum number of tokens necessary for classification. The recommended default value is 3. Tokens are just individual words in any email message. Setting the minimum value to 3 means that a message must contain at least 3 words to be considered for training.
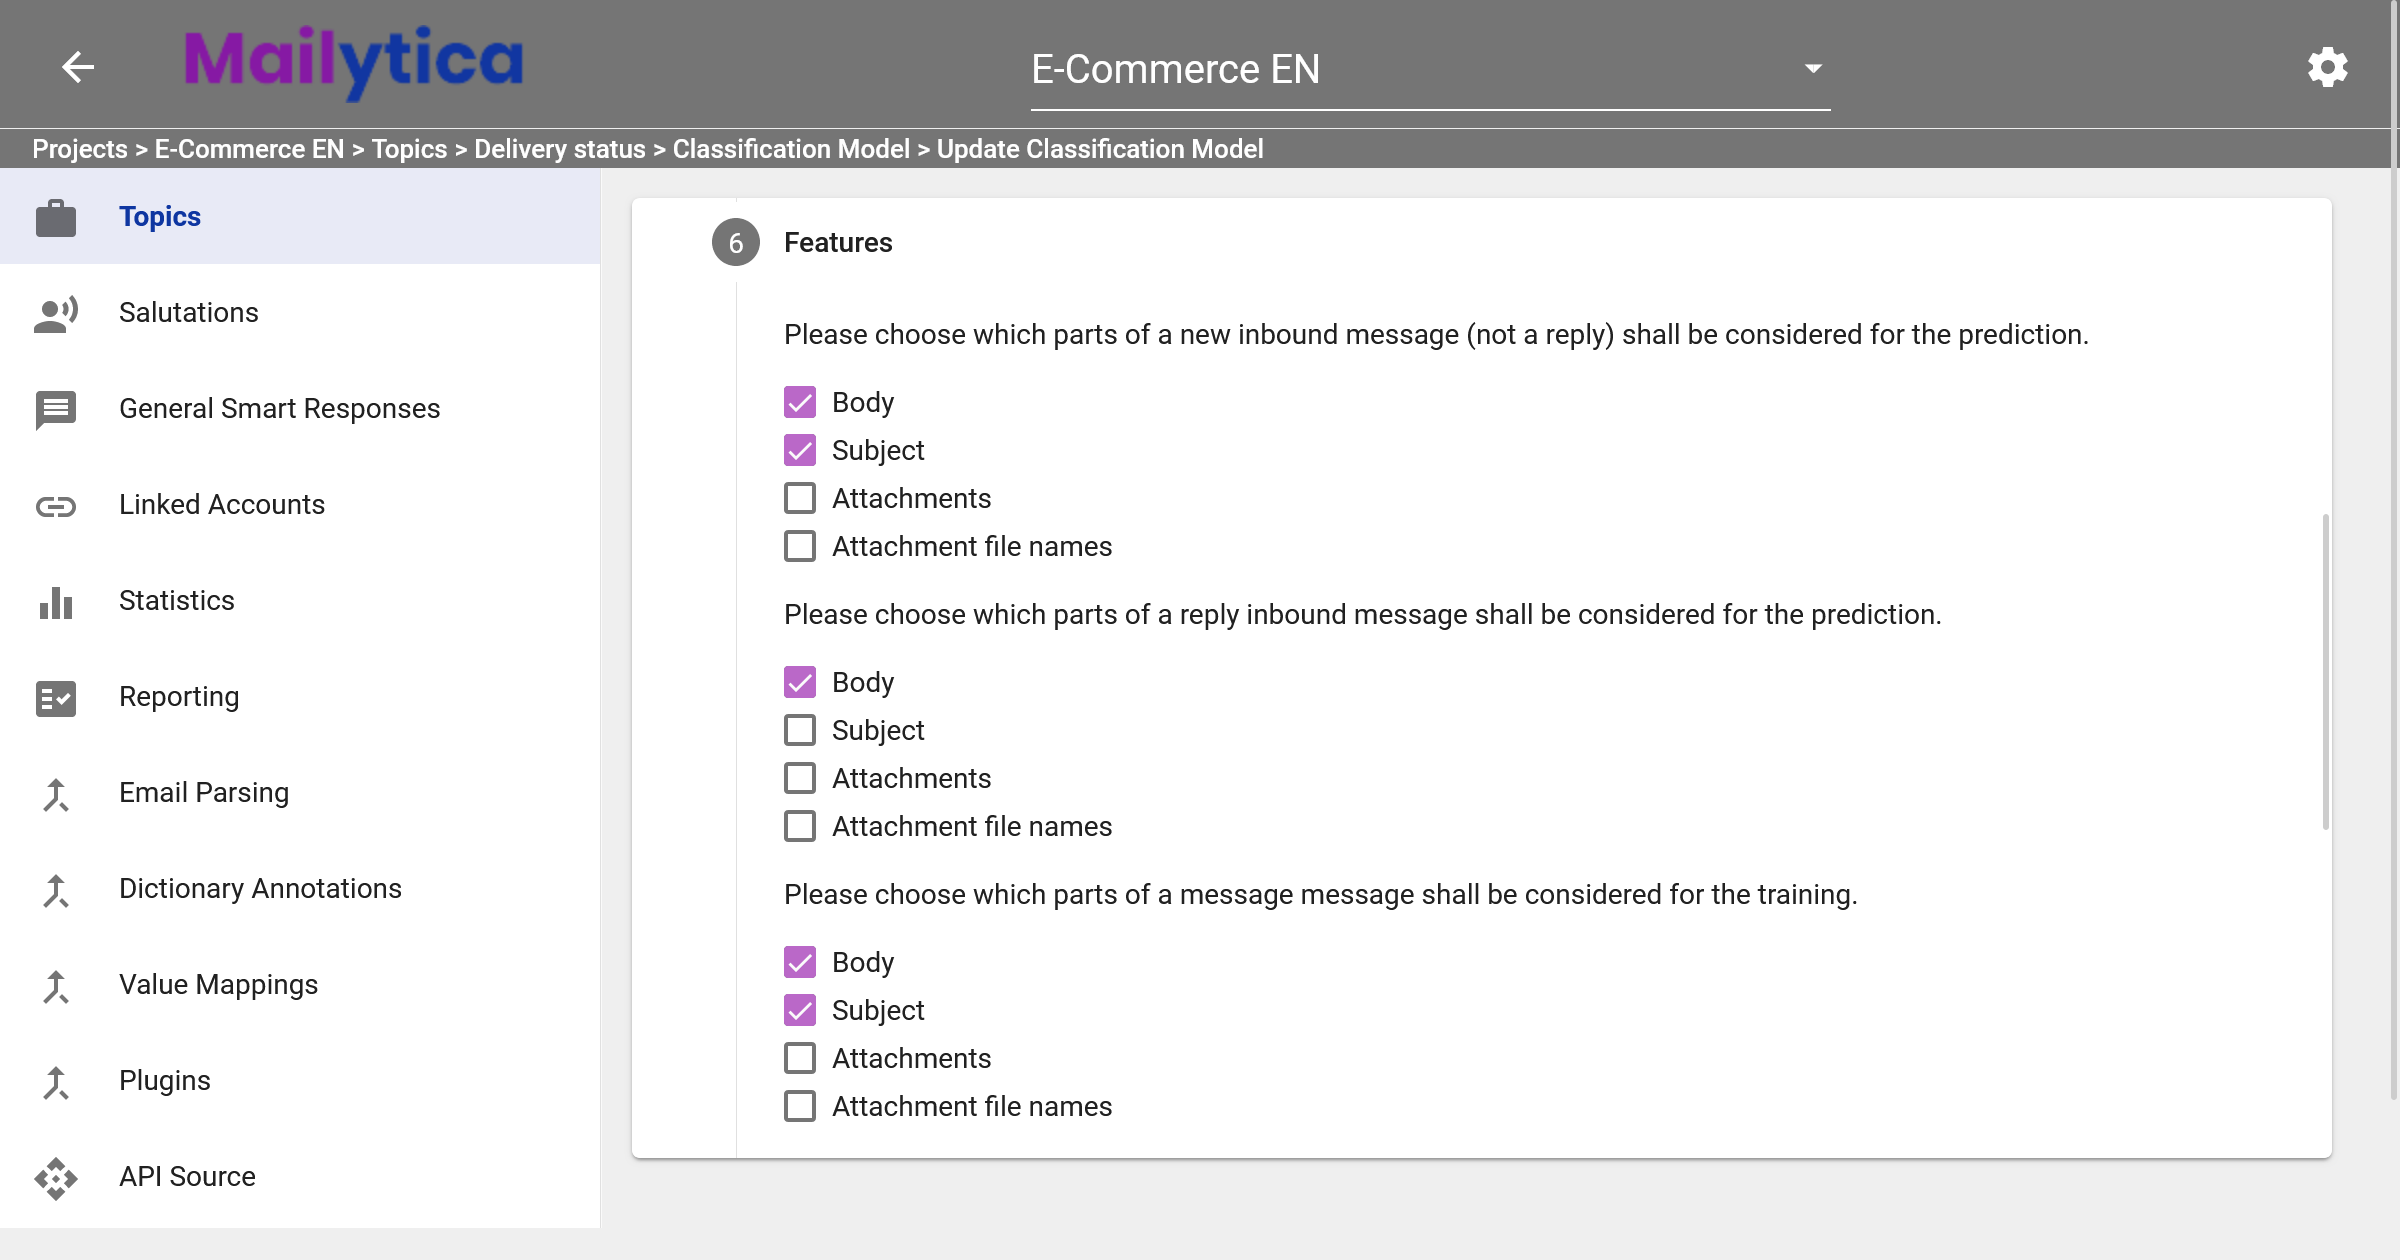
Following, in Features you can select which parts of the email message the AI classification model should consider. Choose from the available options, such as the email body, subject, attachment content, and/or attachment filenames. You have the flexibility to make multiple selections from these options. There are three distinct configurations to consider:
New Inbound Message: Choose which parts of a new incoming email (not a reply) should be considered for prediction.
Reply Inbound Message: Determine which parts of a reply email should be considered for prediction.
Message for Training: Select which parts of an email should be used during the training phase for the AI model.
Then, in Term discrimination you can choose the term discrimination type between TF-IDF (Term Frequency - Inverse Document Frequency) or TF-NBW (Term Frequency - Negative Binomial Weighting). The recommended value is TF-IDF. In addition, you can set Retrain term discrimination to Active if you want to reuse previously trained models for faster training time, or to Inactive if you prefer to train the model from scratch.
Note
In the context of Mailytica, term discrimination is the process of identifying terms that are commonly used in certain types of email messages. It is used to understand which emails go with which topics, for instance. As a general rule, term frequency (TF) measures how frequently a word occurs in your email corpus.
The two types of term discrimination options available for Mailytica are:
TF-IDF (Term Frequency - Inverse Document Frequency): TF-IDF measures how important a term is in a given piece of text. DF (document frequency) measures the occurrences of a term. IDF (inverse document frequency) is the inverse, therefore it measures the informativeness of a term. When we calculate the IDF, it will be very low for the most occurring words, such as stop words, and higher for the most relevant words.
TF-NBW (Term Frequency - Negative Binomial Weighting): A new term frequency method that allocates term weights according to the negative binomial. The benefits of this new method come in the form of better accuracy than typical TF-IDF methods. For more information on TF-NBW please make sure to check this paper.
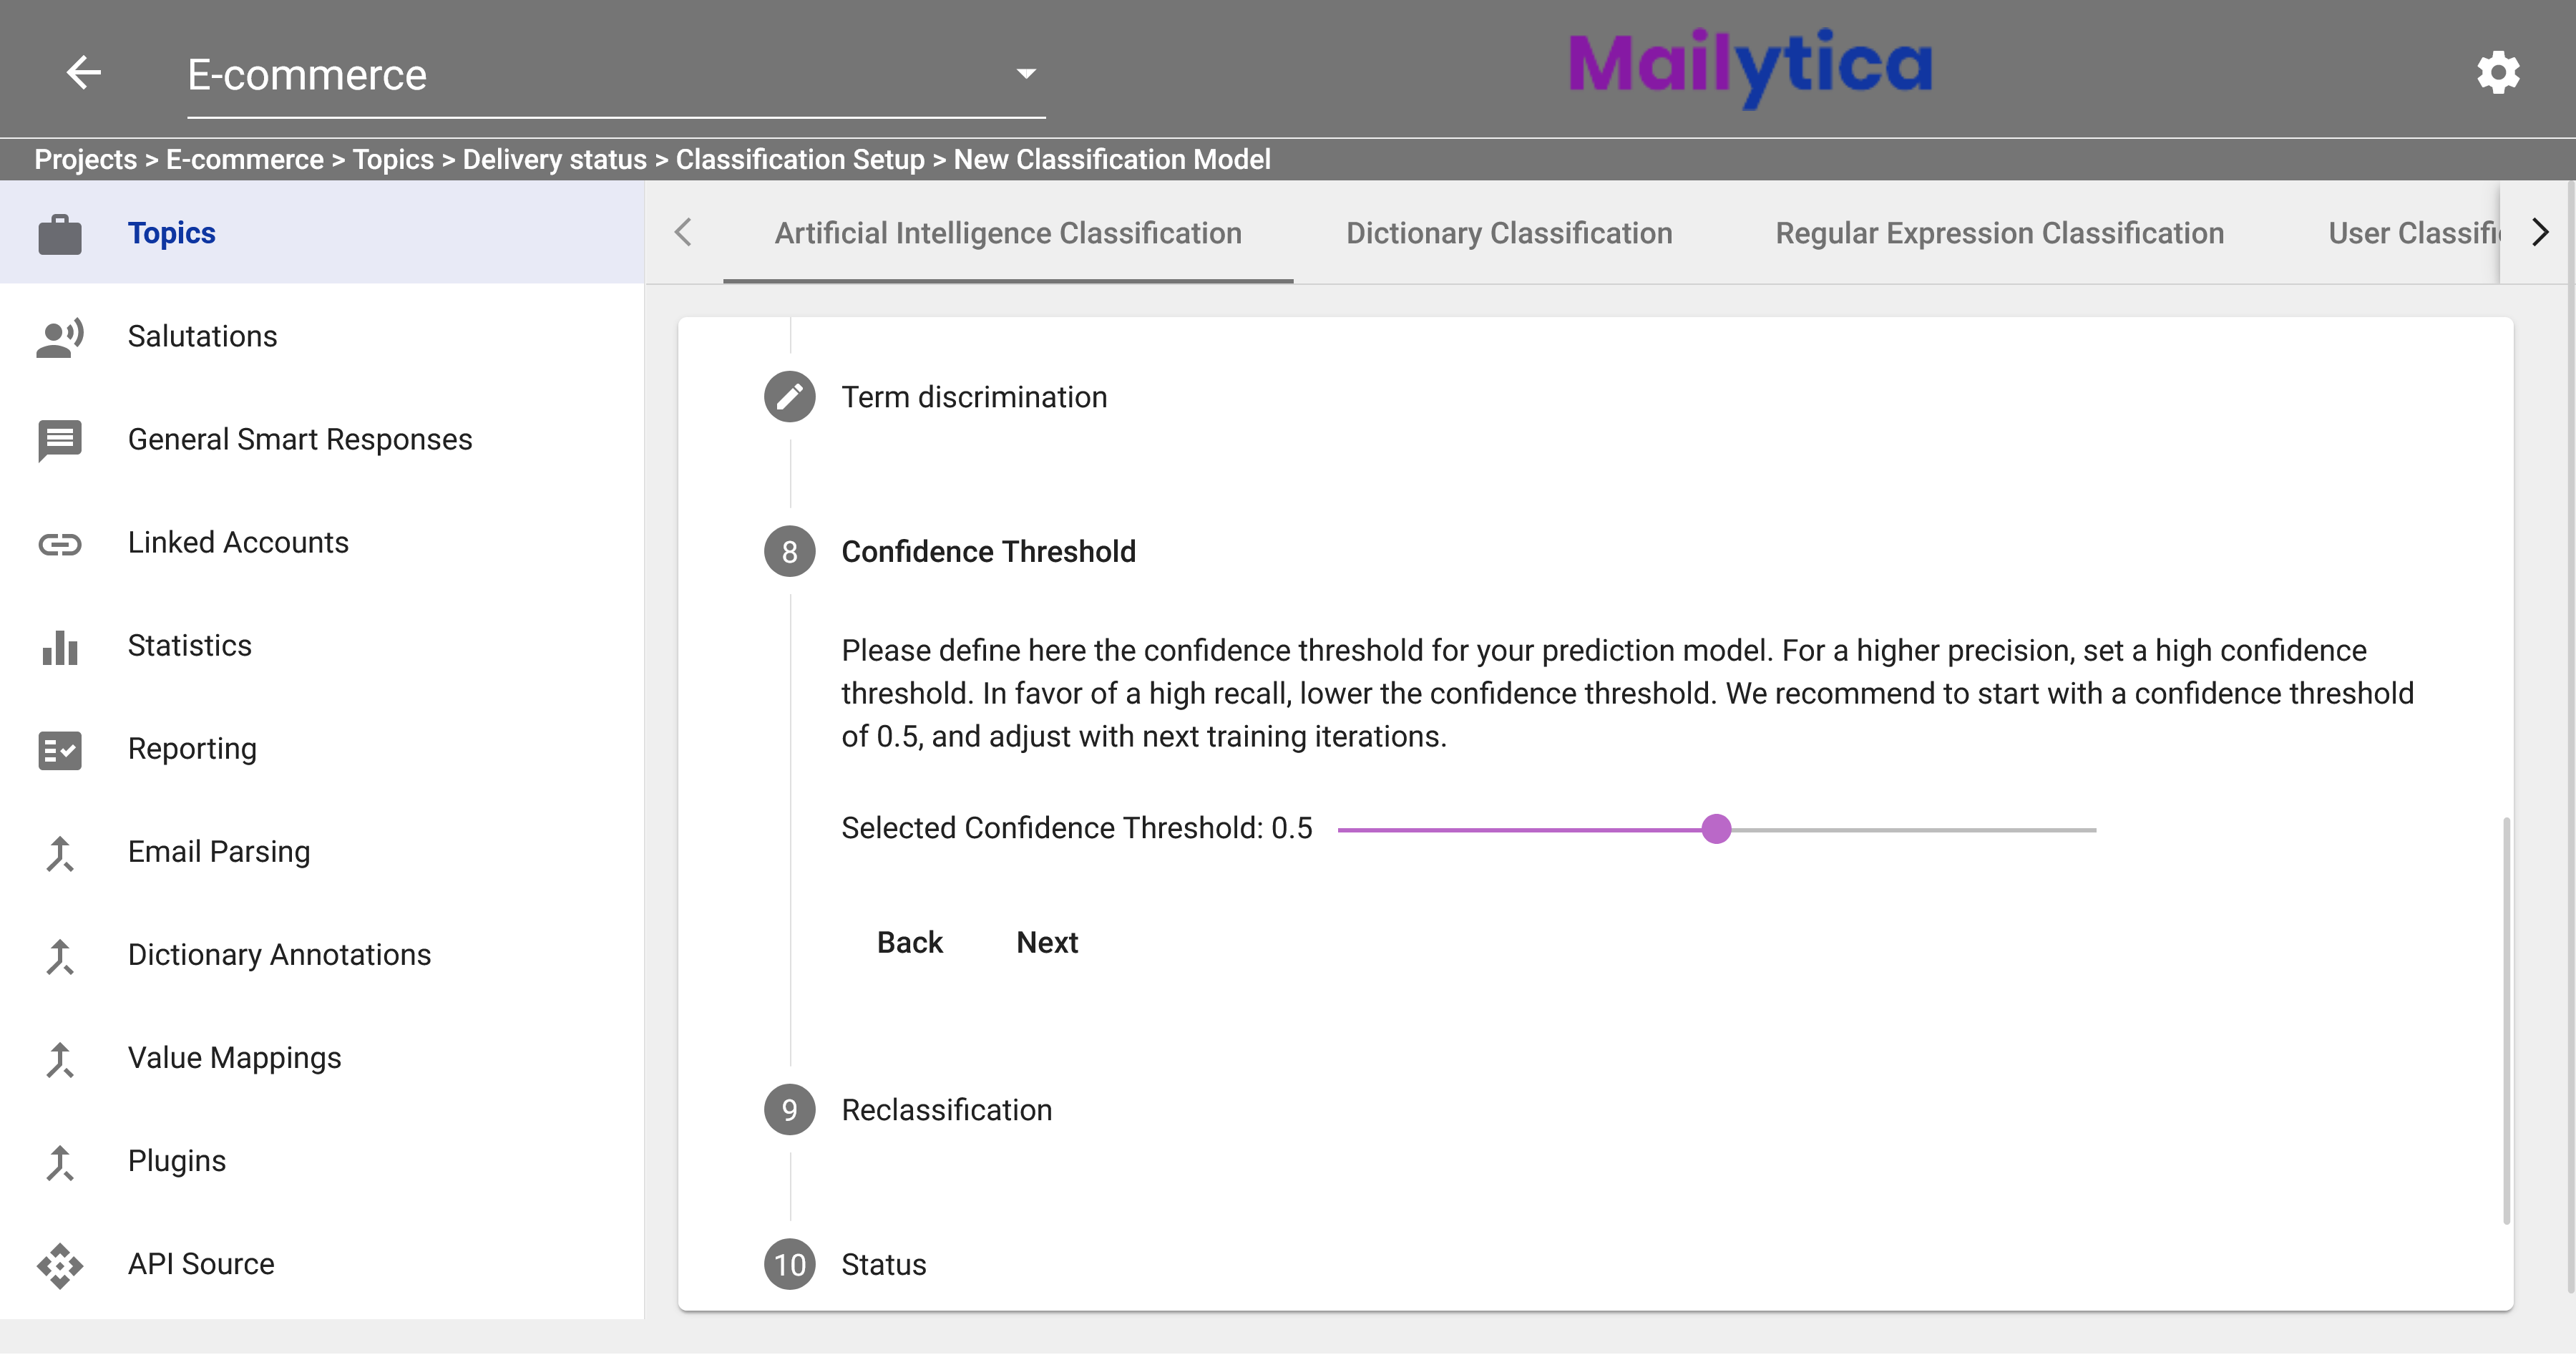
Now you should set the correct Confidence Threshold for your AI classification model. A confidence score is a number between 0 and 1 that represents the probability that the model has correctly classified the email message. For instance, if you set a threshold of 0.5 it means that you will reject all predictions with a confidence score below or equal to 0.5. For higher precision, set a high confidence threshold; for higher recall, lower the confidence threshold. As an example, if you are unsure of what accuracy would suit you best, we recommend starting with a threshold of 0.5, and adjust with next training iterations.
Tip
The trade-off between precision and recall is important to keep in mind when choosing a confidence threshold for your AI classification model.
If you need a higher level of precision (or accuracy), then increase the threshold. Mailytica will only classify an email message if it’s extremely confident, which means it will be much more likely to choose the right classification. However, it might leave some messages unclassified. For example, in our Delivery Status topic, if you set the threshold at 0.8, then you might miss some messages that are somewhat ambiguous like “what is the date?”.
If recall (or coverage) is more important, and you want to classify as many emails as possible then lower the threshold. This means there could be more cases where the email message is classified as that particular topic. For example, if you set the threshold to 0.3, messages such as “what is the status?” might be classified as Delivery Status.
For more information on confidence thresholds, confidence scores, precision, and recall please visit the Glossary or The confidence score of an answer.
Next, in Reclassification you can choose whether to include already seen messages in the classification model. If this is disabled, only new and unseen email messages will be classified.
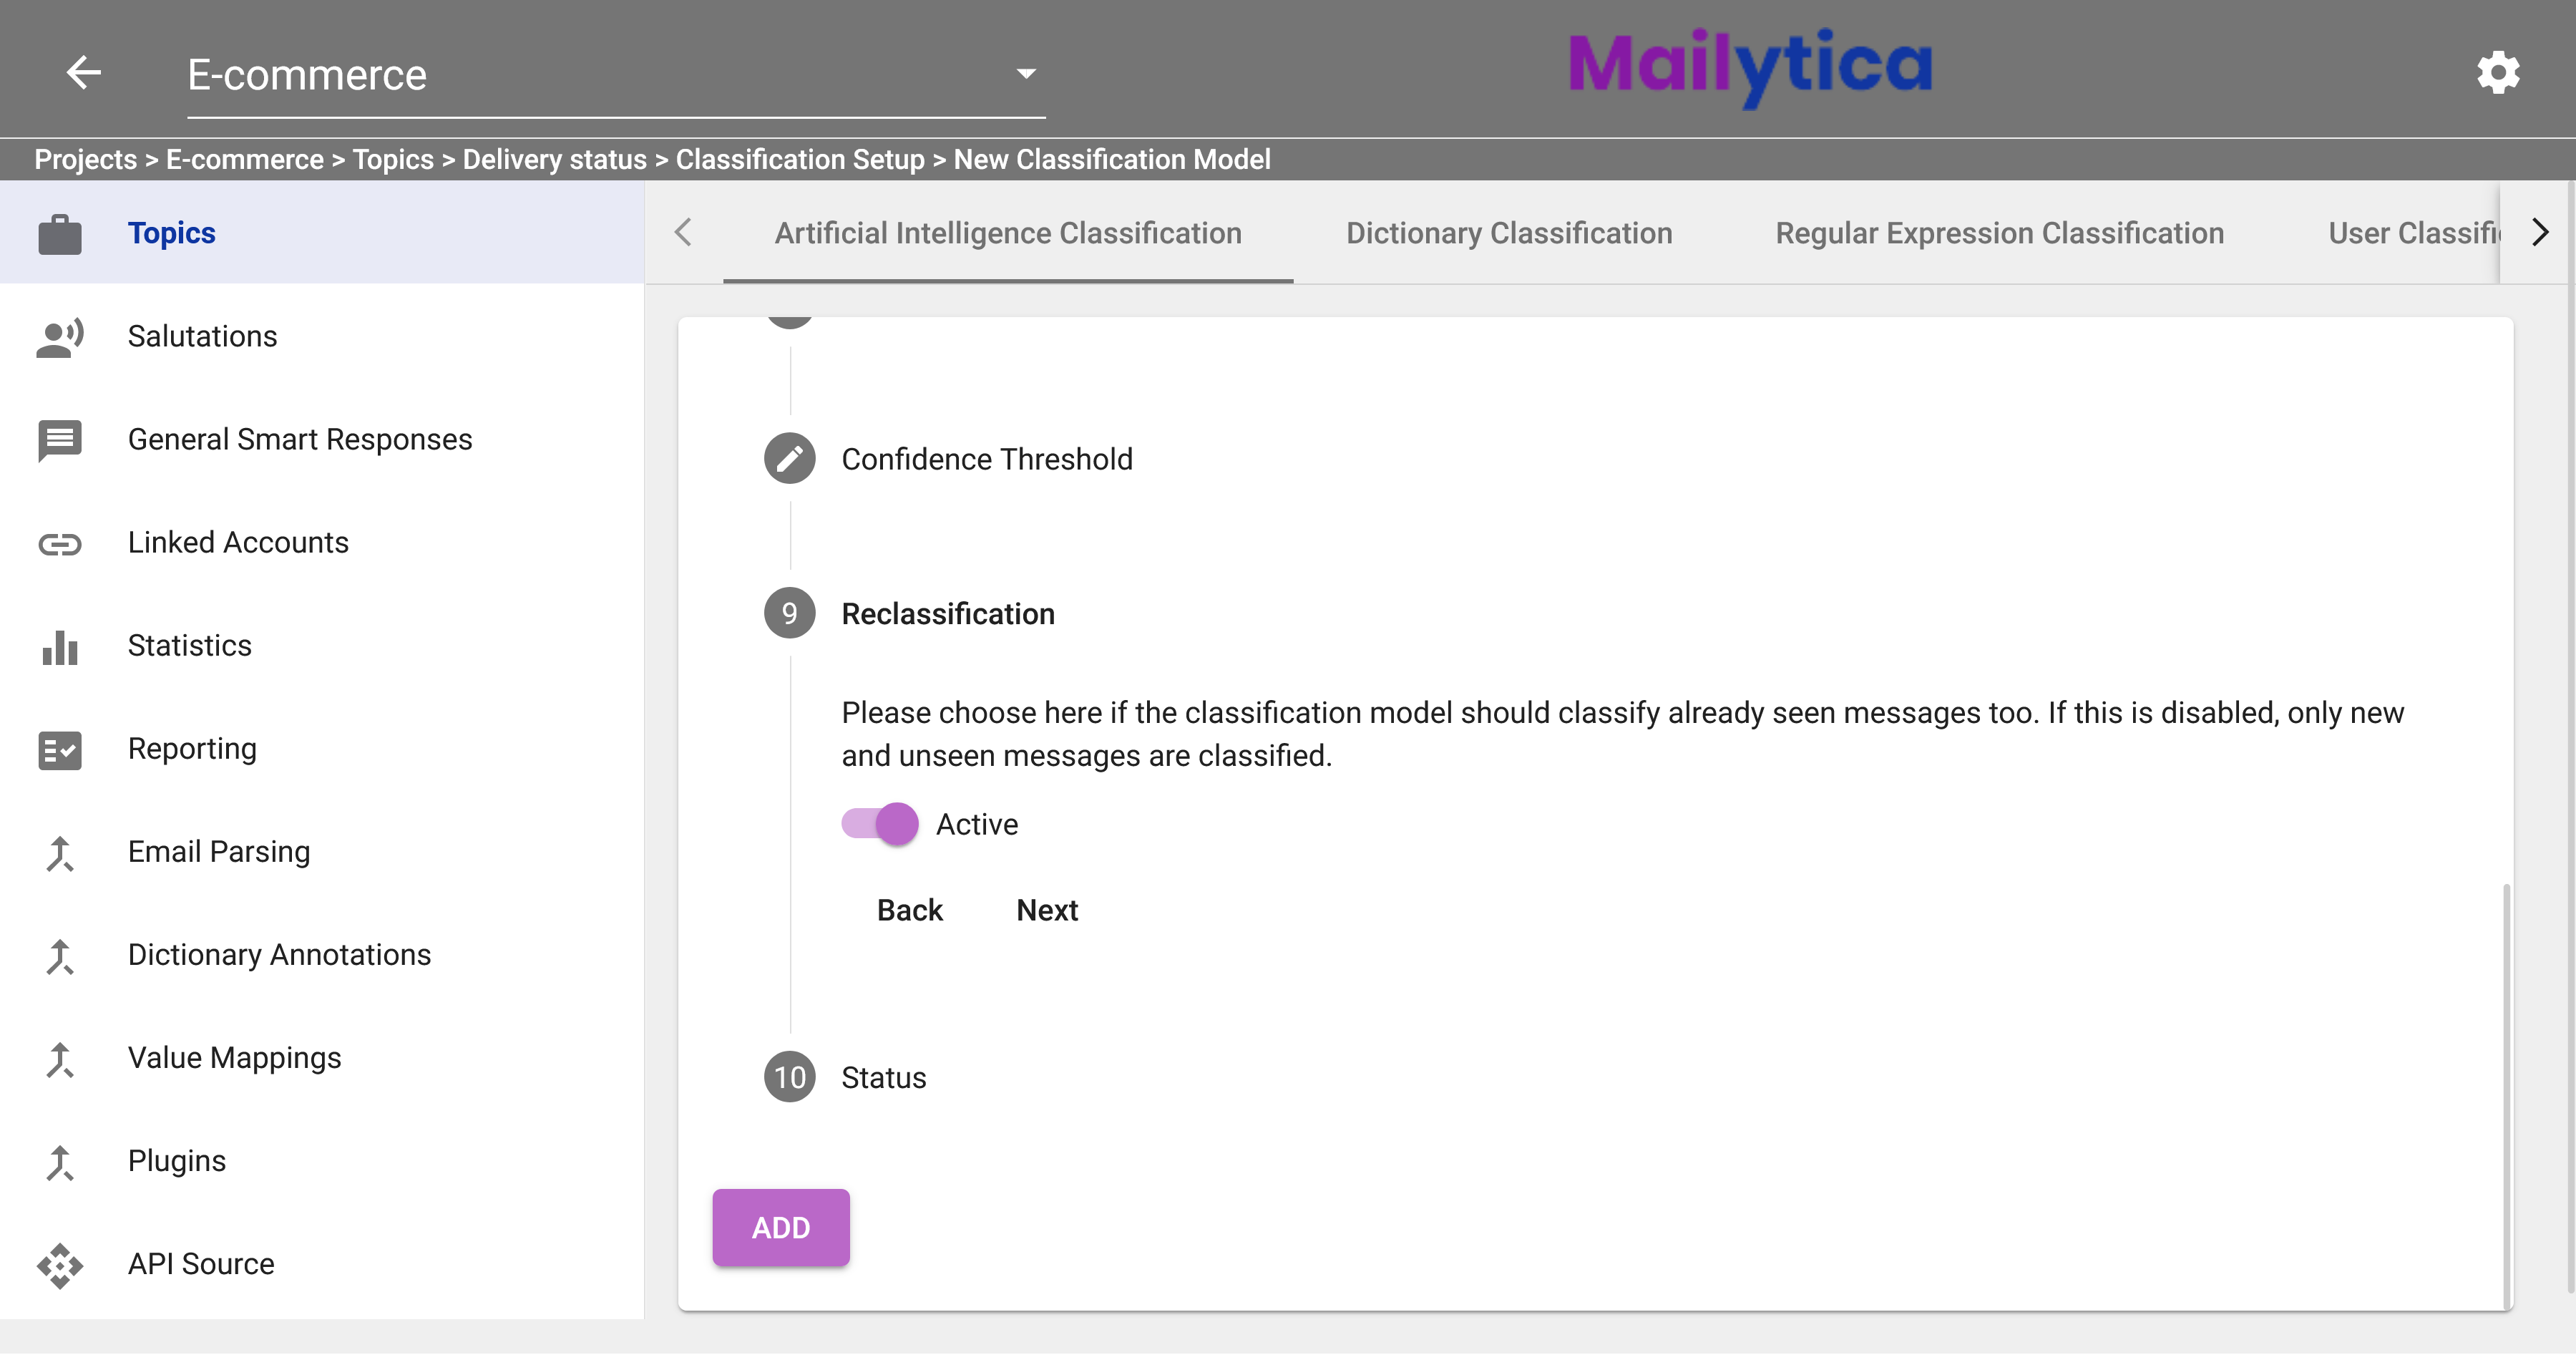
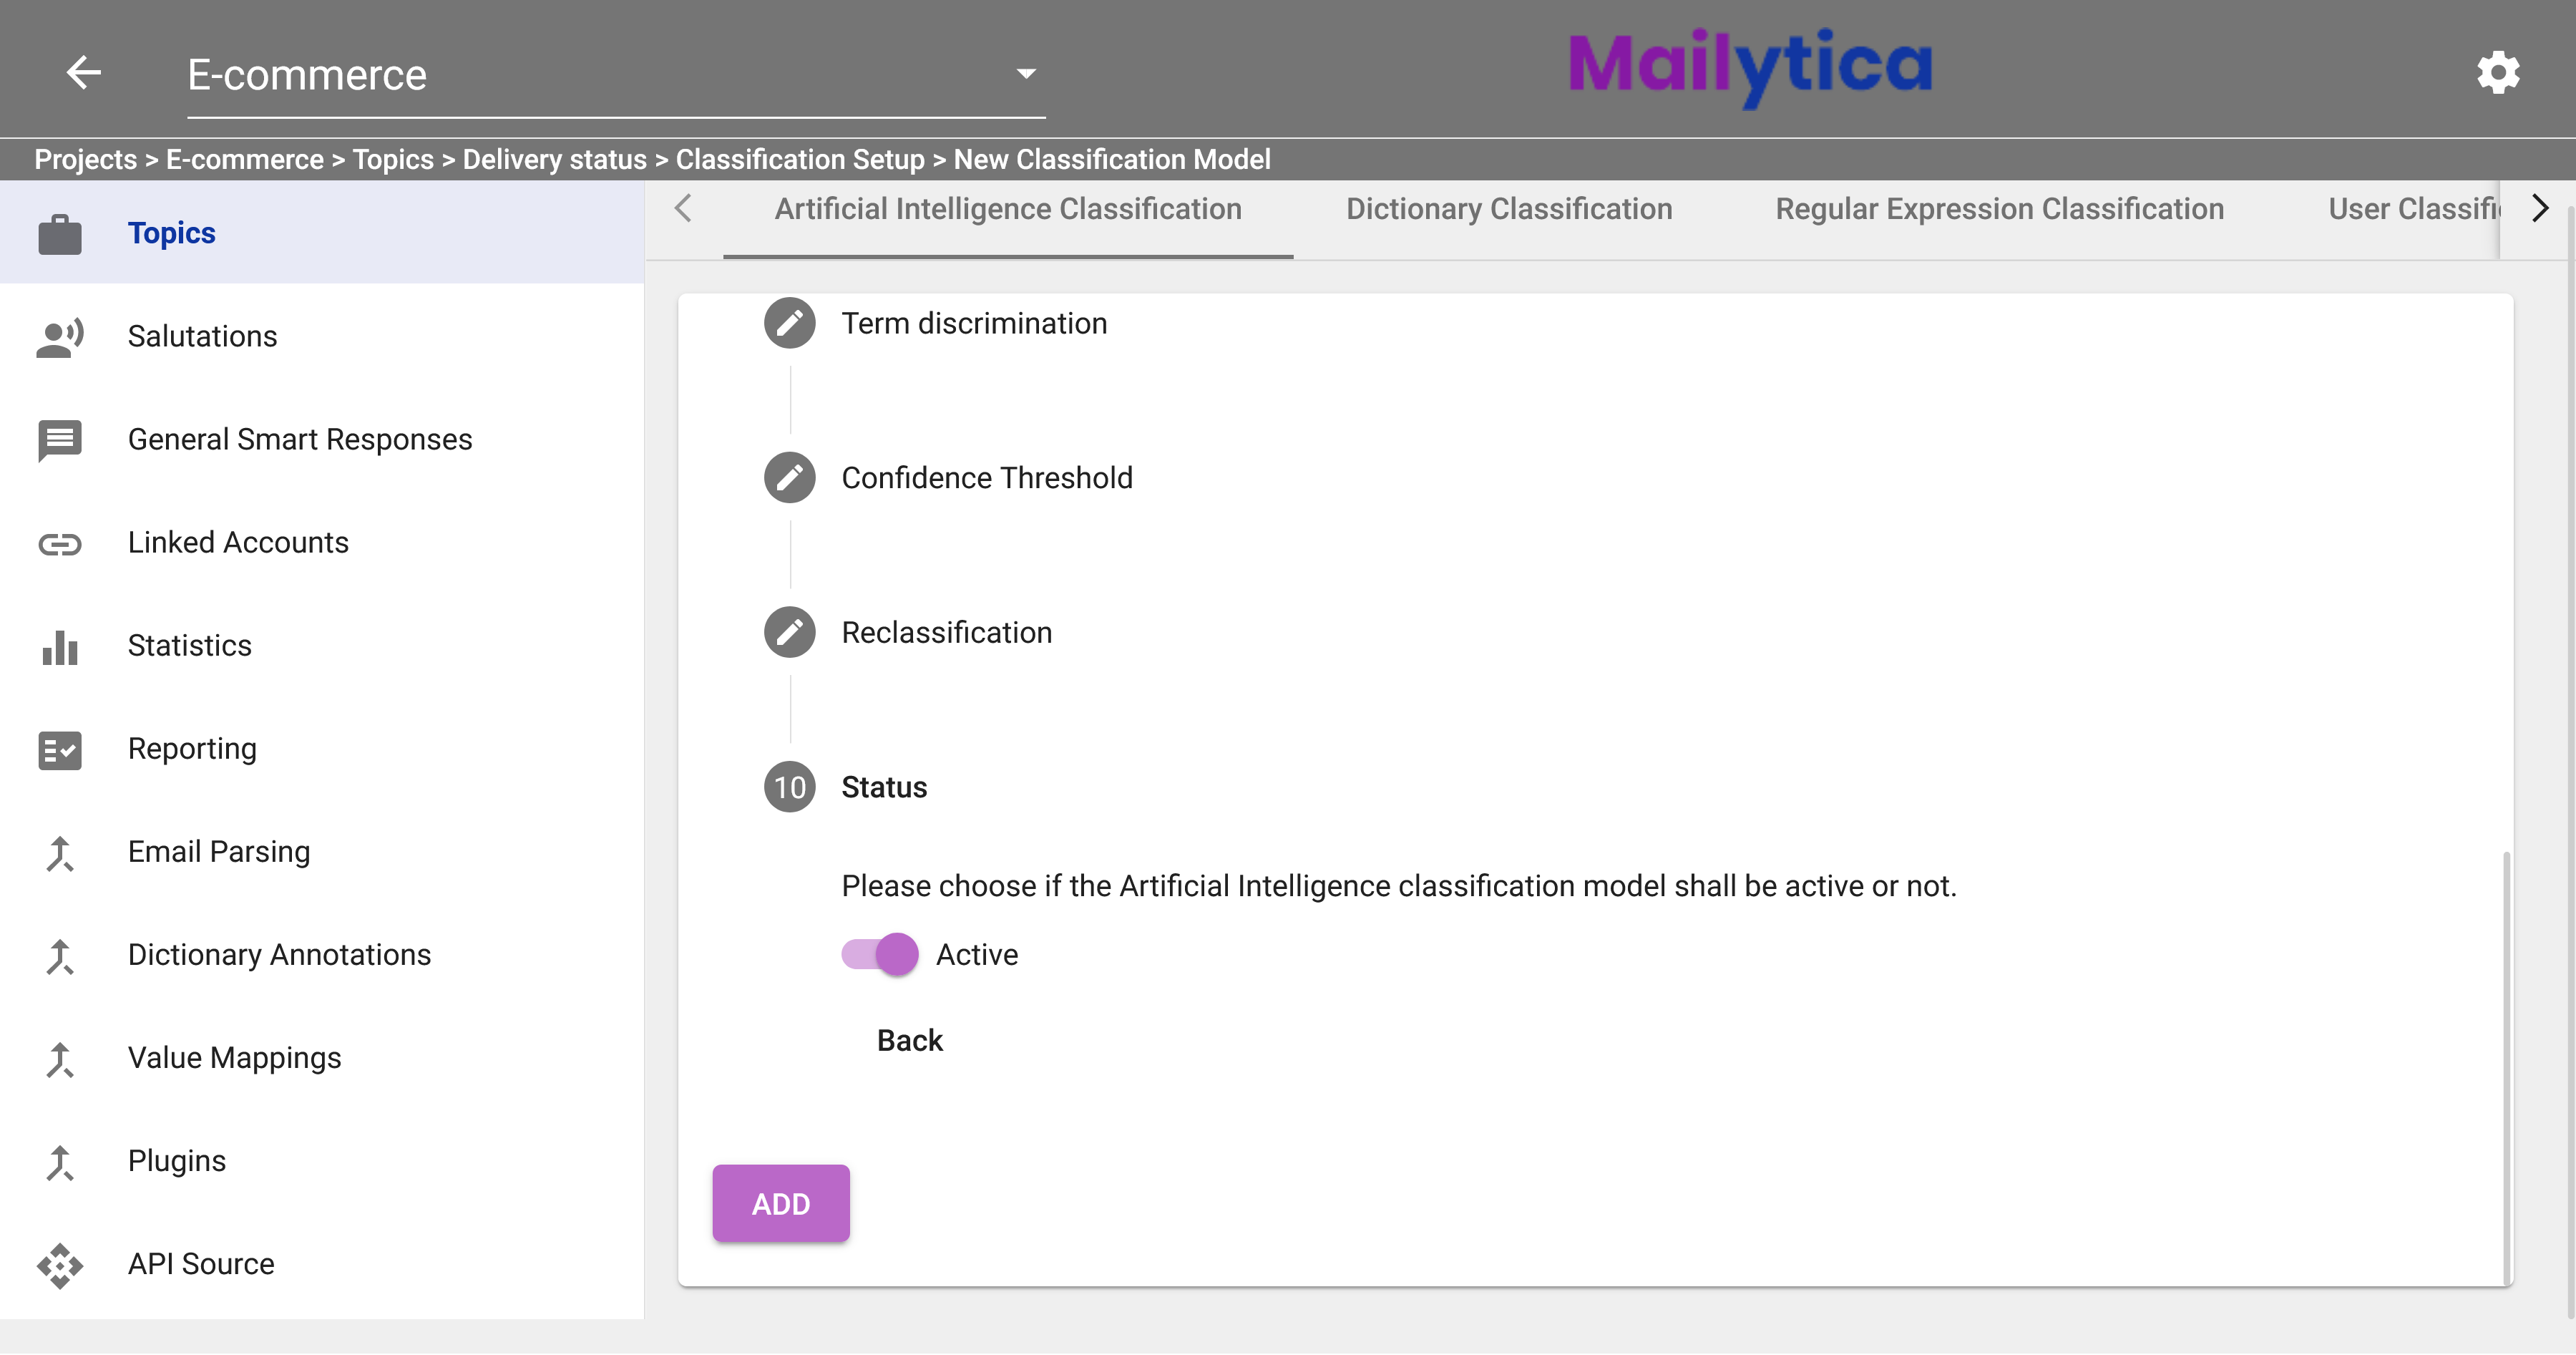
Finally, in Status, toggle the Active button and then click Add. If you don’t want your model to classify any emails, you can set the Status option to Inactive.
Once you click the Add button, the training process will begin. The time it takes to train will depend on the number of labelled email messages you have. You can track your training progress by clicking on your AI classification model and checking the Status section. As soon as it says Active your AI Classification model has finished training and it is now ready to use.
Dictionary Classification#
Dictionary Classification categorizes email messages by finding keywords that are associated with a topic.
For instance, if you have a topic called Order Status, you can define keywords that your clients often use when inquiring about the status of their orders. Mailytica will then classify those emails and carry out an action upon it (automated Smart Response or E-Mail Routing).
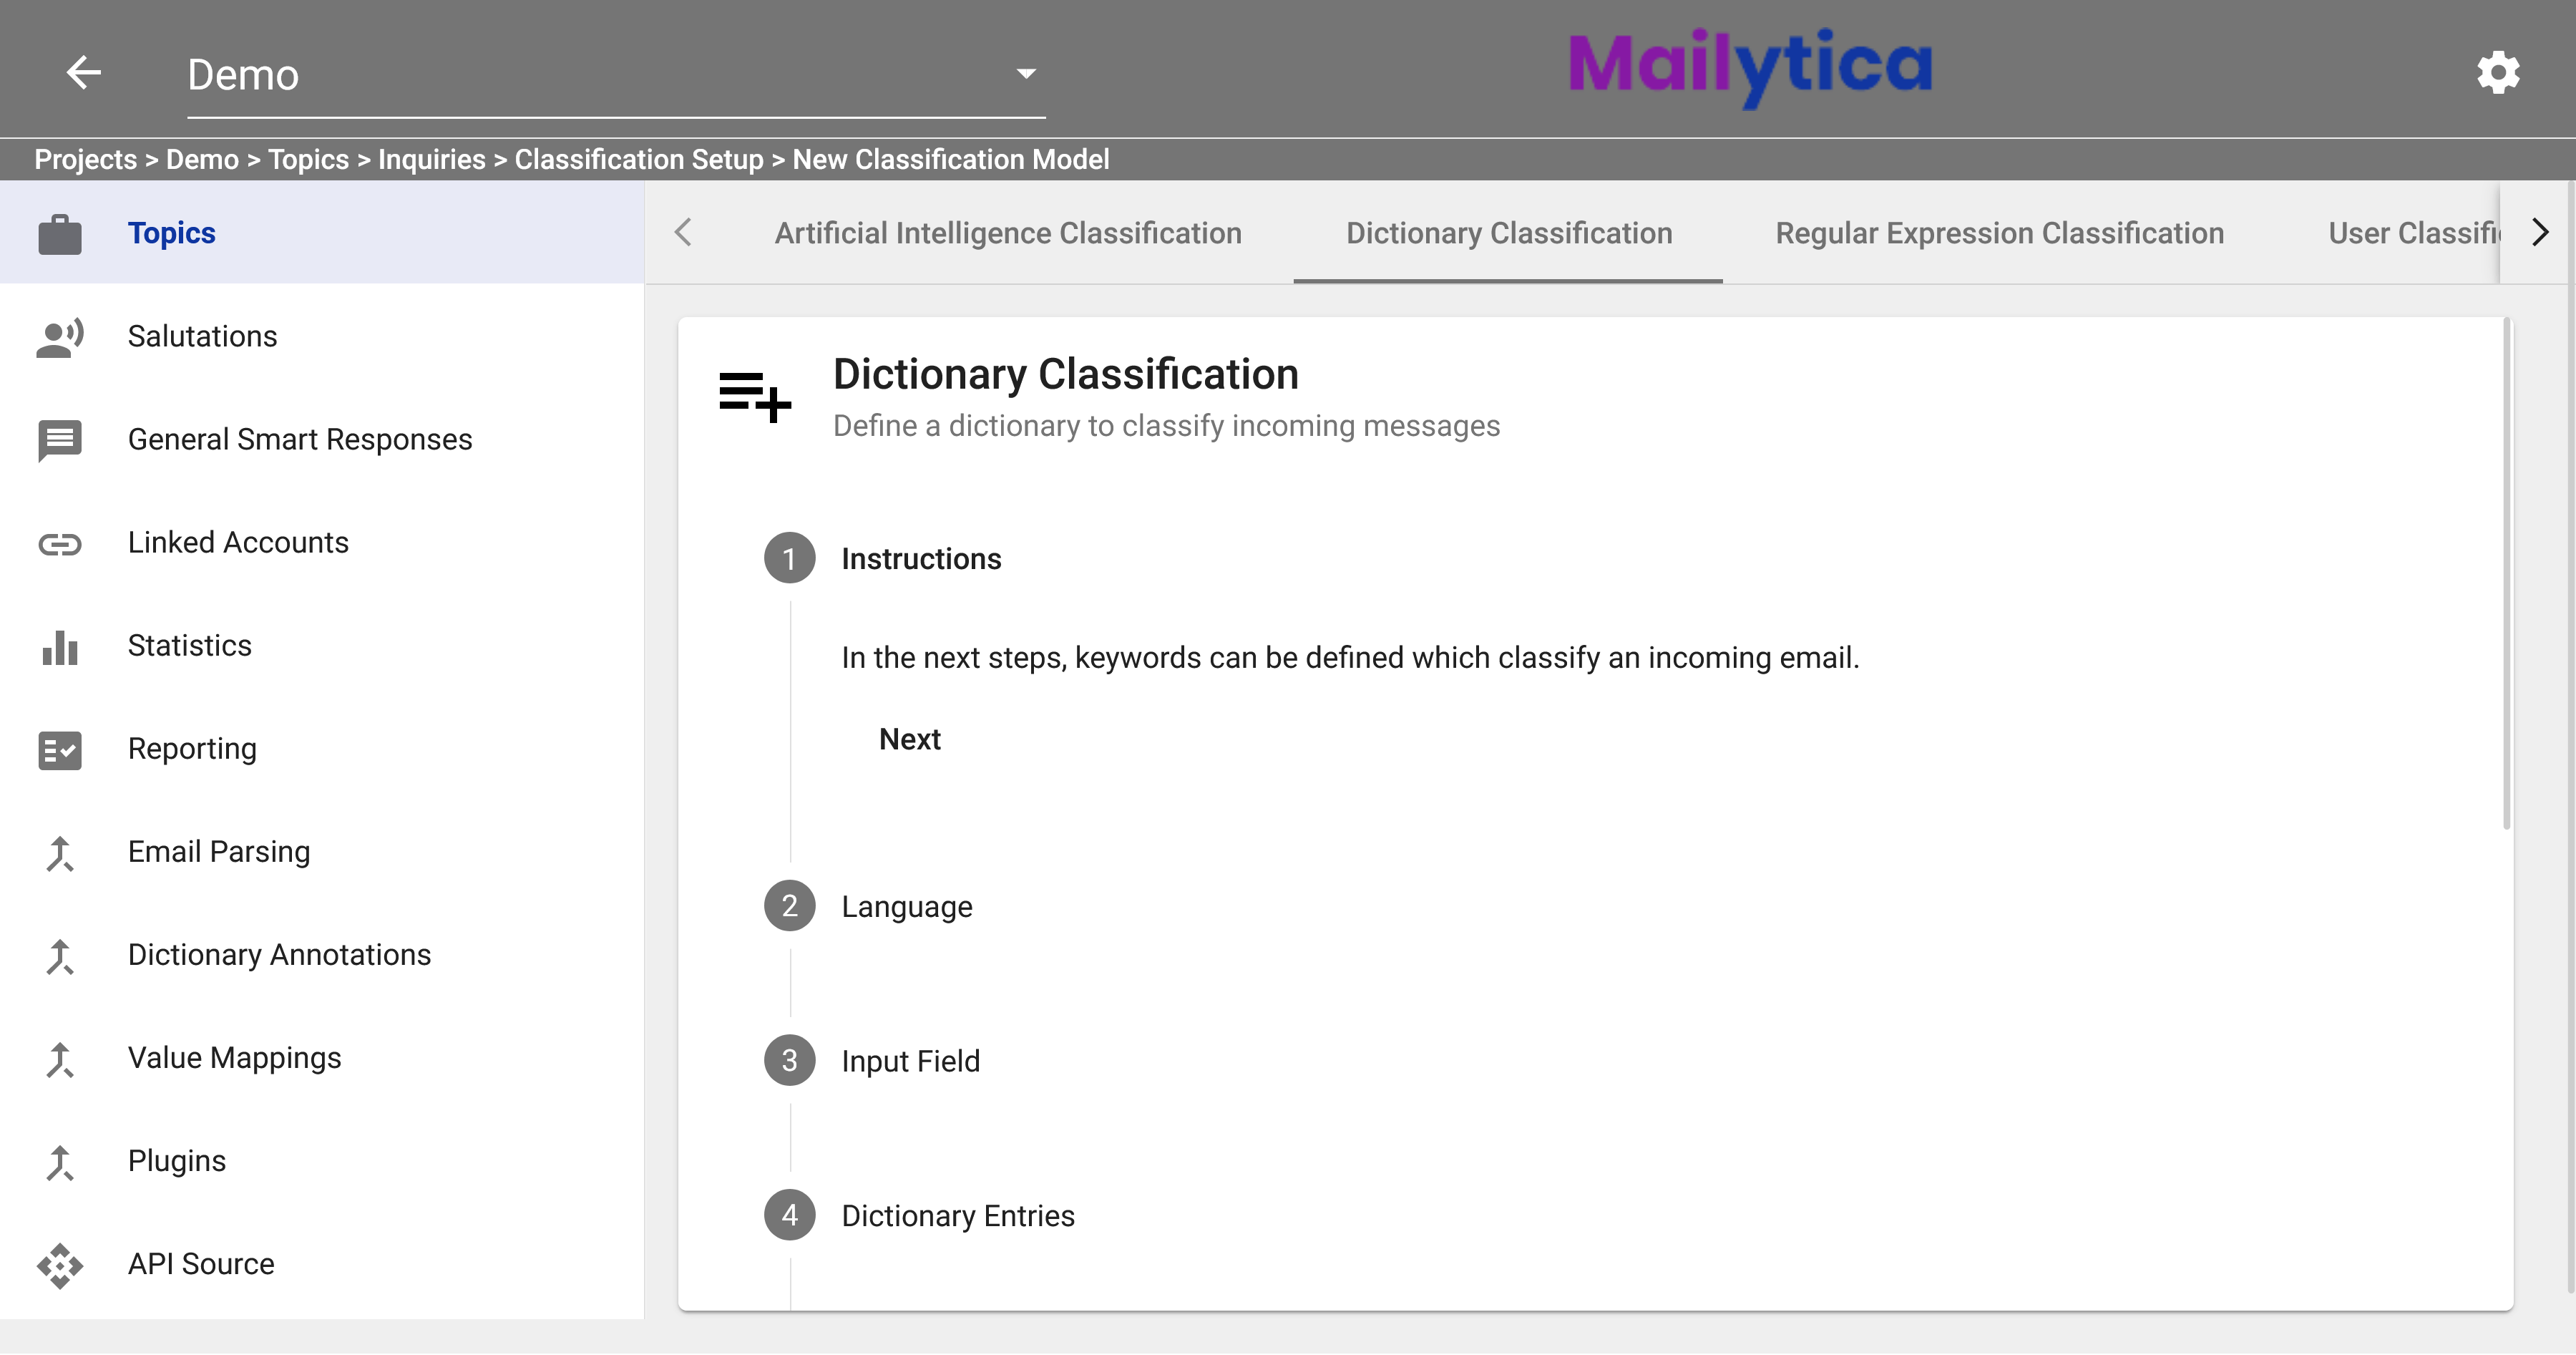
To set up a Dictionary Classification model, follow these steps:
First, in the Classification Setup section, select Dictionary Classification from the top tab bar. The Dictionary Classification tab will show you the instructions on how to define your keywords. Click Next.
Afterward, you can choose the language of the messages you want to classify. For example, if you select English, then only emails in that language will be considered for the dictionary classification.
Next, you can define the model’s Input Field, which refers to the different parts of an email message that Mailytica can use to find your keywords. To select an input field, first delete the default value and then select your desired input from the dropdown menu.
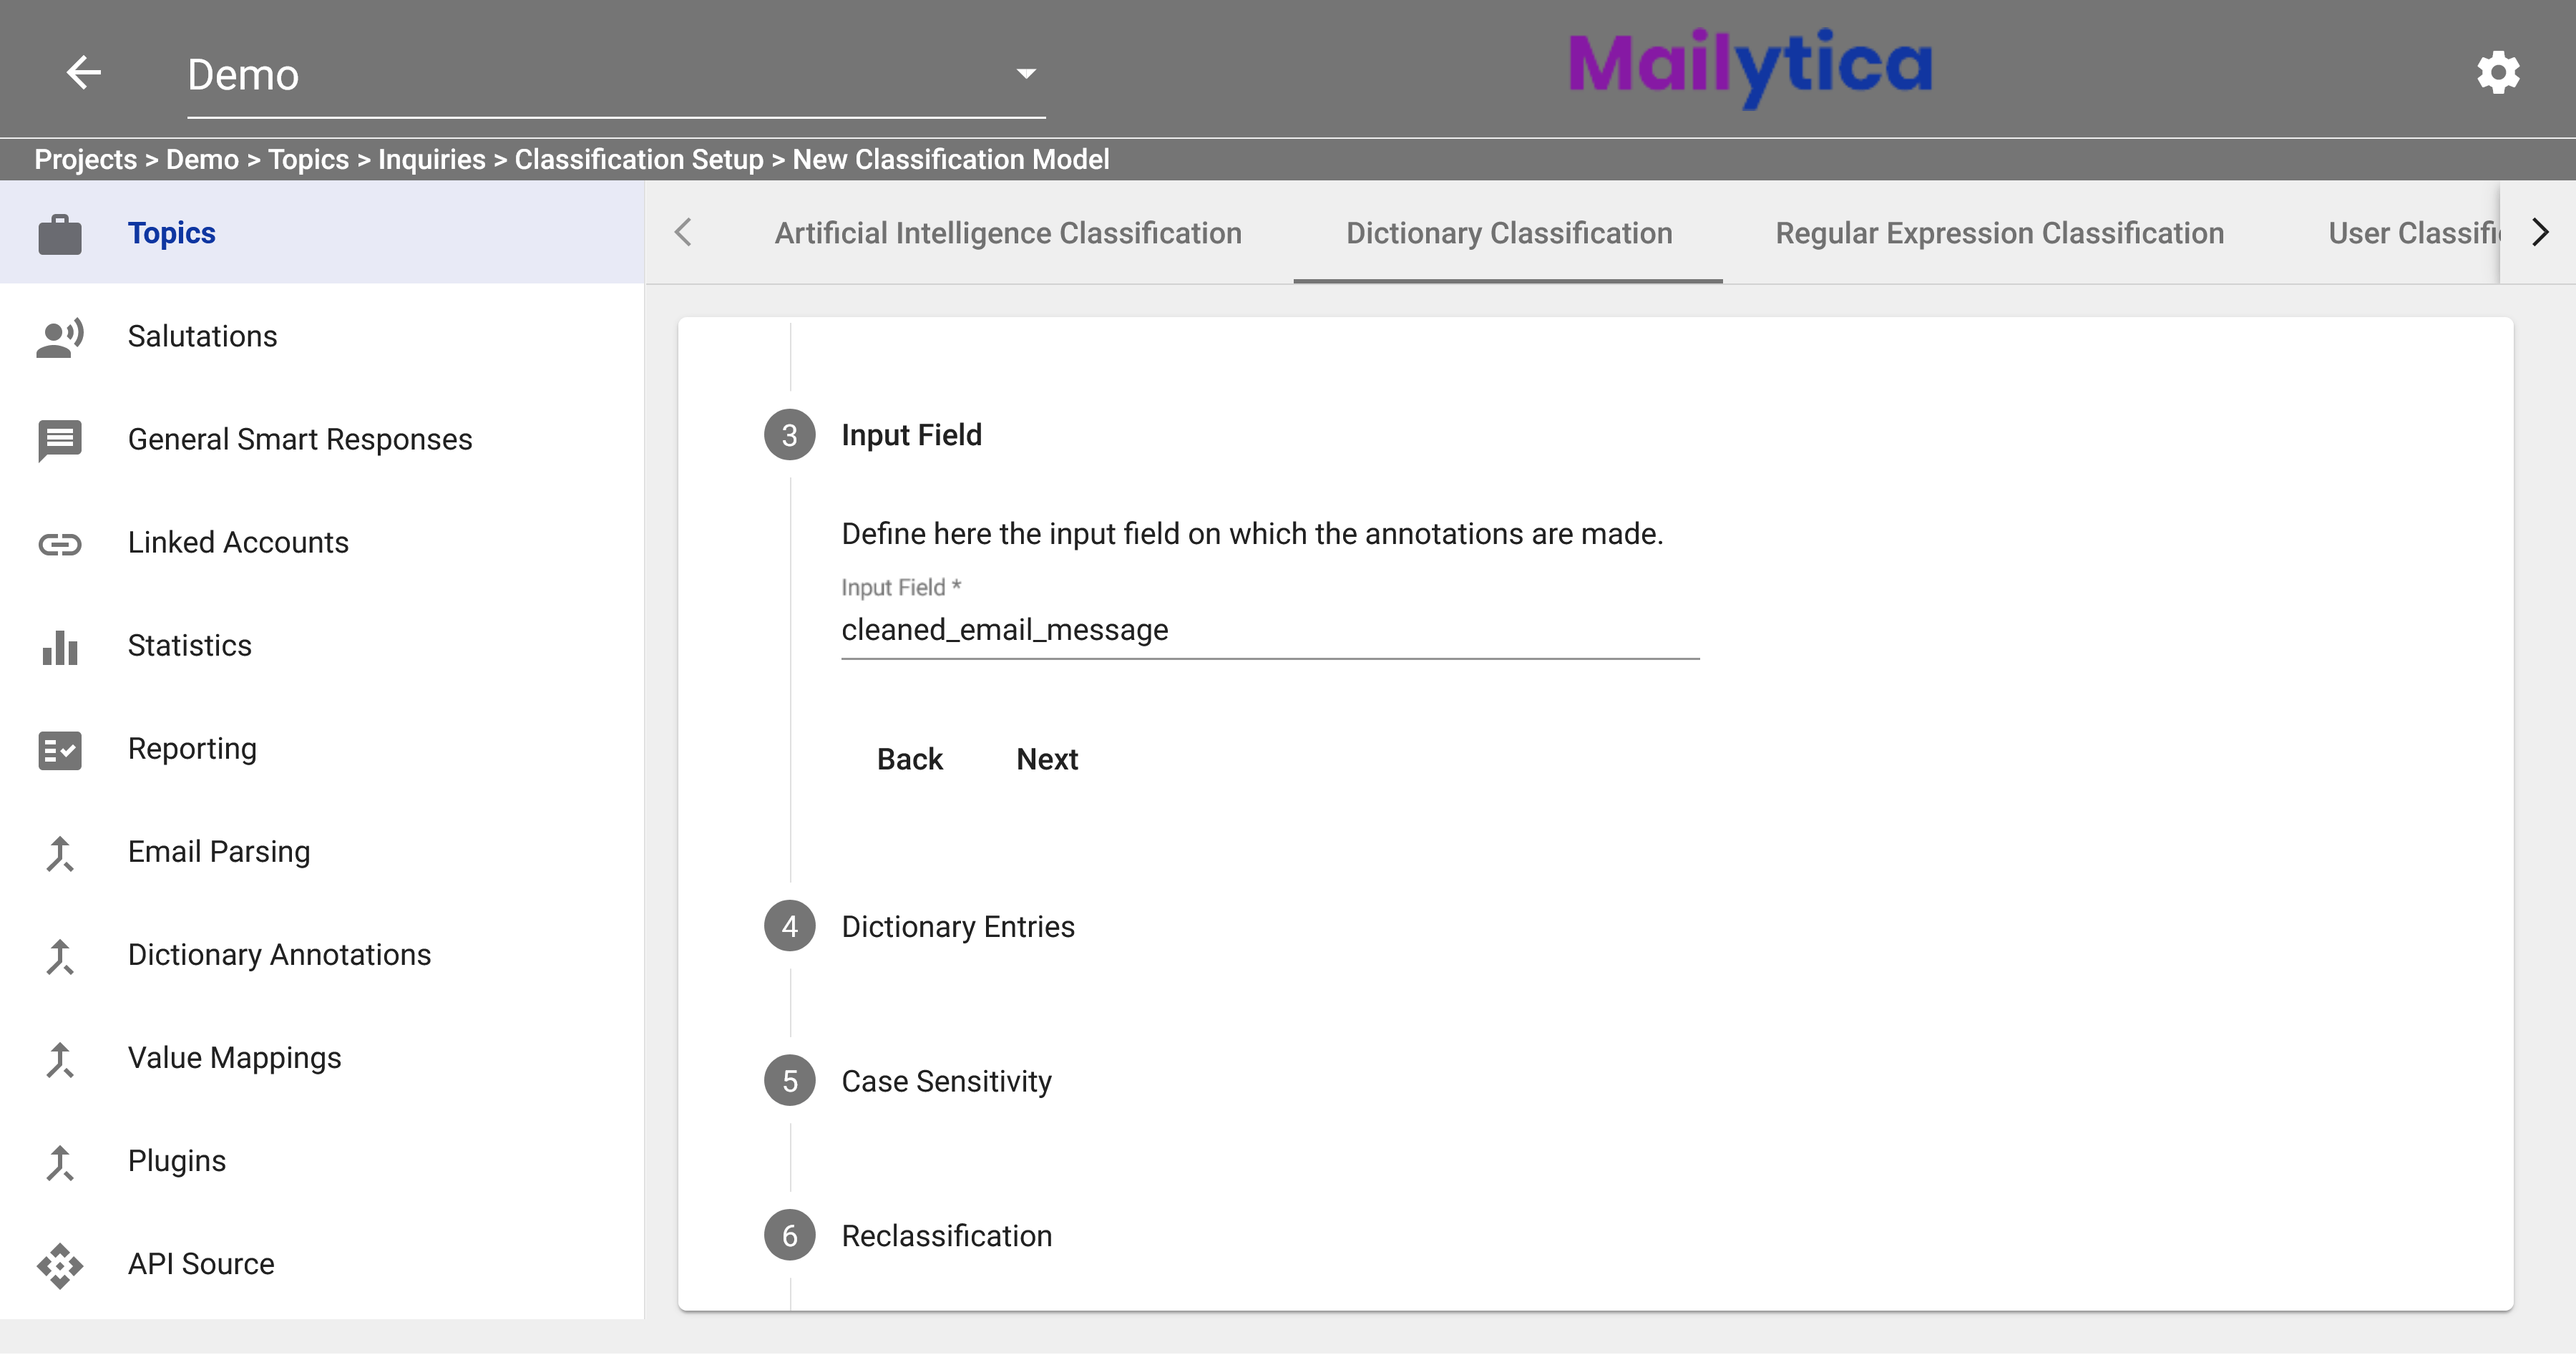
The recommended value is cleaned_email_message. For more information on Input Fields, please visit the section Mailytica’s Email Data.
Note
The cleaned_email_message input field refers to the content of the actual email message - it removes any greetings, sign-offs, or unnecessary information.
Consider the following email message example:
Subject: Order status
Sender: client@company.com
Hello,
I wanted to check on the status of the order that is due on Monday 15th.
Kind regards.
In the case of our example, the cleaned_email_message field would be:
I wanted to check on the status of the order that is due on Monday 15th.
In Dictionary Entries, you can add all the keywords related to your topic. There are two different options to enter your keywords. The first option is to upload a
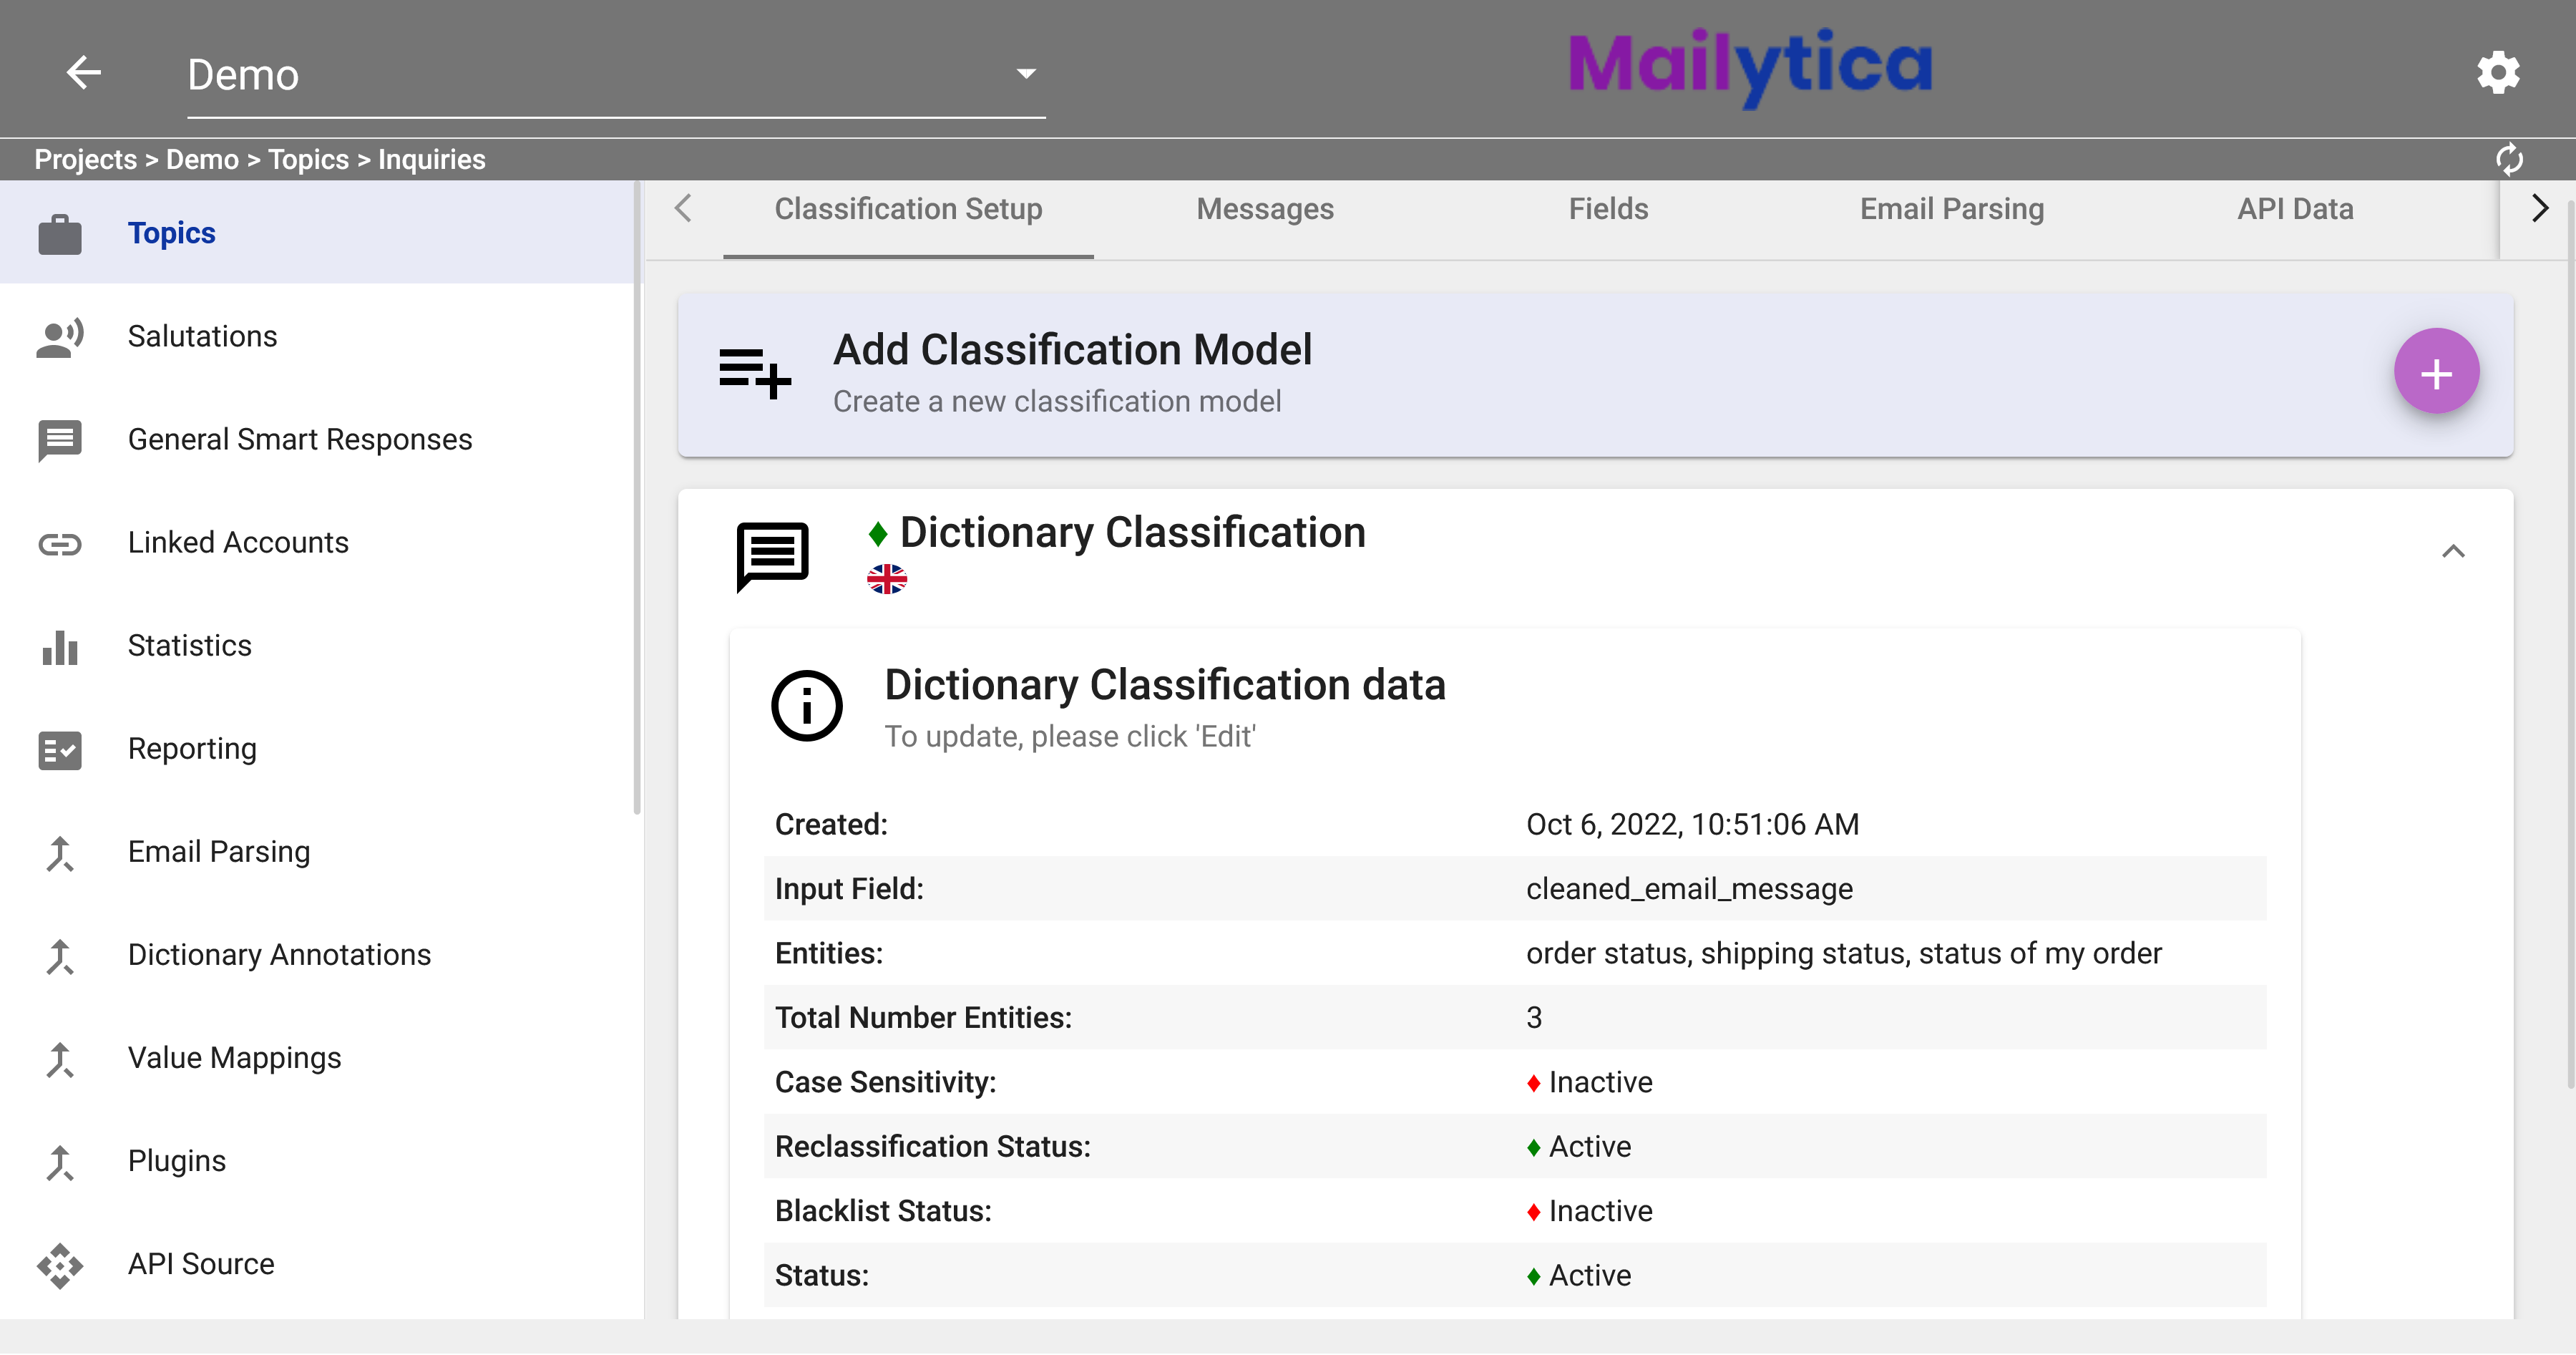
.txtfile with each keyword separated by a semicolon. The second option is to add them manually, to do so simply write your keywords in the text box and press enter after each one. For example, for our Order Status topic we will add the keywordsorder status,shipping status, andstatus of my order.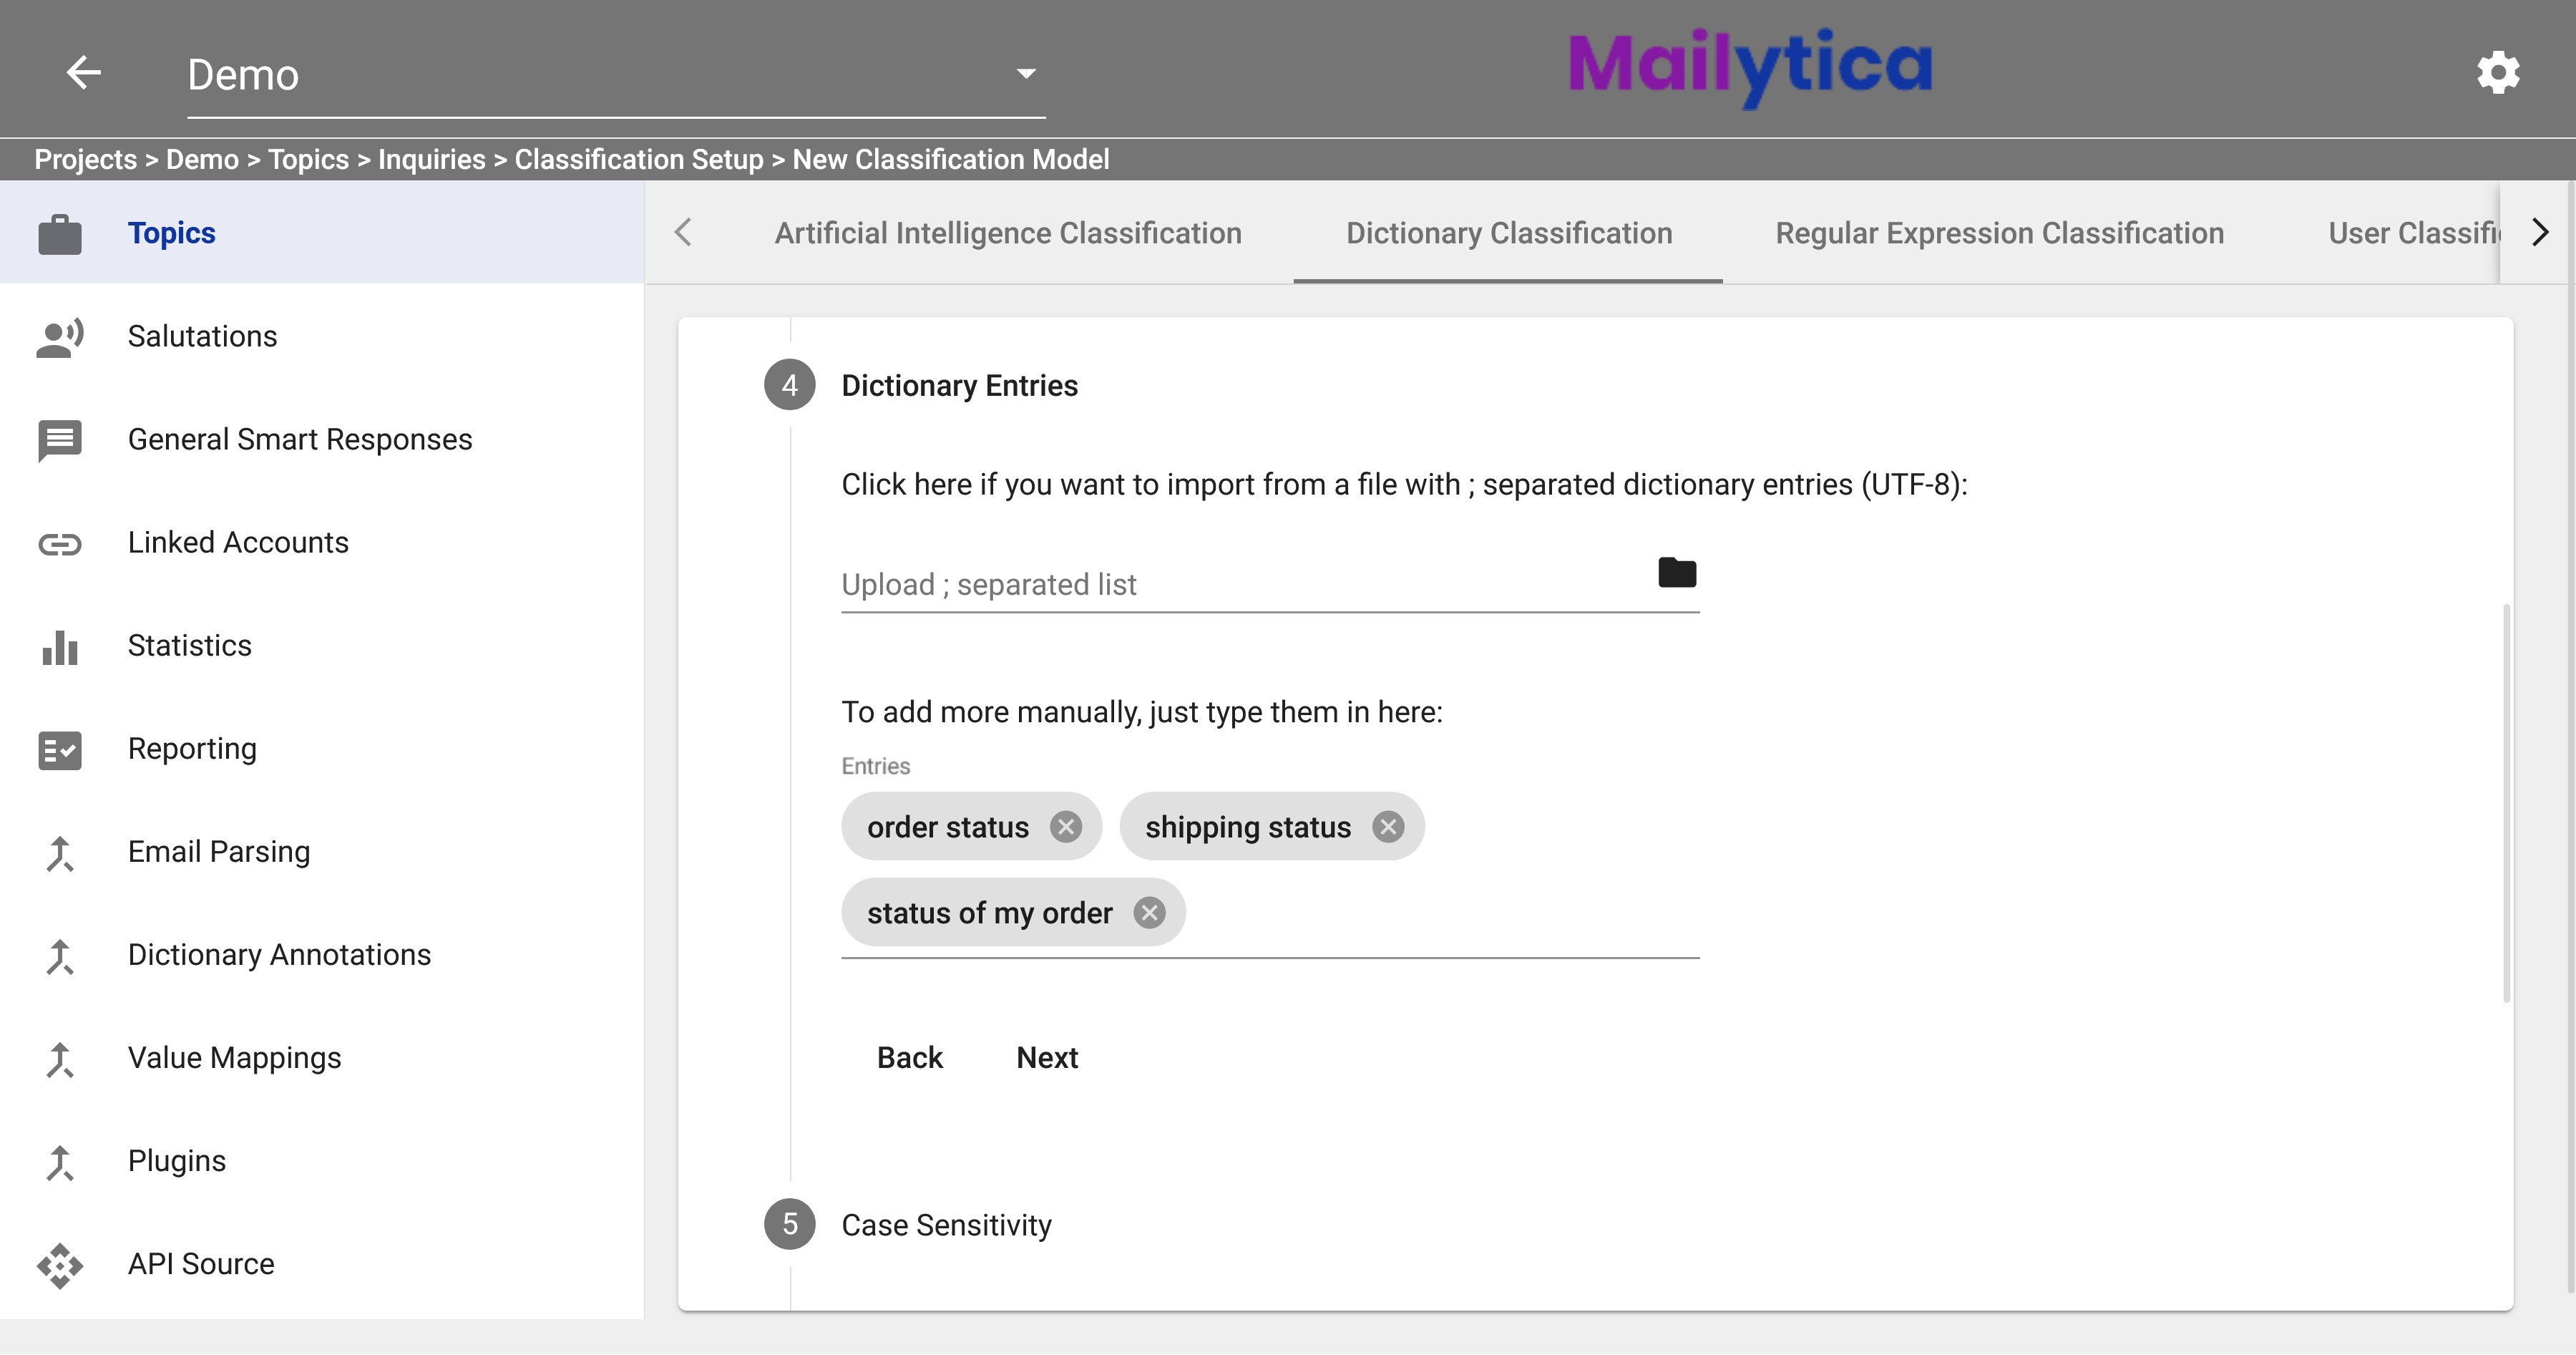
Following, in Case Sensitivity you can choose whether keywords should be case-sensitive. The recommended value is Inactive. When inactive, Mailytica will detect the keywords regardless if they are written in upper or lower case. To illustrate, the keyword
order statusin our previous example will be detected whether it is written as order status, Order Status, or Order status in a message.Next, the Reclassification feature allows you to choose whether Mailytica also classifies past messages that you have already received. If this feature is disabled, only new messages are classified. Therefore, the recommended value is Active.
The next step is to configure the Confidence Strategy, which determines how confident Mailytica should be before classifying an email.
First, select a Confidence Value from 0 to 1. The Confidence Value represents the minimum confidence Mailytica needs to classify an email under a particular topic. A higher value (closer to 1) means Mailytica will only classify emails it’s very sure about, while a lower value (closer to 0) allows more flexibility, meaning Mailytica can classify emails even if it’s less certain about the topic.
In Confidence Strategy, choose among three strategies to calculate match confidence:
Max: This option selects the highest confidence score from all possible topics.
Multiply: This strategy multiplies the confidence scores of all potential matches. This strategy increases classification accuracy for emails that include multiple relevant keywords. In this way, it’s less likely to incorrectly classify an email based on a single, potentially misleading match.
Log: The log strategy applies logarithmic scaling to confidence scores, helping to balance the impact of very high or very low scores. This approach is helpful for finding a middle ground.
Next, select a value for Document Normalization, the default value is 100. This reduces the impact of longer emails to ensure they’re treated equally with shorter ones. If an email exceeds this value, Mailytica will adjust its calculation to prevent length from impacting the classification.
Tip
Depending on the confidence strategy, we recommend setting the following confidence values:
Max: Confidence value = 0.8
Multiply: Confidence value = 0.7
Log: Confidence value = Start with 0.5 and test the accuracy of your classifications, adjusting as necessary until you reach 0.7.
You can then select the Classification Mode between normal Classification, Blacklist, or Whitelist. In Blacklist, you set specific terms to block certain topics from a classification. The model will exclude every message that matches these terms. On the other hand, Whitelist positively selects your emails. A classification is successful only if the contents of the message match the keywords in the dictionary model.
Note
Let’s use the Order Status topic as an example. If we don’t want email messages that have complaints about delayed orders to be classified as Order Status, we can define a blacklist with keywords such as
delayordelayed.Alternatively, if we want to spot emails that should always be classified as Order Status, we can define a whitelist with specific terms like
shipped,tracking number, orout for delivery, for instance.To finish, in Status, toggle the Active button and then click Add. Your Dictionary Classification model should now be activated and saved. If you don’t want your model to classify any emails, you can set the Status option to Inactive.
Regular Expression Classification#
Regular Expression Classification is a powerful way to categorize email messages with user defined words or expressions. Regular expressions work similarly to keywords, but with more rigorous matching rules.
A regular expression (also known as a regex or RegExp) is simply a pattern that you can use to match specific characters. Therefore, regular expressions identify text patterns and extract specific portions of text from within larger blocks of text.
Regular expressions are used to determine whether a string matches a certain pattern. This can be done through the use of special characters such as *, ^, [ ], ( ), and +.
For example, square brackets [] can be used to match any character that is inside them. Therefore, the regular expression [cb]at would match the words cat and bat, while eat would not match this pattern.
Tip
For a more in-depth explanation of regular expressions, please check RegexOne Introductory Course, and Regex101 Editor.
Common Regular Expressions#
Regular Expression |
Meaning |
Example |
|---|---|---|
|
Matches characters inside brackets |
|
|
Matches characters between a-z or A-Z |
|
|
Matches any kind of letter, including language-specific characters |
|
|
Any character |
|
|
Any digit |
|
|
Capture everything inside parentheses |
|
|
Case insensitive match |
|
|
Defines an unnamed group. You can use it to define optional matches. |
|
|
Either or |
|
|
0 or 1 |
|
|
0 or more |
|
|
1 or more |
|
|
An exact number of characters |
|
|
Beginning of the string or line |
|
|
End of the string or line |
|
|
Matches a line break |
|
Regular Expressions Examples#
Below is an example of how to use regular expressions to extract information from email messages:
We could use regular expressions to extract information from a message as follows:
Target |
Regular Expression |
Result |
|---|---|---|
Order number |
|
#98237 |
Order date |
|
01/10 |
Phone number |
|
123-456-7890 |
Message topic |
|
order, ship |
Regular Expression Classification Set Up#
To set up a Regular Expression Classification model, follow these steps:
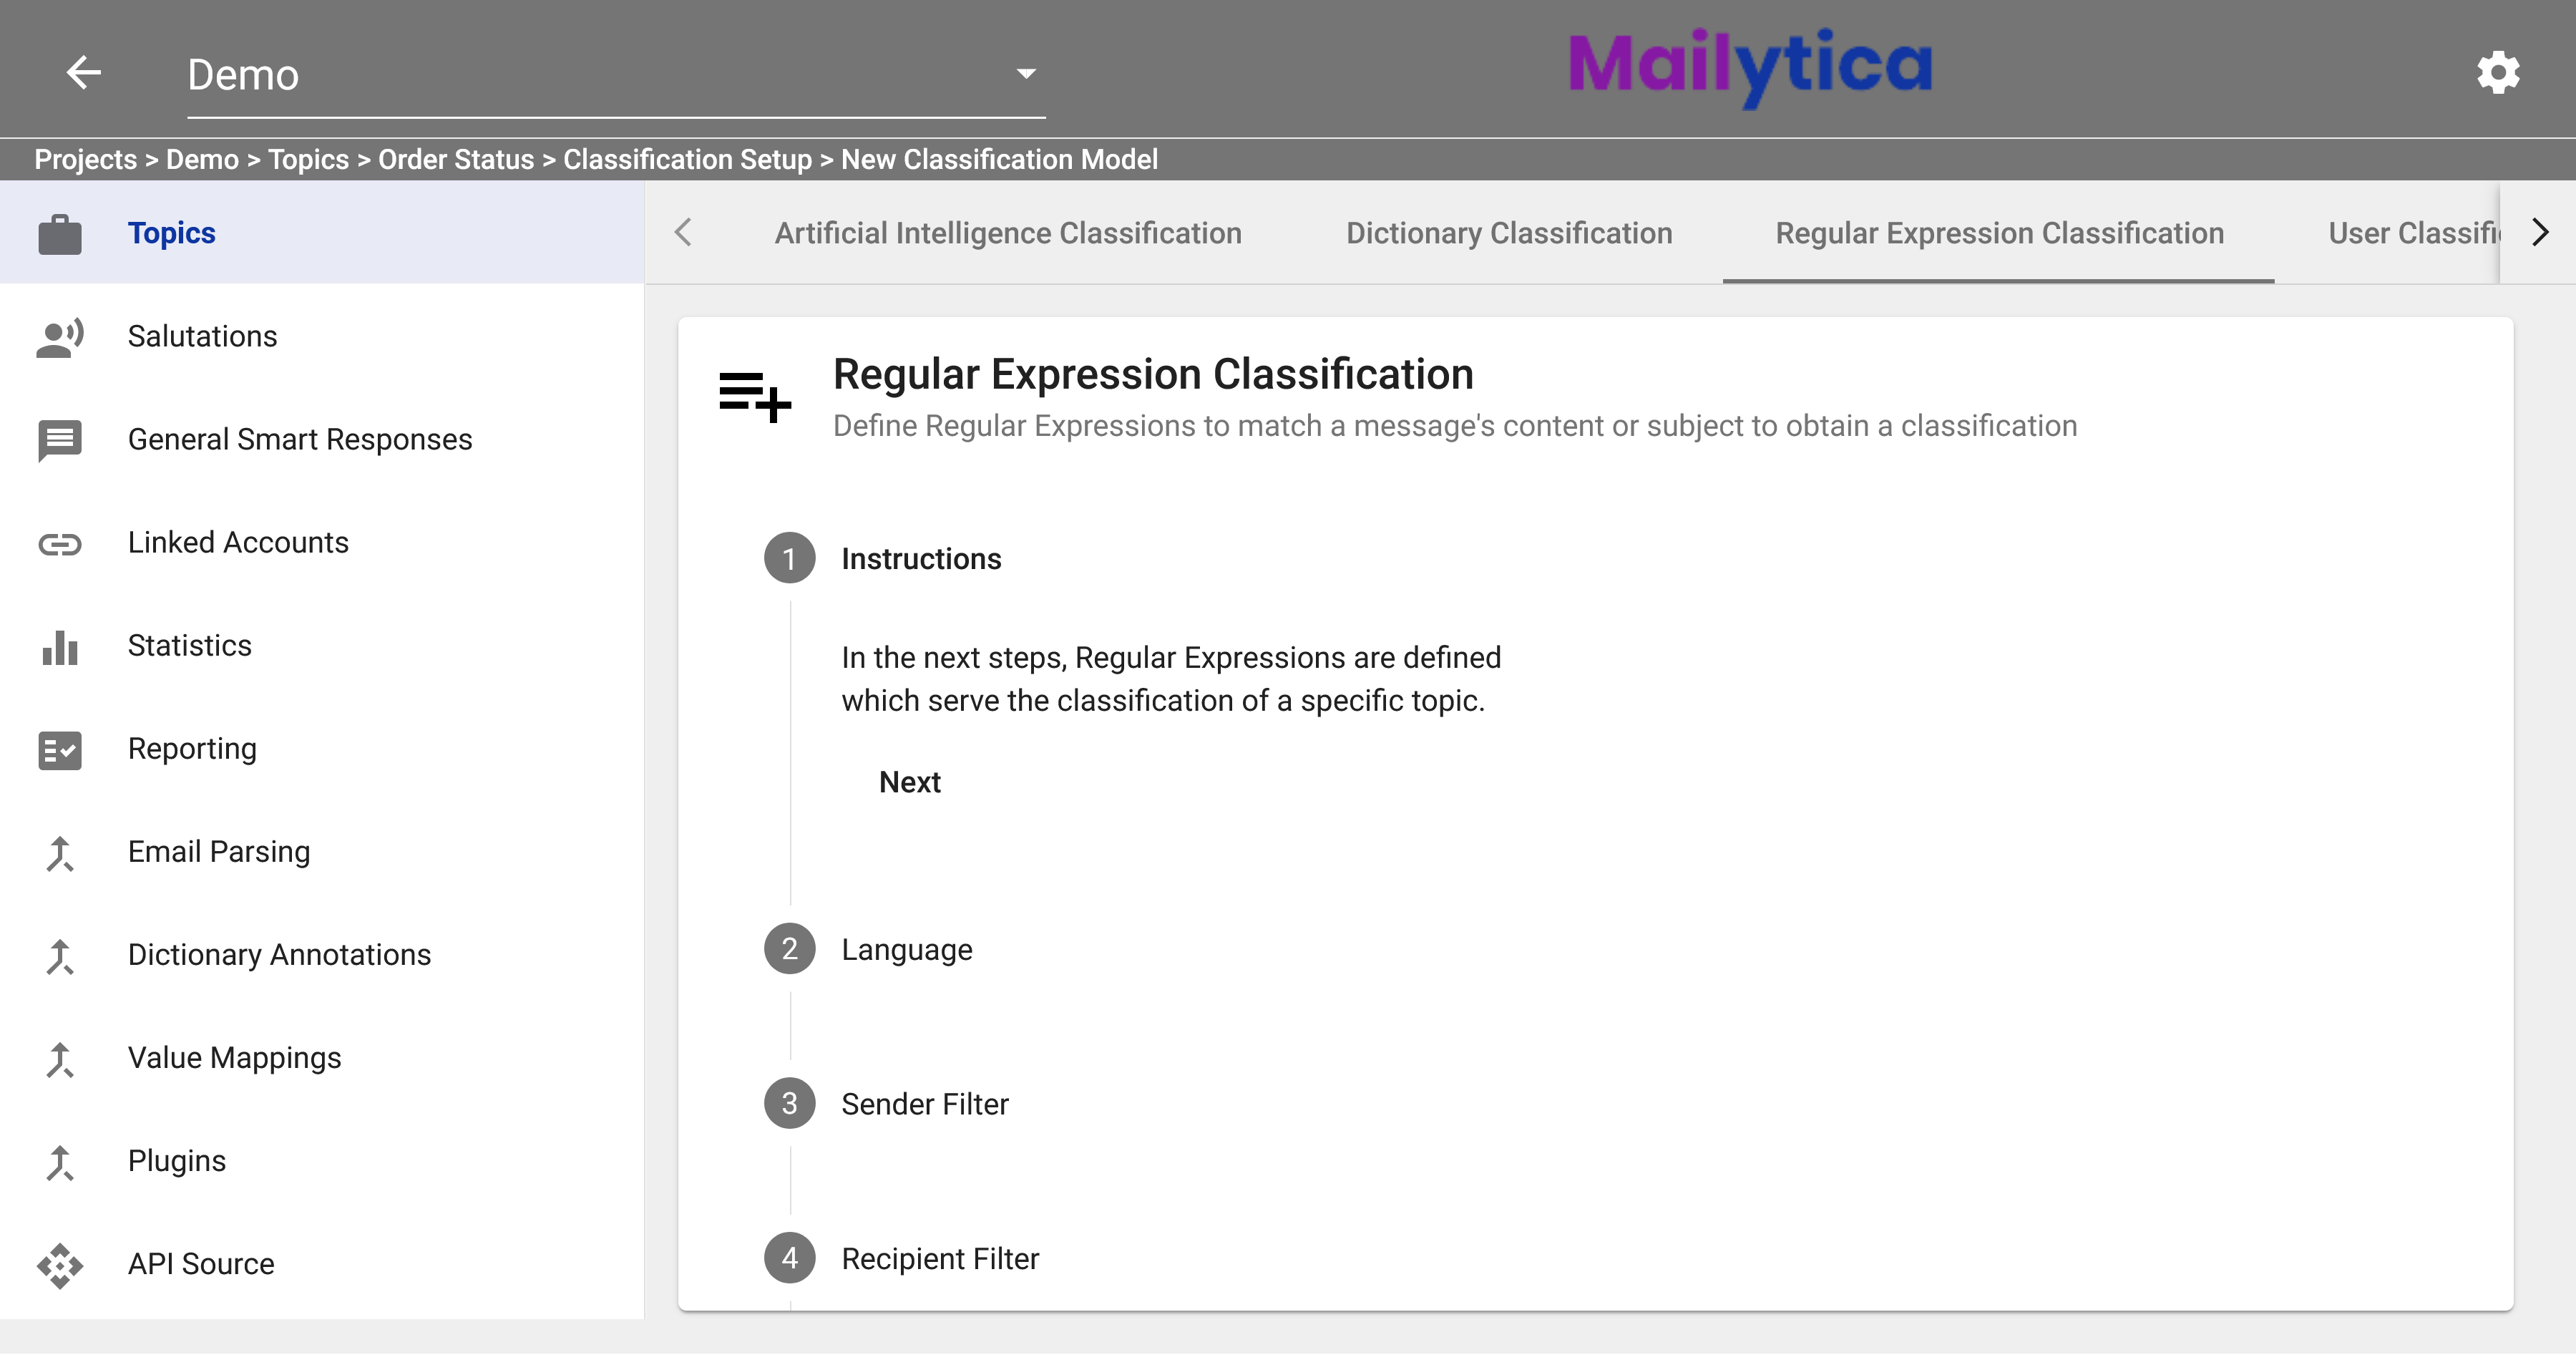
First, in the Classification Setup section, select Regular Expression Classification from the top tab bar. The Regular Expression Classification tab will show you the instructions on how to define your expressions. Click Next.
Then, you can choose the Language of the messages you want to classify. For example, if you select English, then only emails in that language will be considered for the regular expression classification.
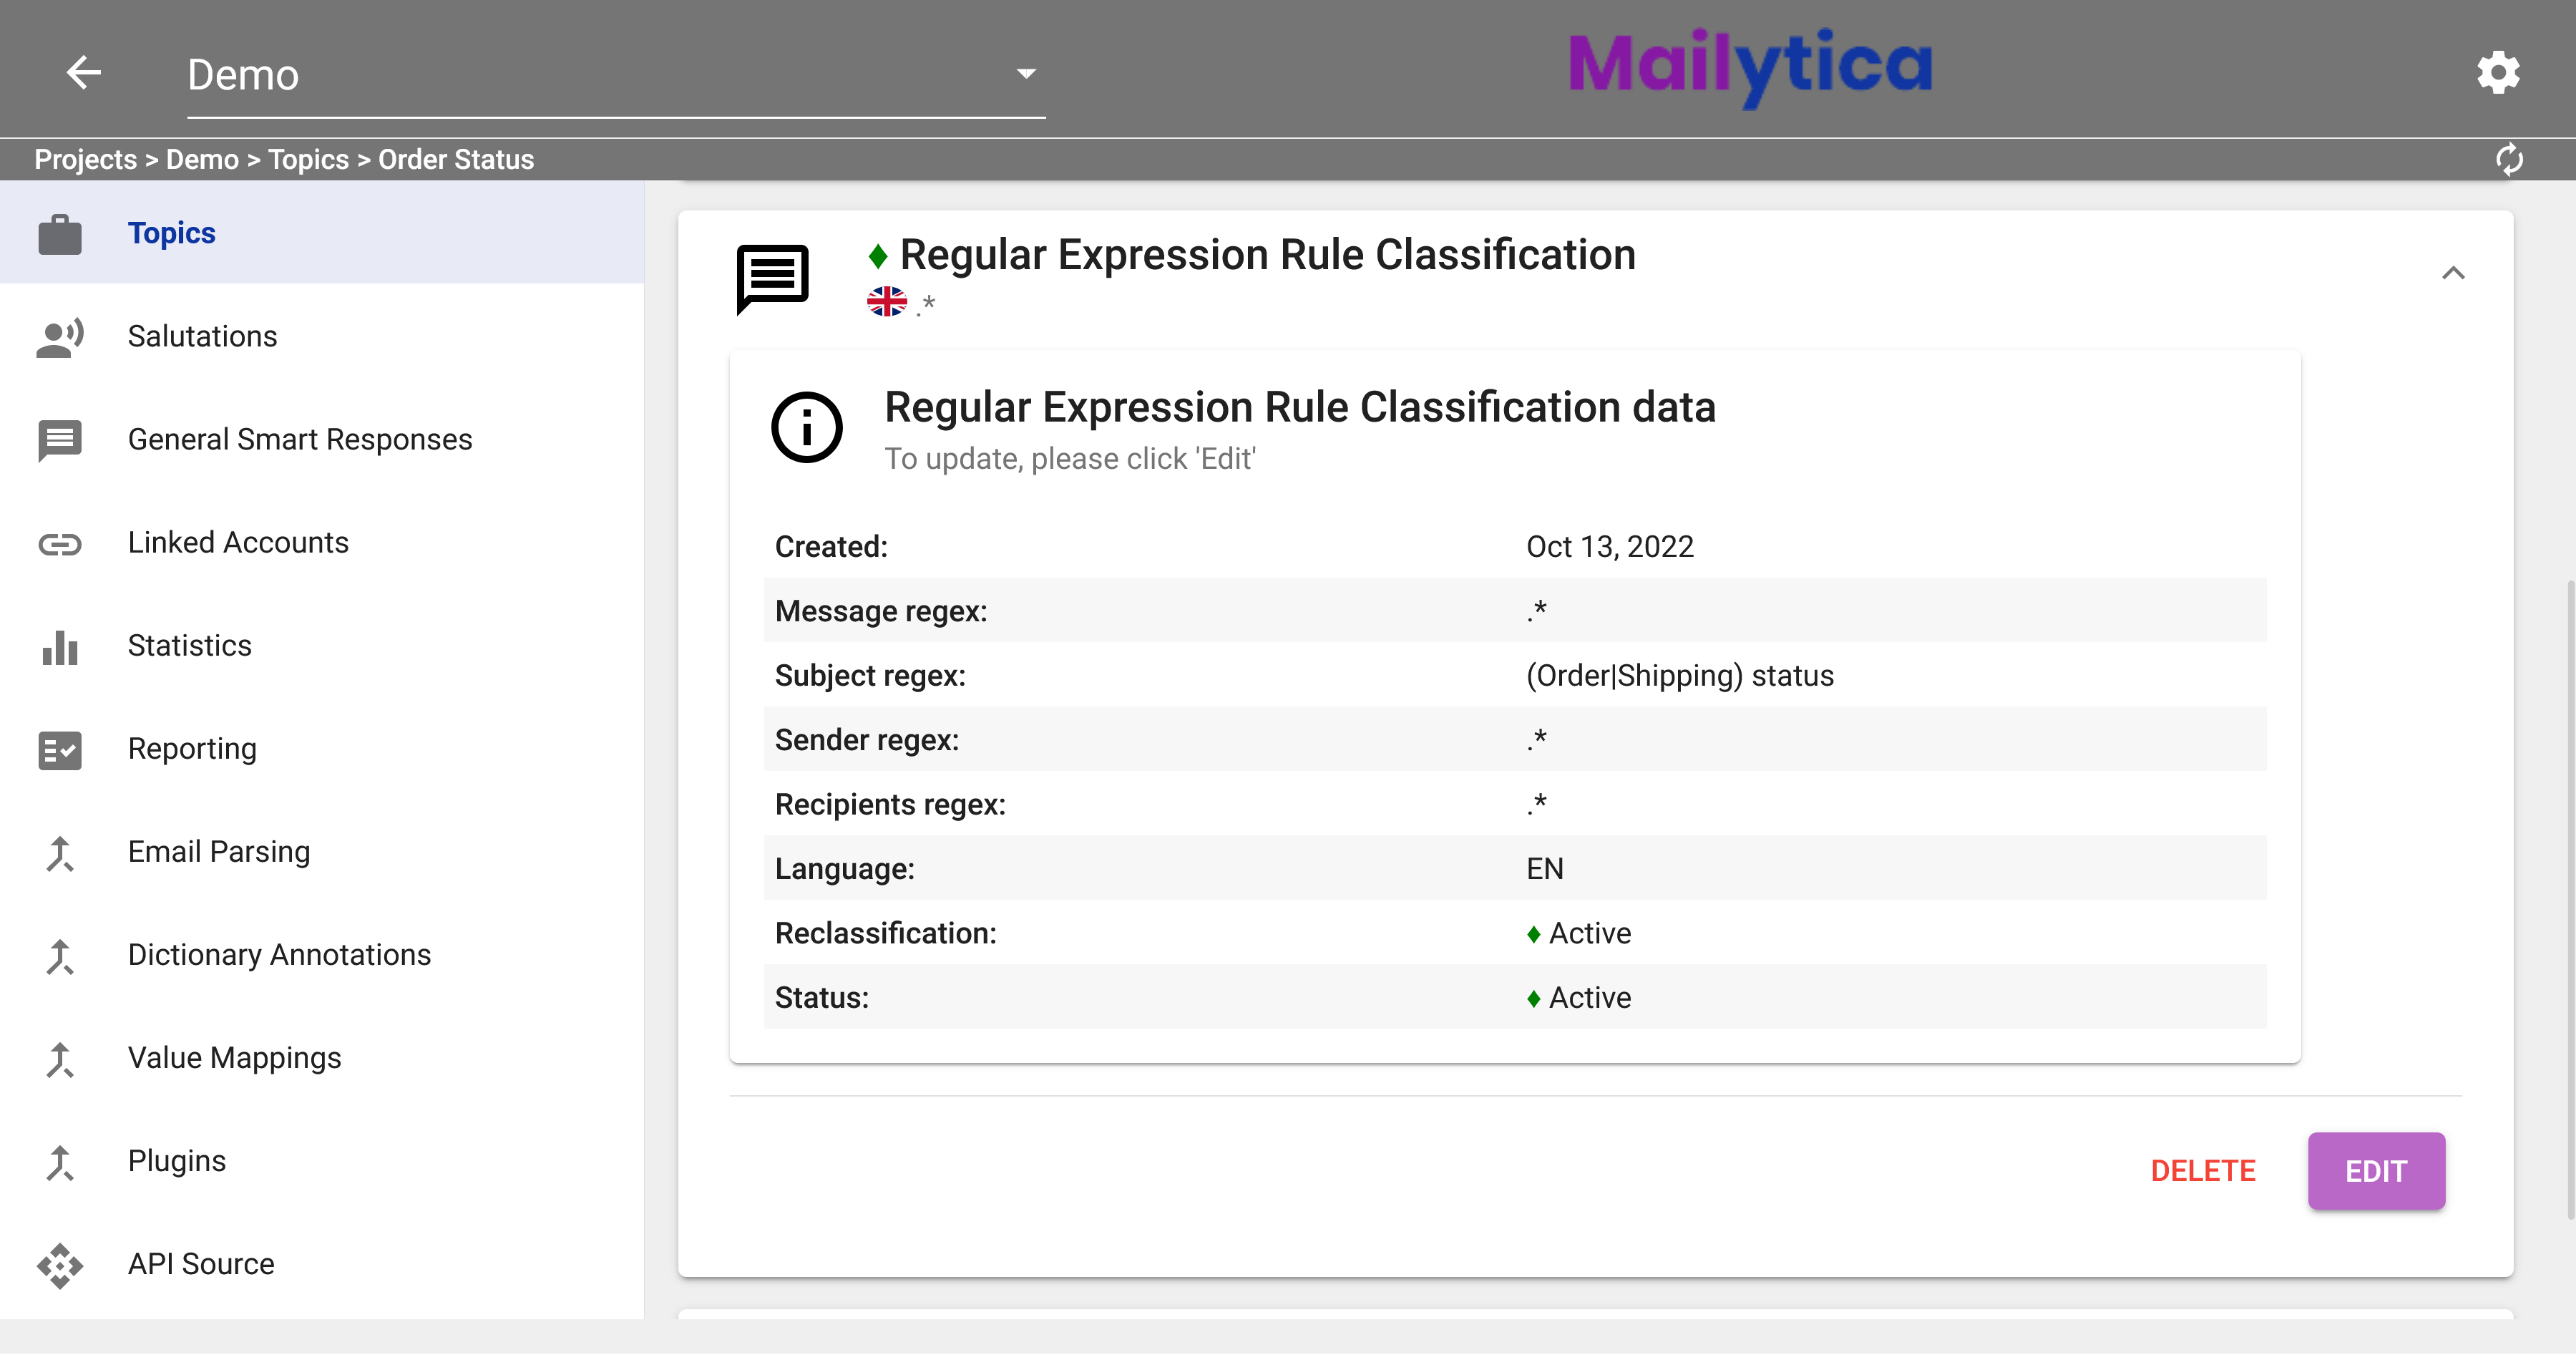
Next, in Sender Filter, if the sender holds an identifier that can be used as a filter, you can add its corresponding regular expression. Otherwise, you can add the expression
.*to include every character.Similarly, in Recipient Filter, if the recipient holds an identifier that can be used as a filter, you can add its corresponding regular expression or just add
.*.Following, under Subject Filter, you can enter a regular expression to match emails with a specific subject. For example, we can match emails with either the subject Order status or Shipping status using the following regular expression:
(Order|Shipping) status.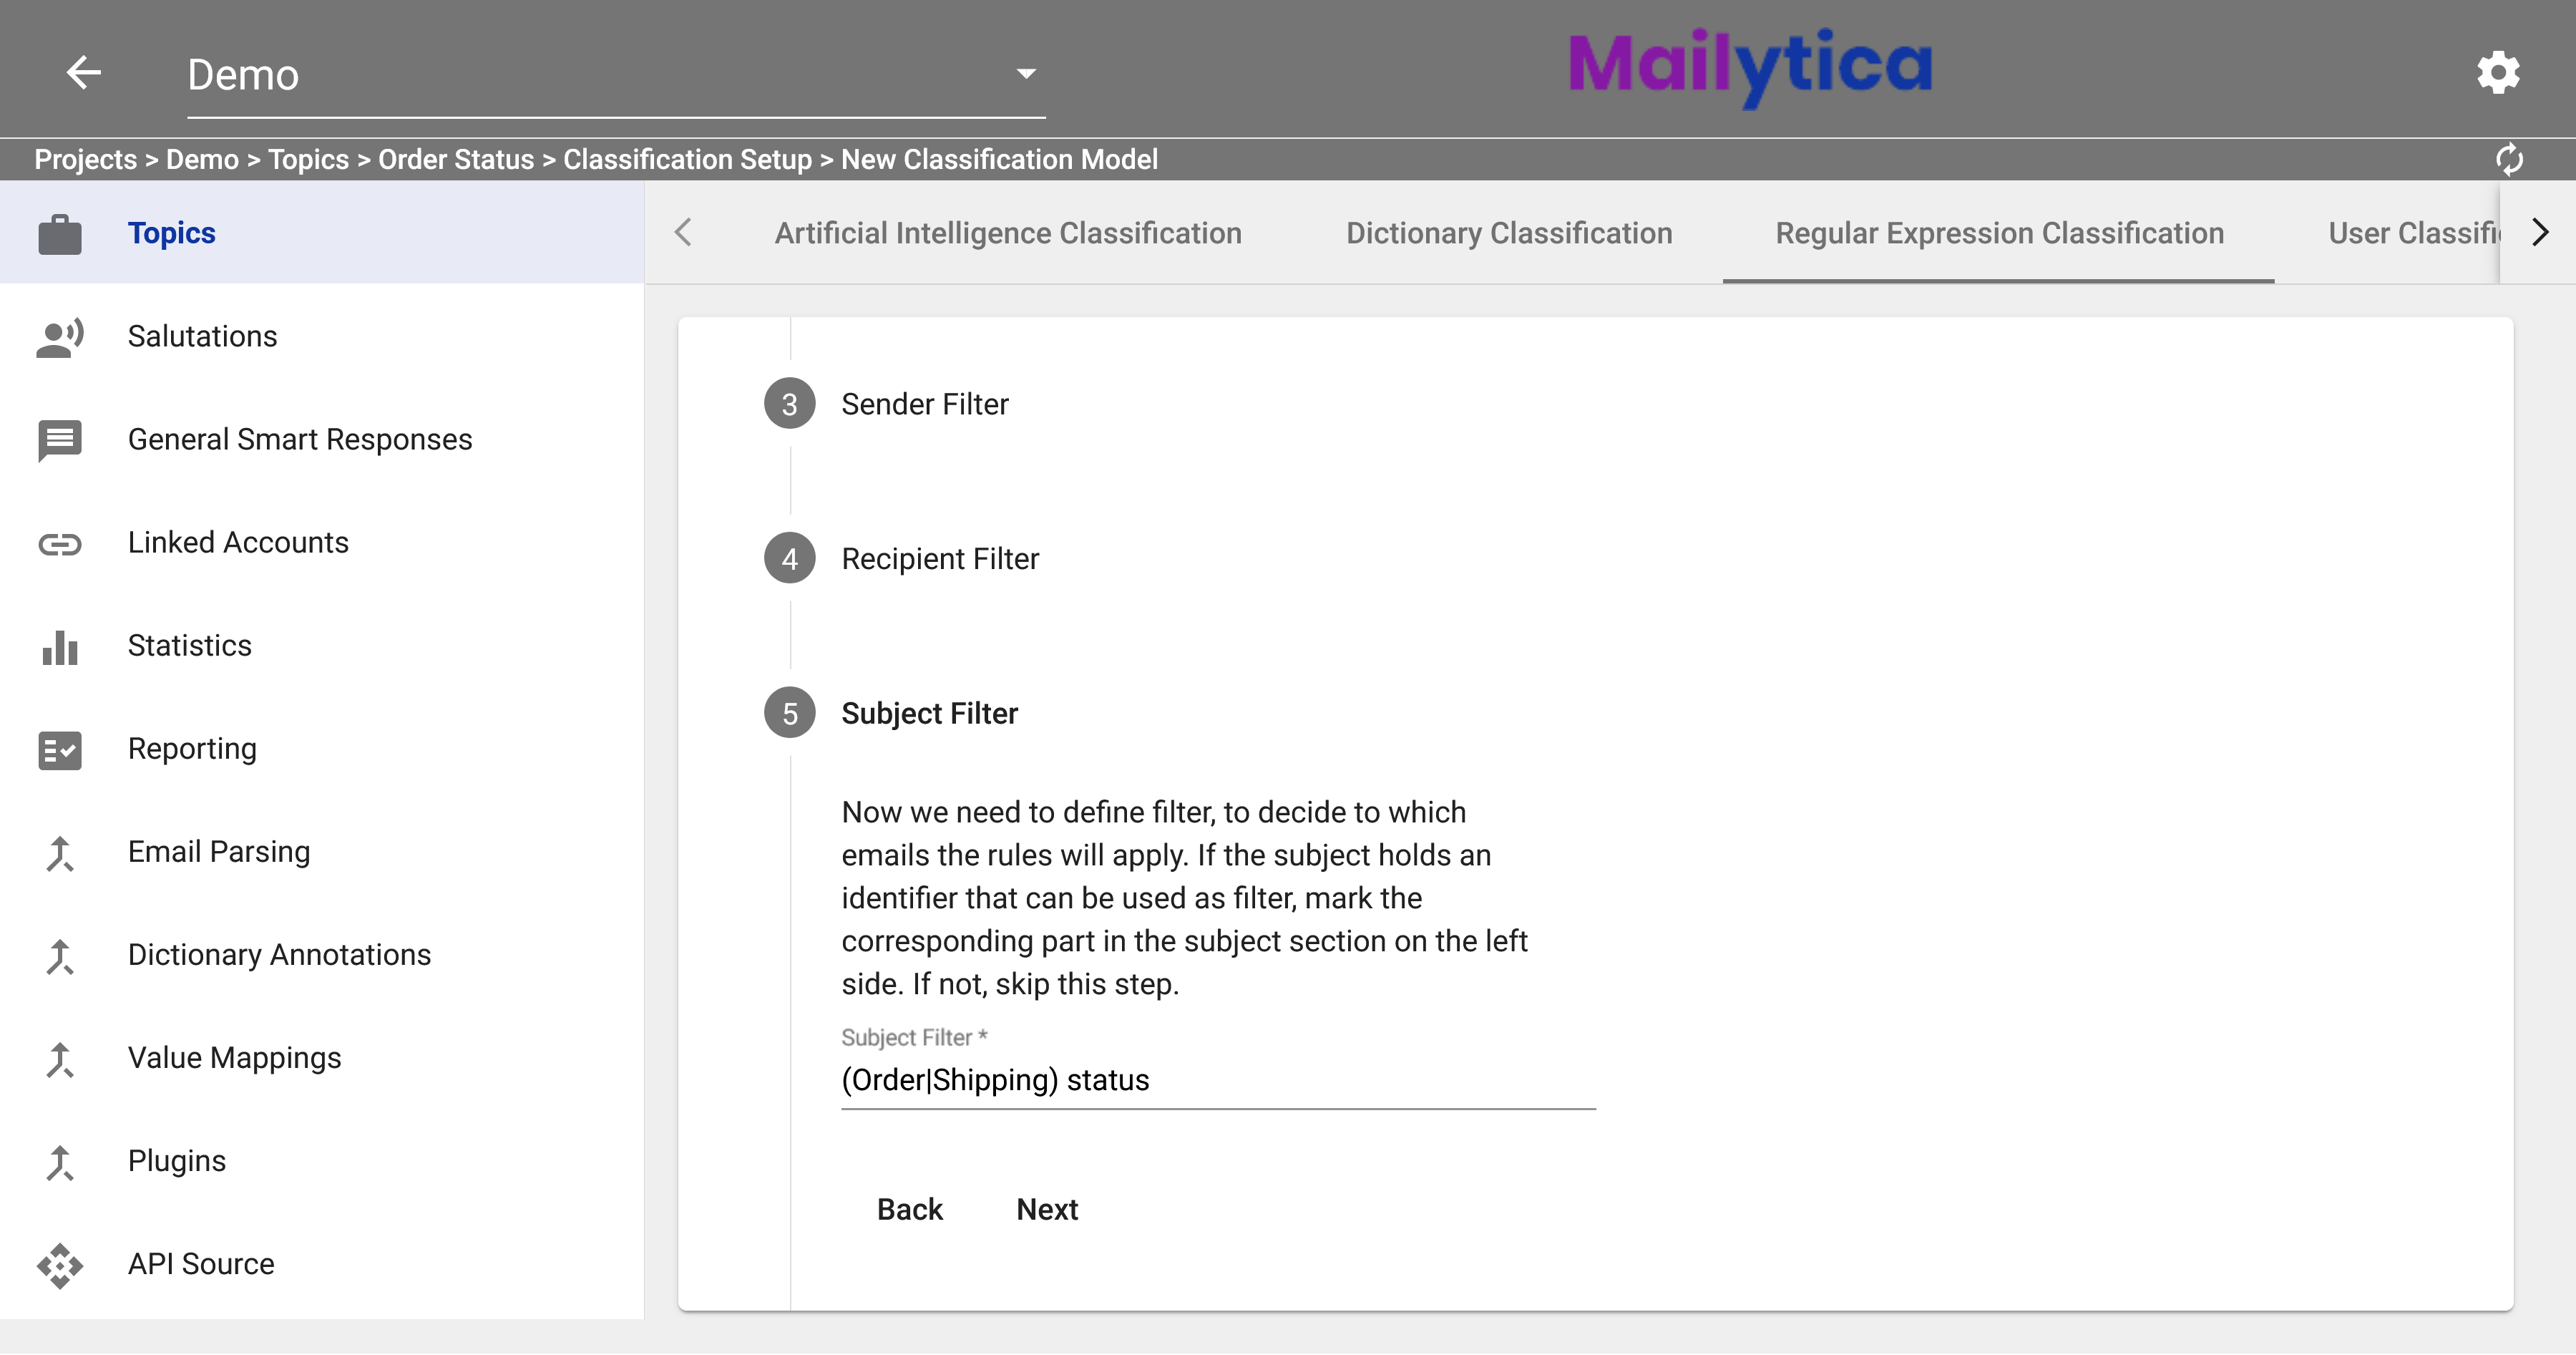
Likewise, in Message Filter you can enter a regular expression to match the message’s body. Otherwise, you can add the expression
.*to include every character.Afterward, you can also define an Input Field filter, which refers to the different parts of an email message that Mailytica can use to find your keywords. To do this, enter the appropriate name of the input field in the first text box and then, in the Filter text box, enter the regular expression of your choice. If you wish to skip this step, please enter
.*to include every character. For more information on Input Fields, please visit the section Mailytica’s Email Data.Next, the Reclassification feature allows you to choose whether Mailytica also classifies past messages that you have already received. If this feature is disabled, only new messages are classified. Therefore, the recommended value is Active.
In Confidence Weighting you can set a value between 0 and 1 depending on the reliability of your regular expressions. A higher confidence weighting (closer to 1) means you’re more sure that the email is classified correctly when it matches the regex pattern. Confidence weighting is just a measure of your trust in the regex match. It’s a way to control how sure Mailytica needs to be that a certain pattern is correct before deciding the classification of an email.
You can then select the Classification Mode between normal Classification, Blacklist, or Whitelist. In Blacklist, you set specific terms to block certain topics from a classification. The model will exclude every message that matches these terms. On the other hand, Whitelist positively selects your emails. A classification is successful only if the contents of the message match the expressions in the regex model.
To finish, in Status, toggle the Active button and then click Add. Your Regular Expression Classification model should now be activated and saved. If you don’t want your model to classify any emails, you can set the Status option to Inactive.
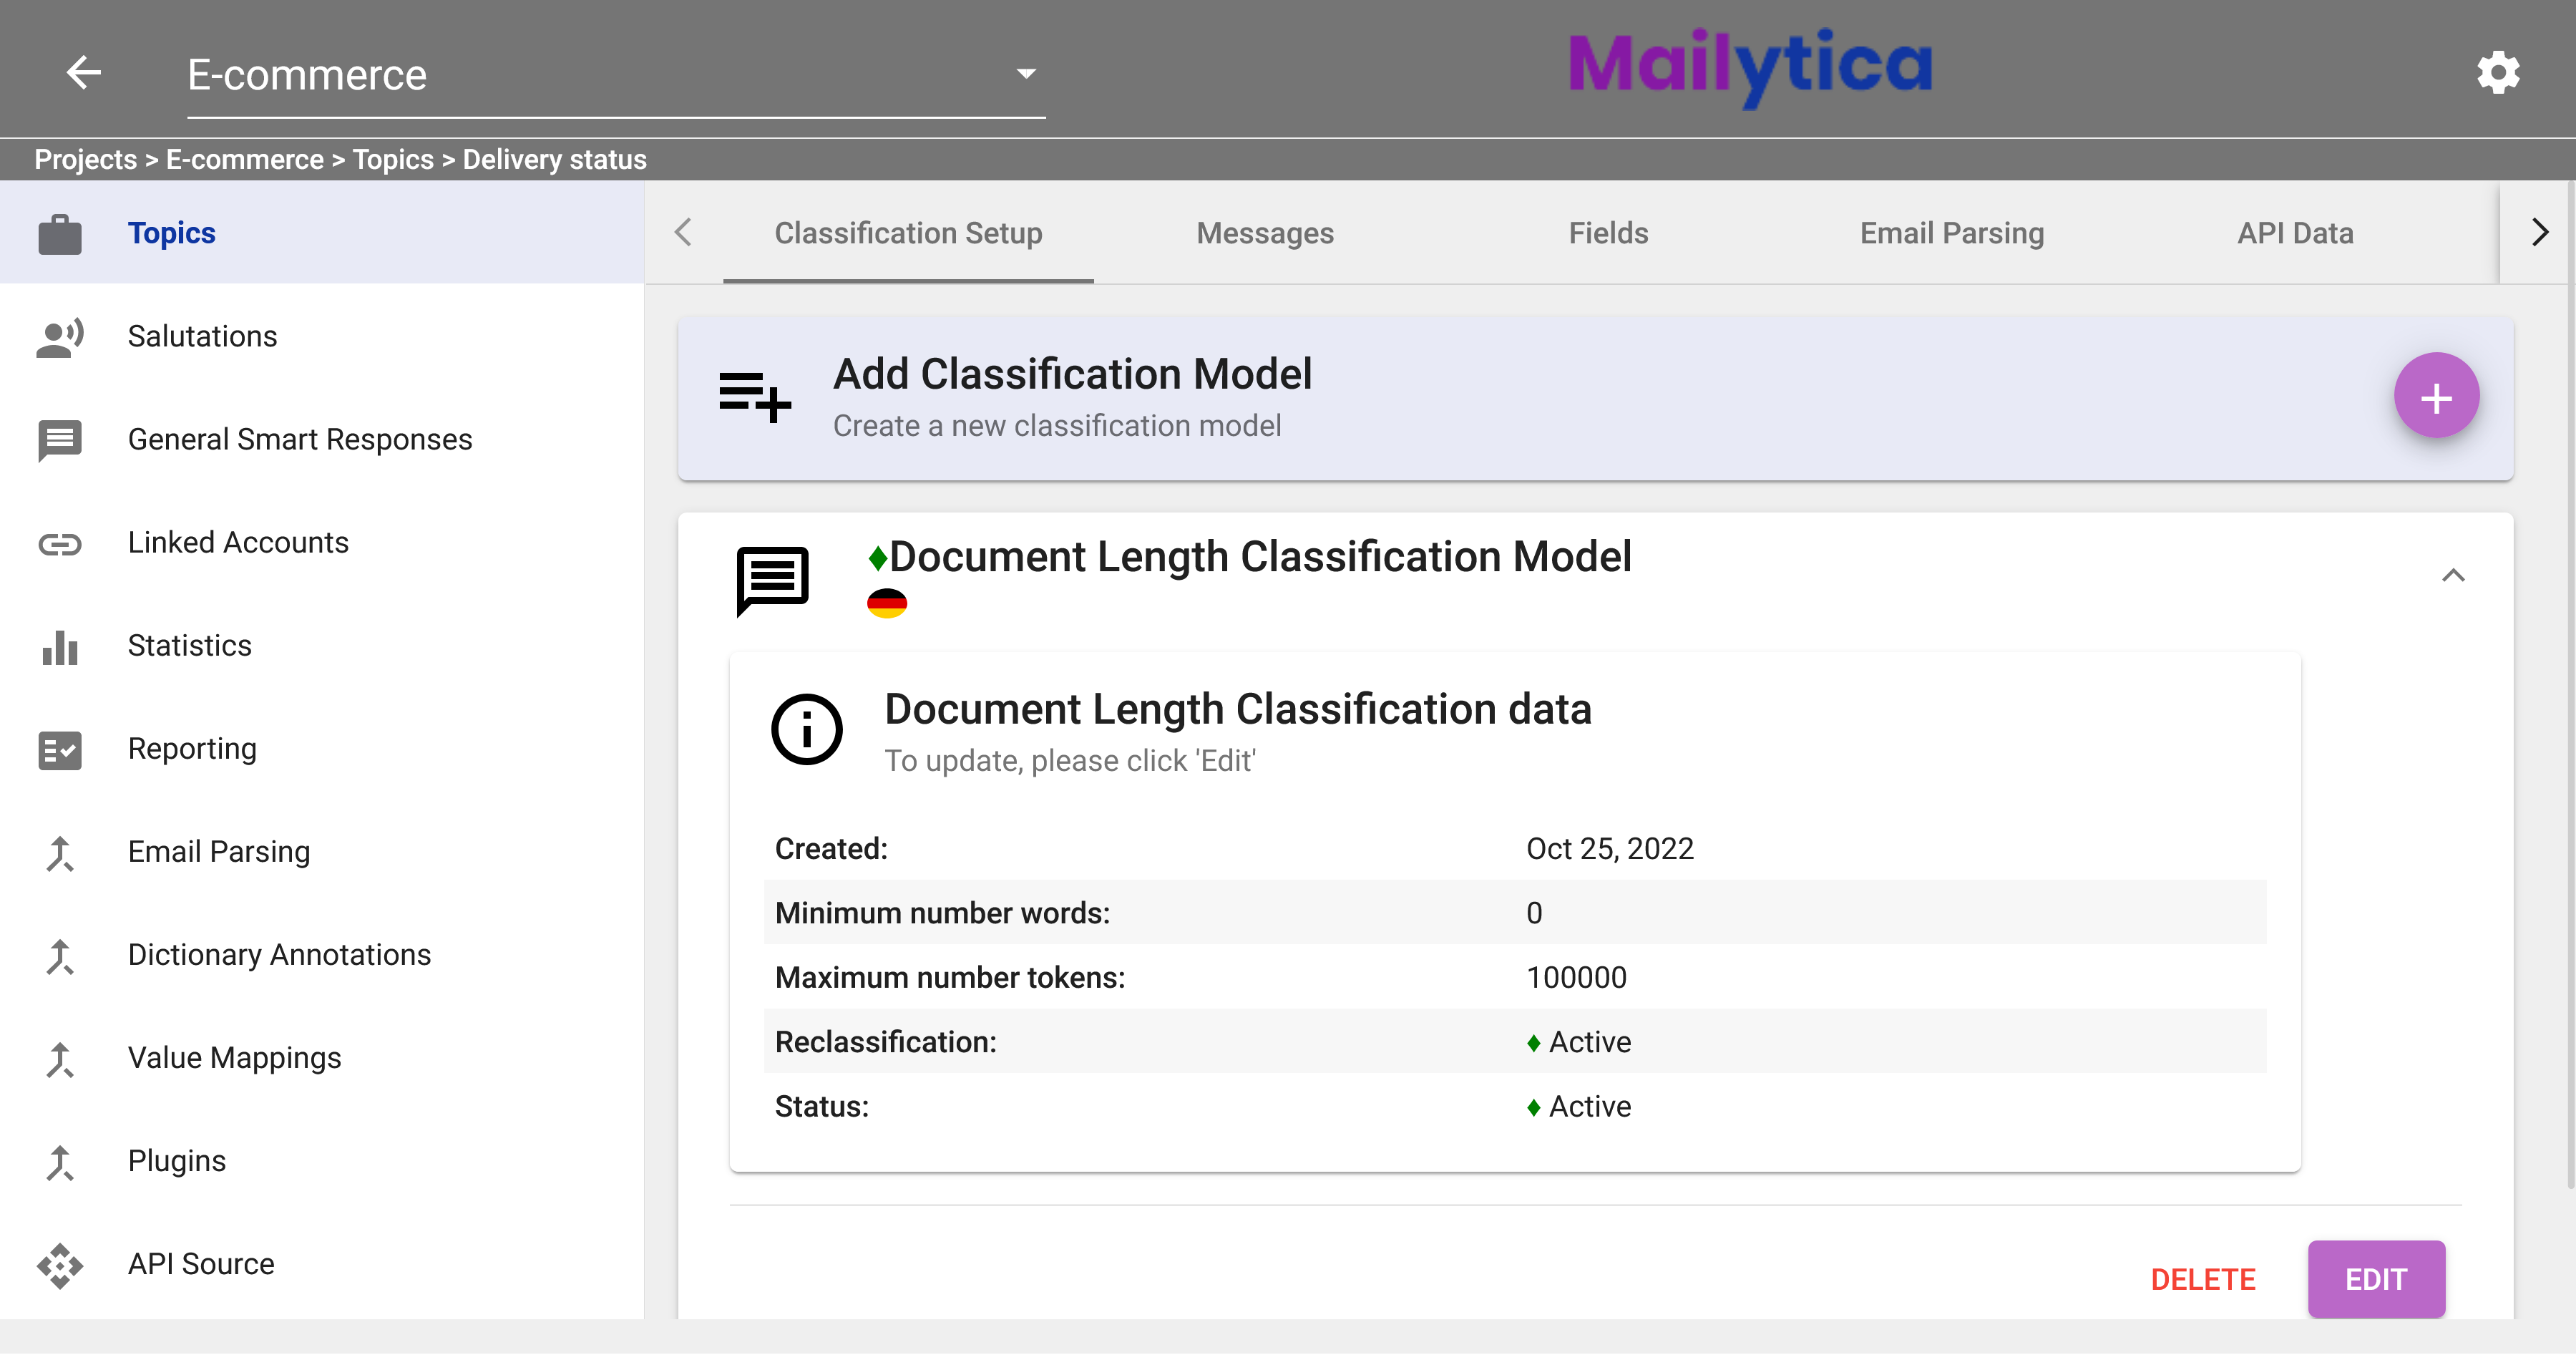
Document Length Classification#
With Mailytica, you can also classify email messages depending on the number of words they contain. You might use this feature to prioritize your inbox or to group messages in a specific language. Additionally, by classifying email messages by number of words, you can find messages that are likely to be advertisements or spam.
To create a new Document Length Classification model, follow these steps:
To begin, in the Classification Setup section, select Document Length Classification from the top tab bar. The Document Length Classification tab will show you the instructions on how to define your model. Click Next.
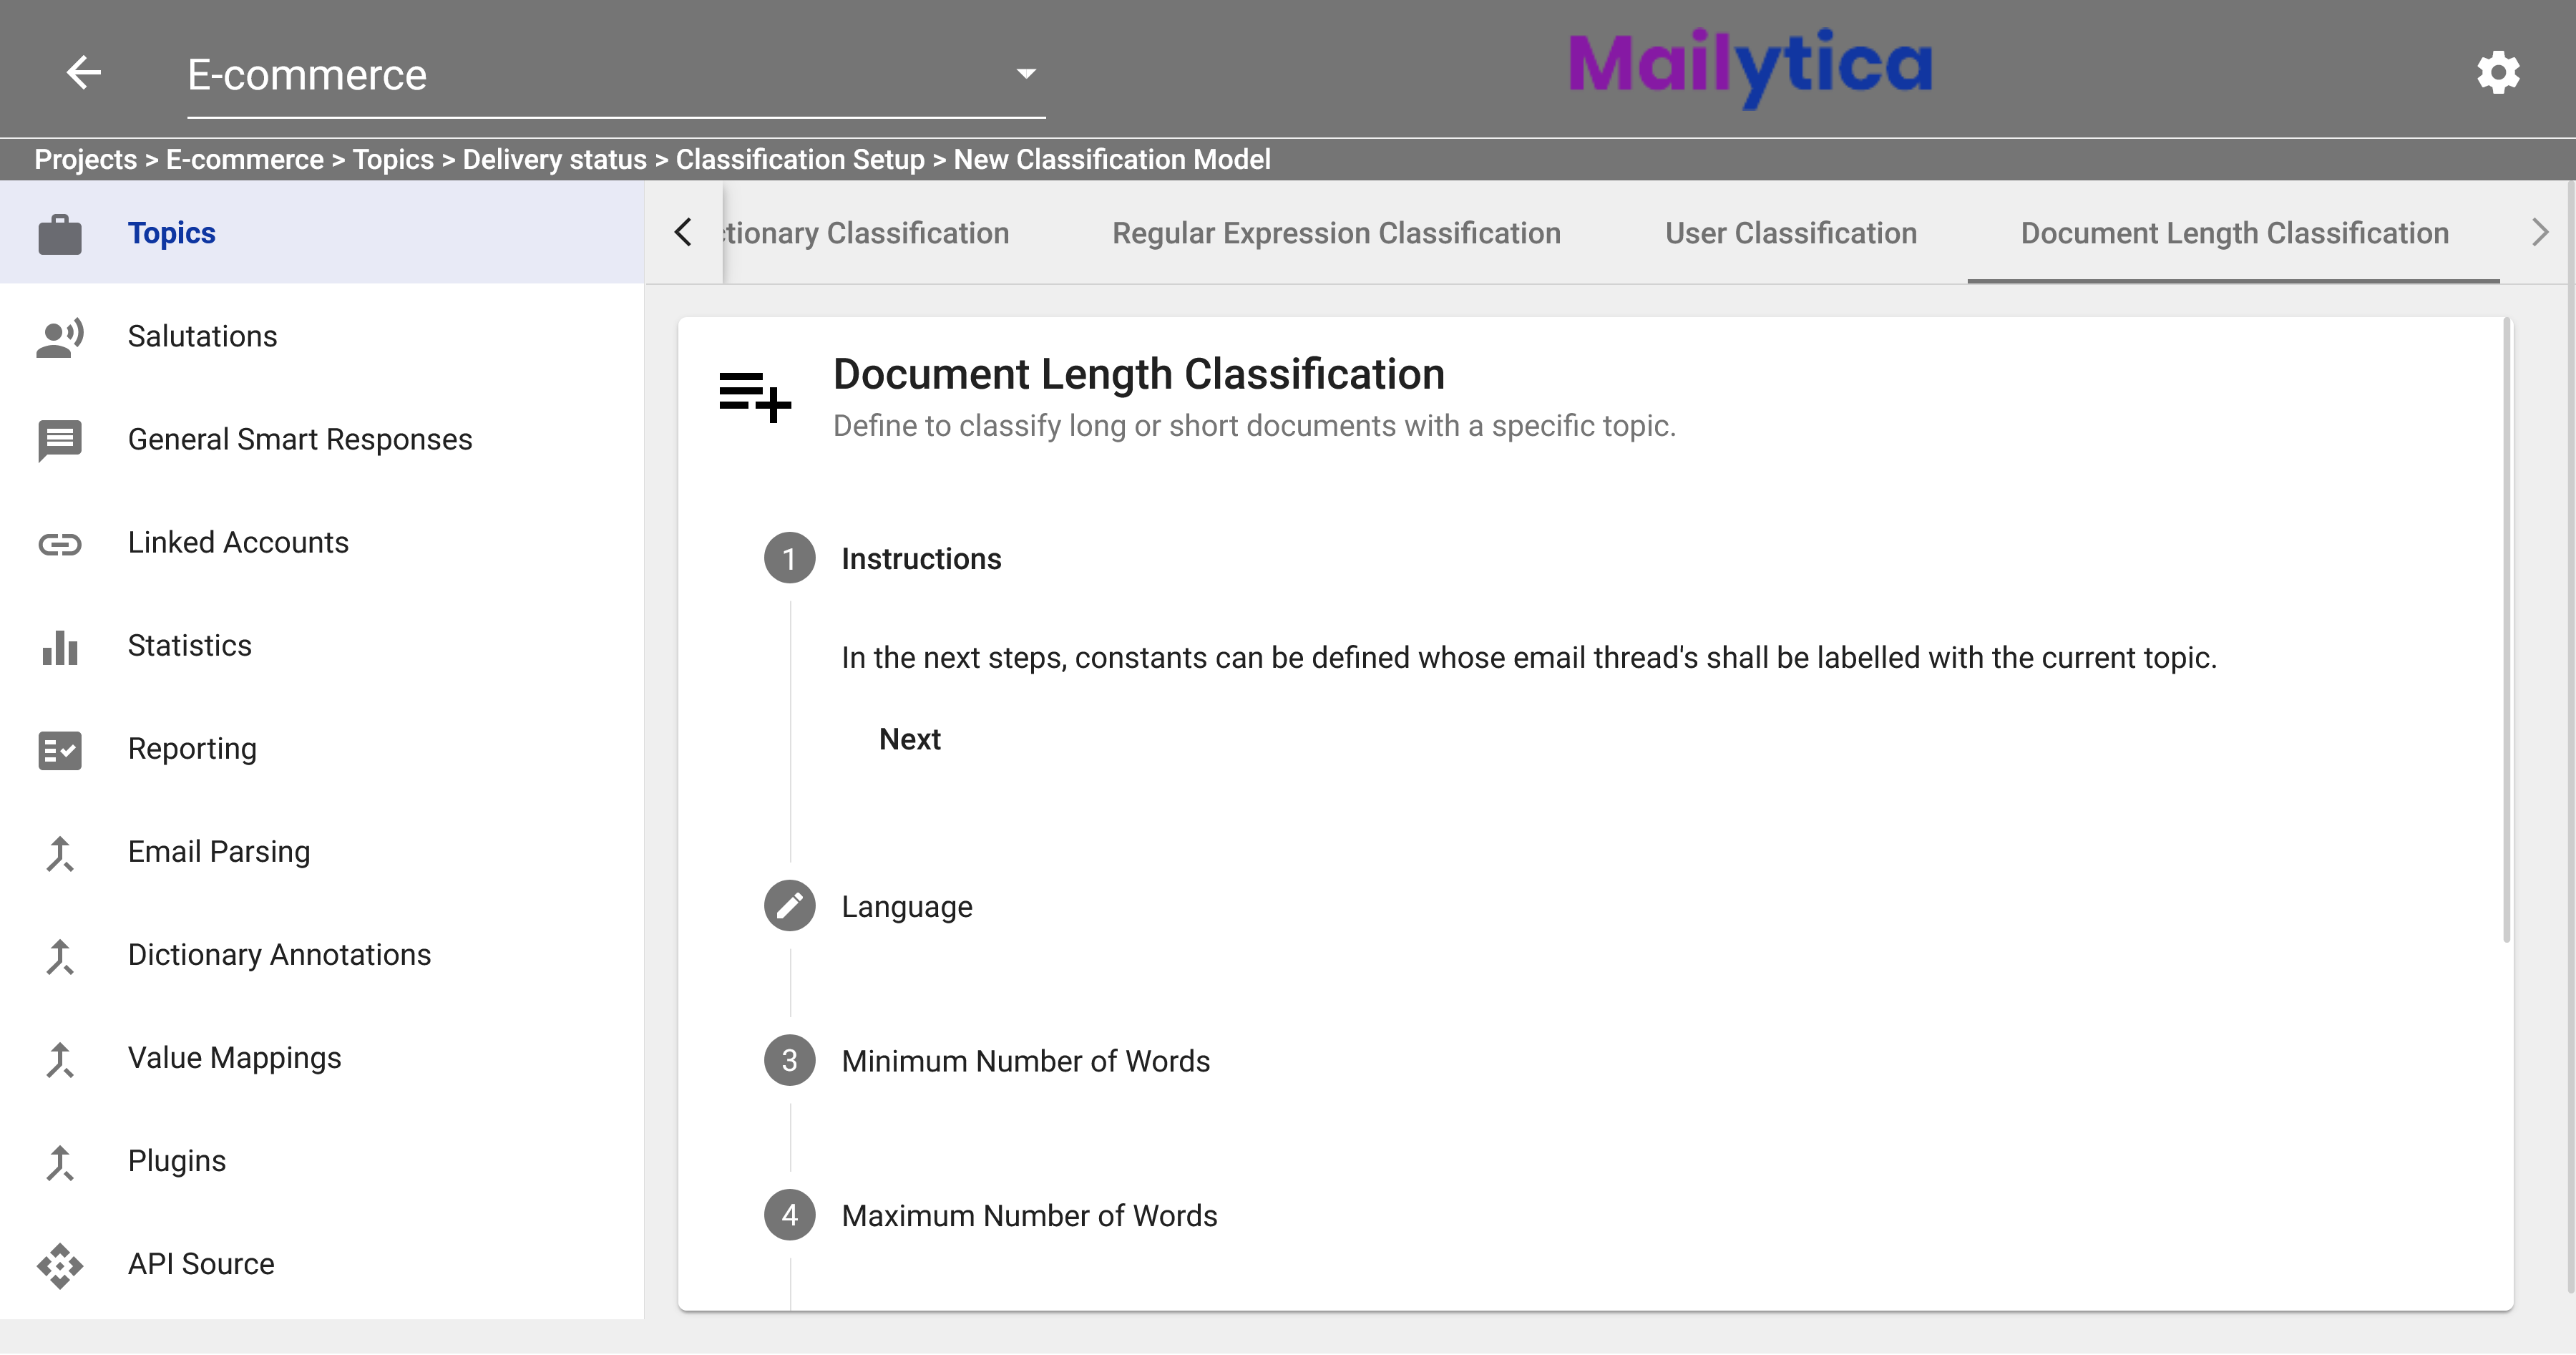
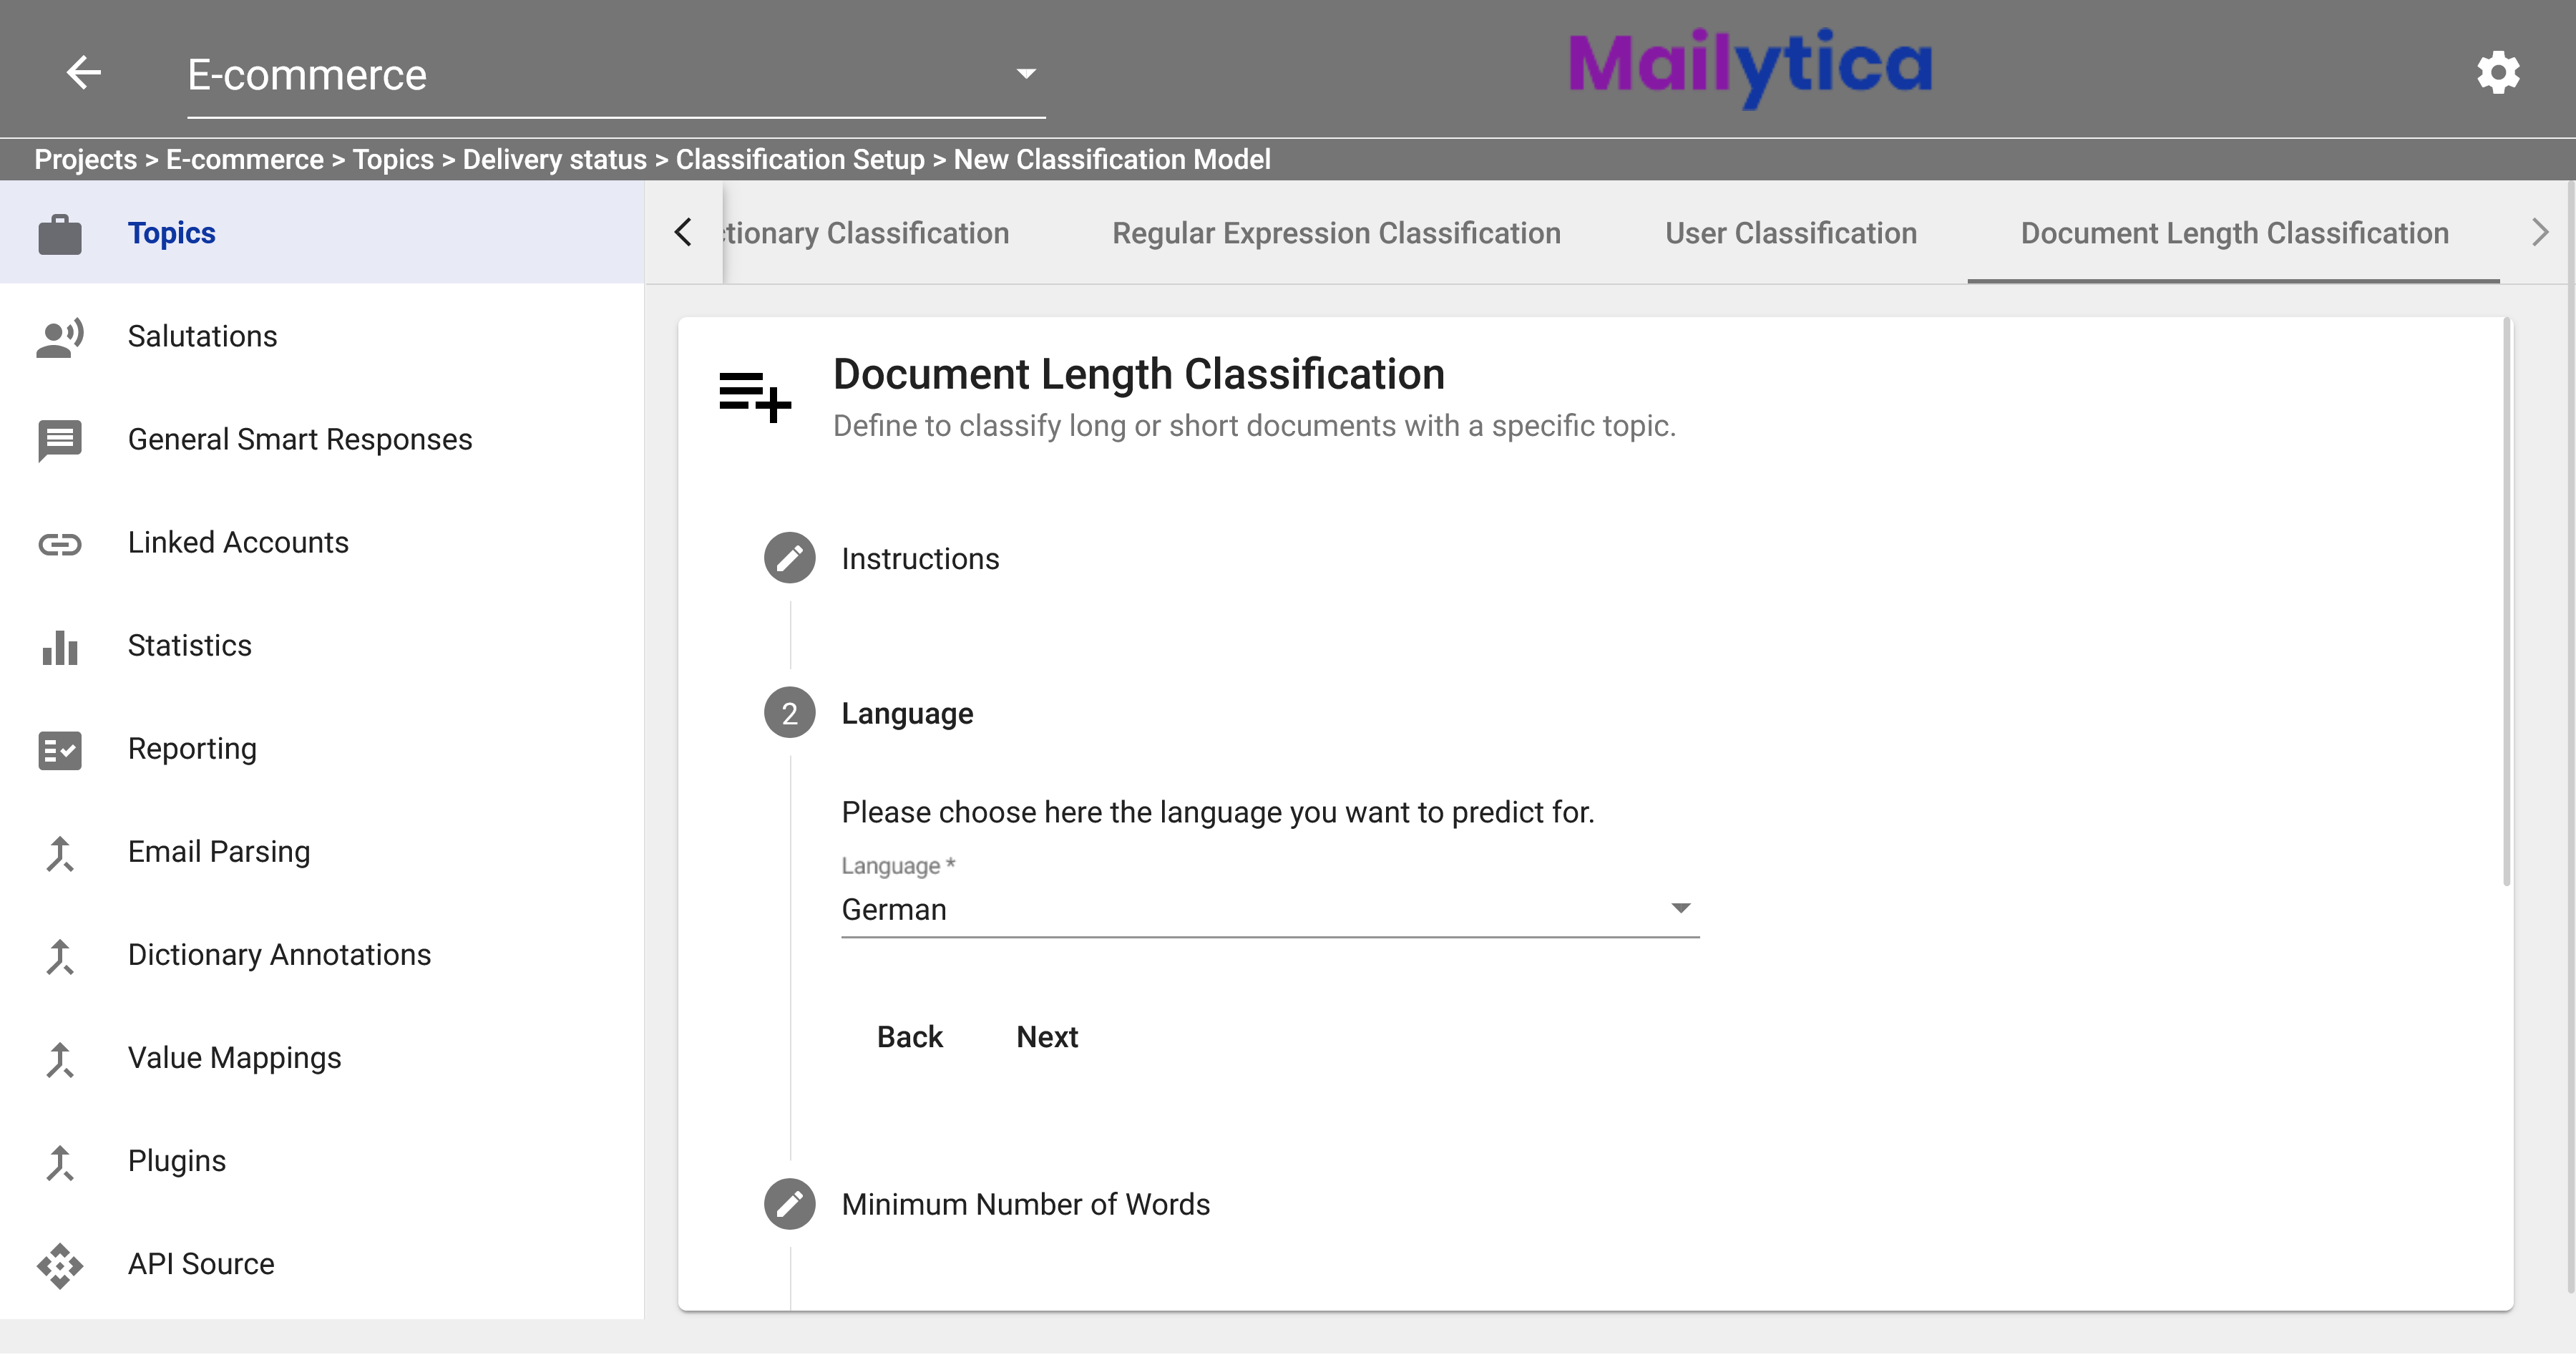
Next, in the Language section, you can choose the language of the messages you want to classify. For instance, if you are receiving emails in multiple languages and would like to sort your inbox by language, then you could create Document Length Classification models for each one. As an example, we can create a model that can identify messages in German, so they can be filed in a language-specific folder in our inbox.
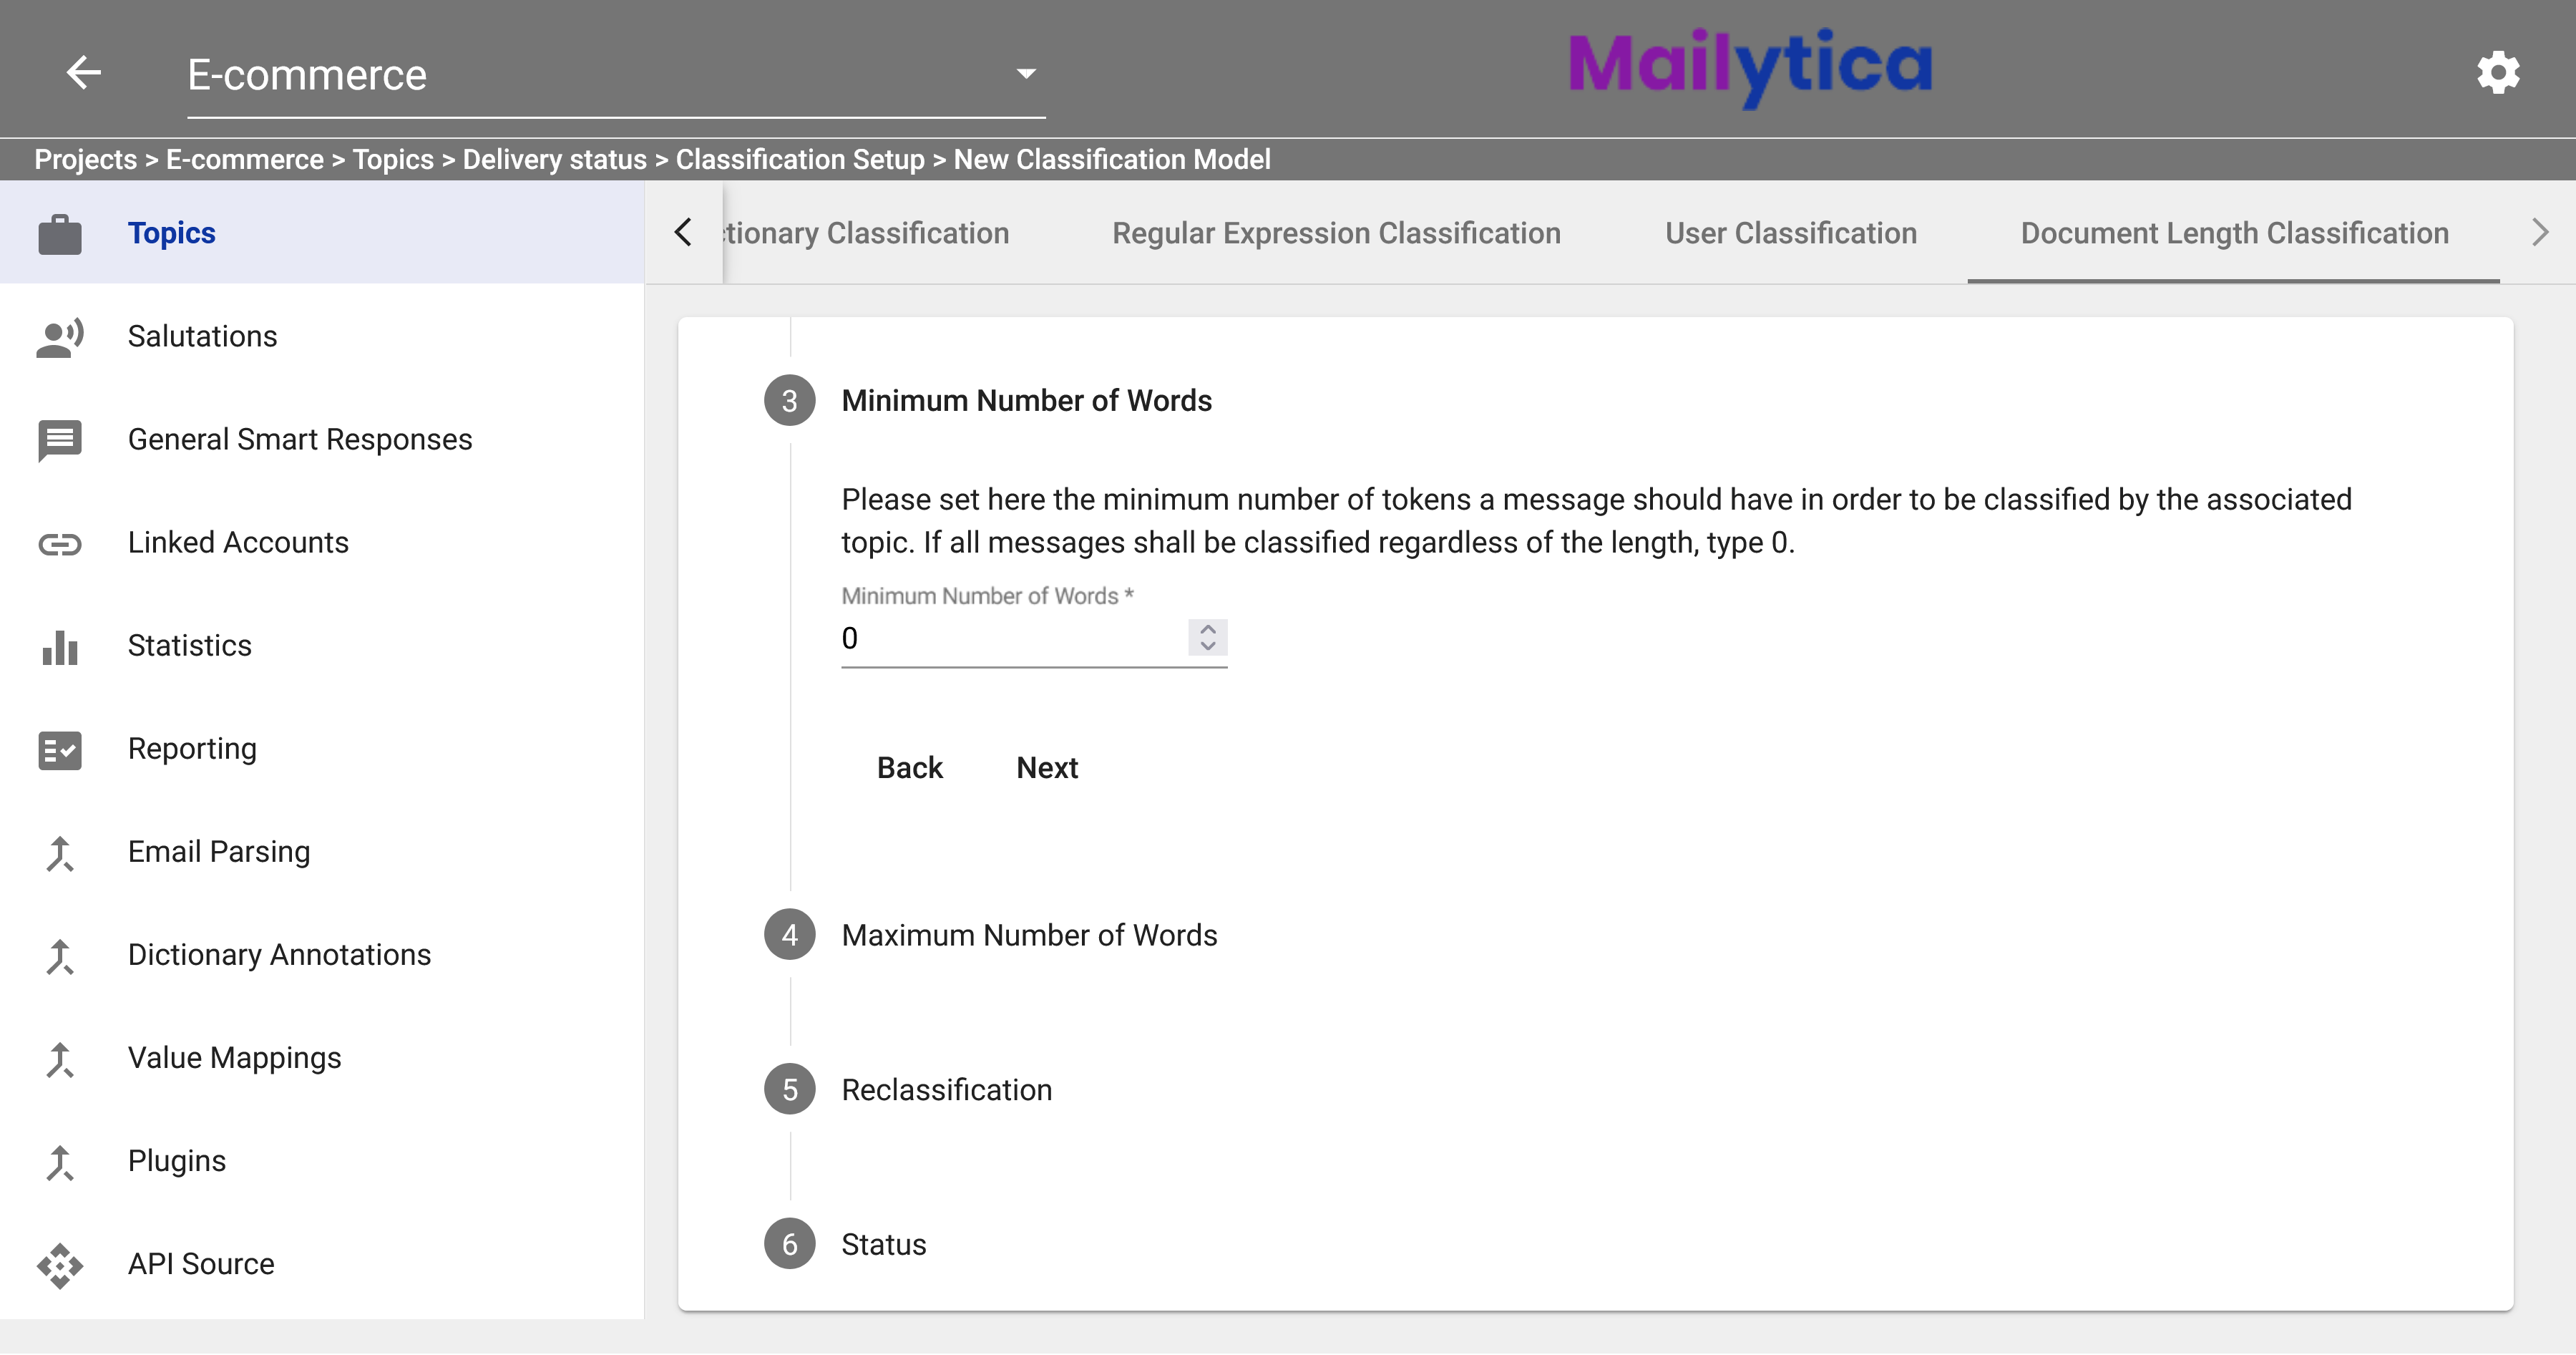
Following, under Minimum Number of Words, you can set the minimum number of words a message has to have before it can be classified into the topic. Set the value to 0 if you want messages from any length to be classified.
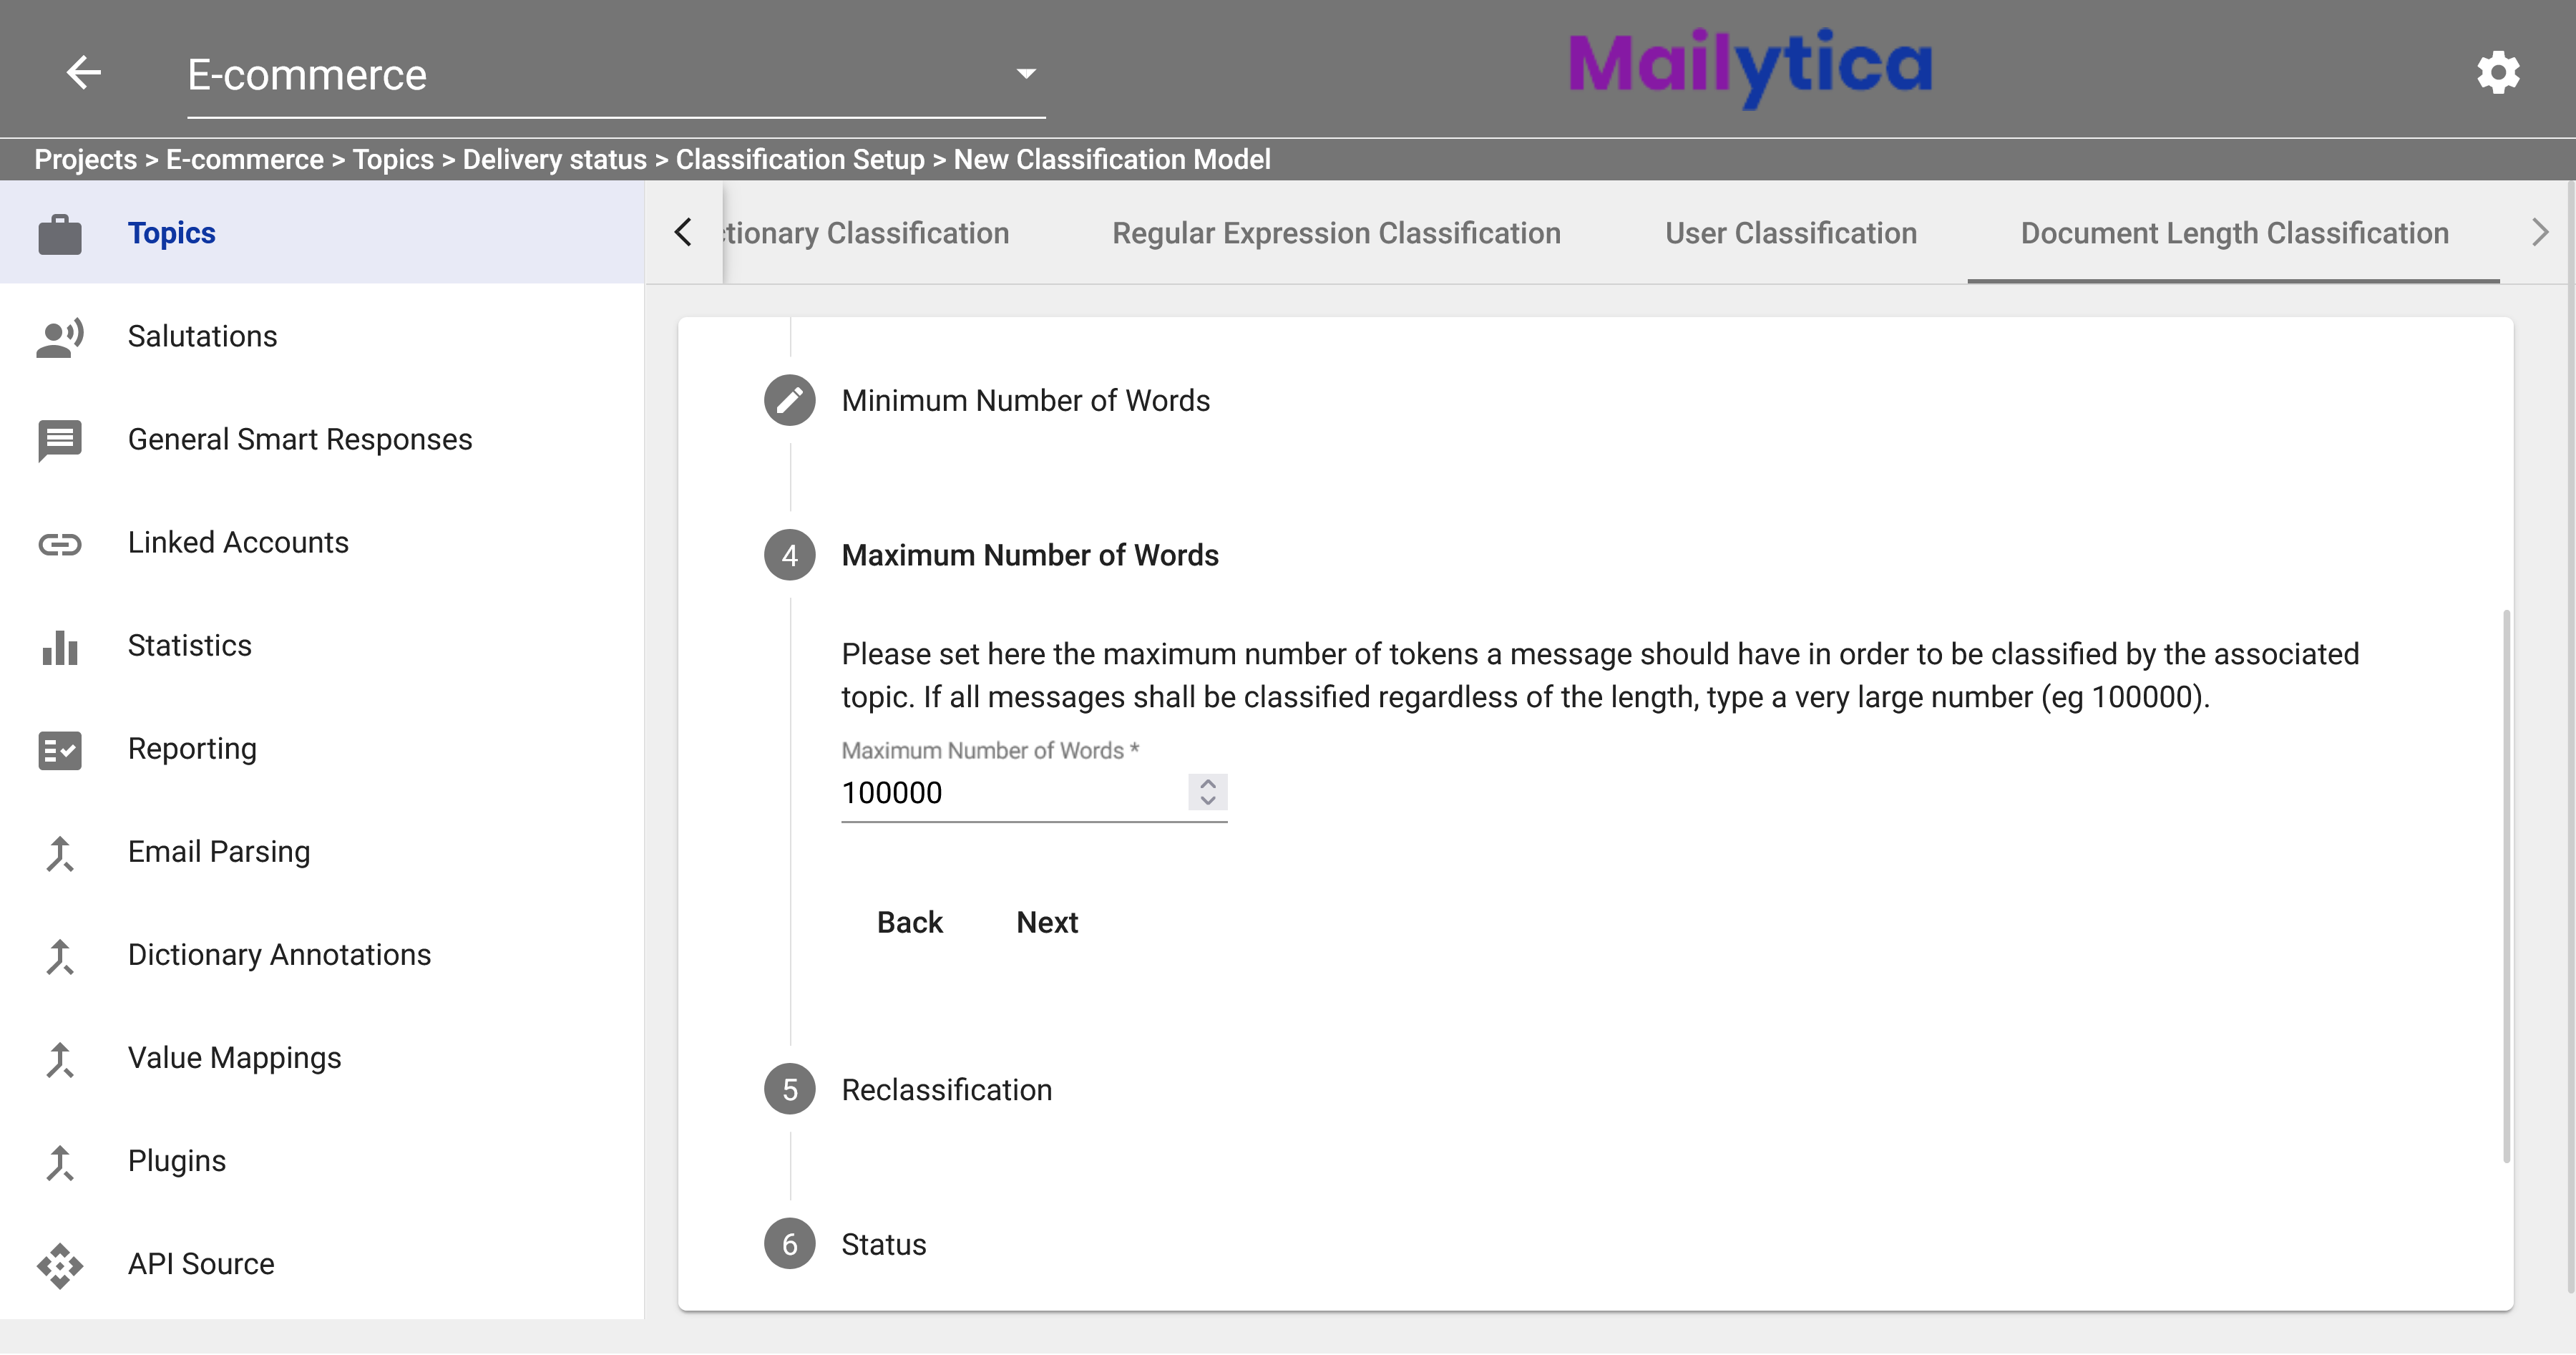
Similarly, in the Maximum Number of Words section, you can set the maximum number of words messages should have to be matched with their related topic. If you want messages to be classified regardless of length, enter a larger number, such as 100,000.
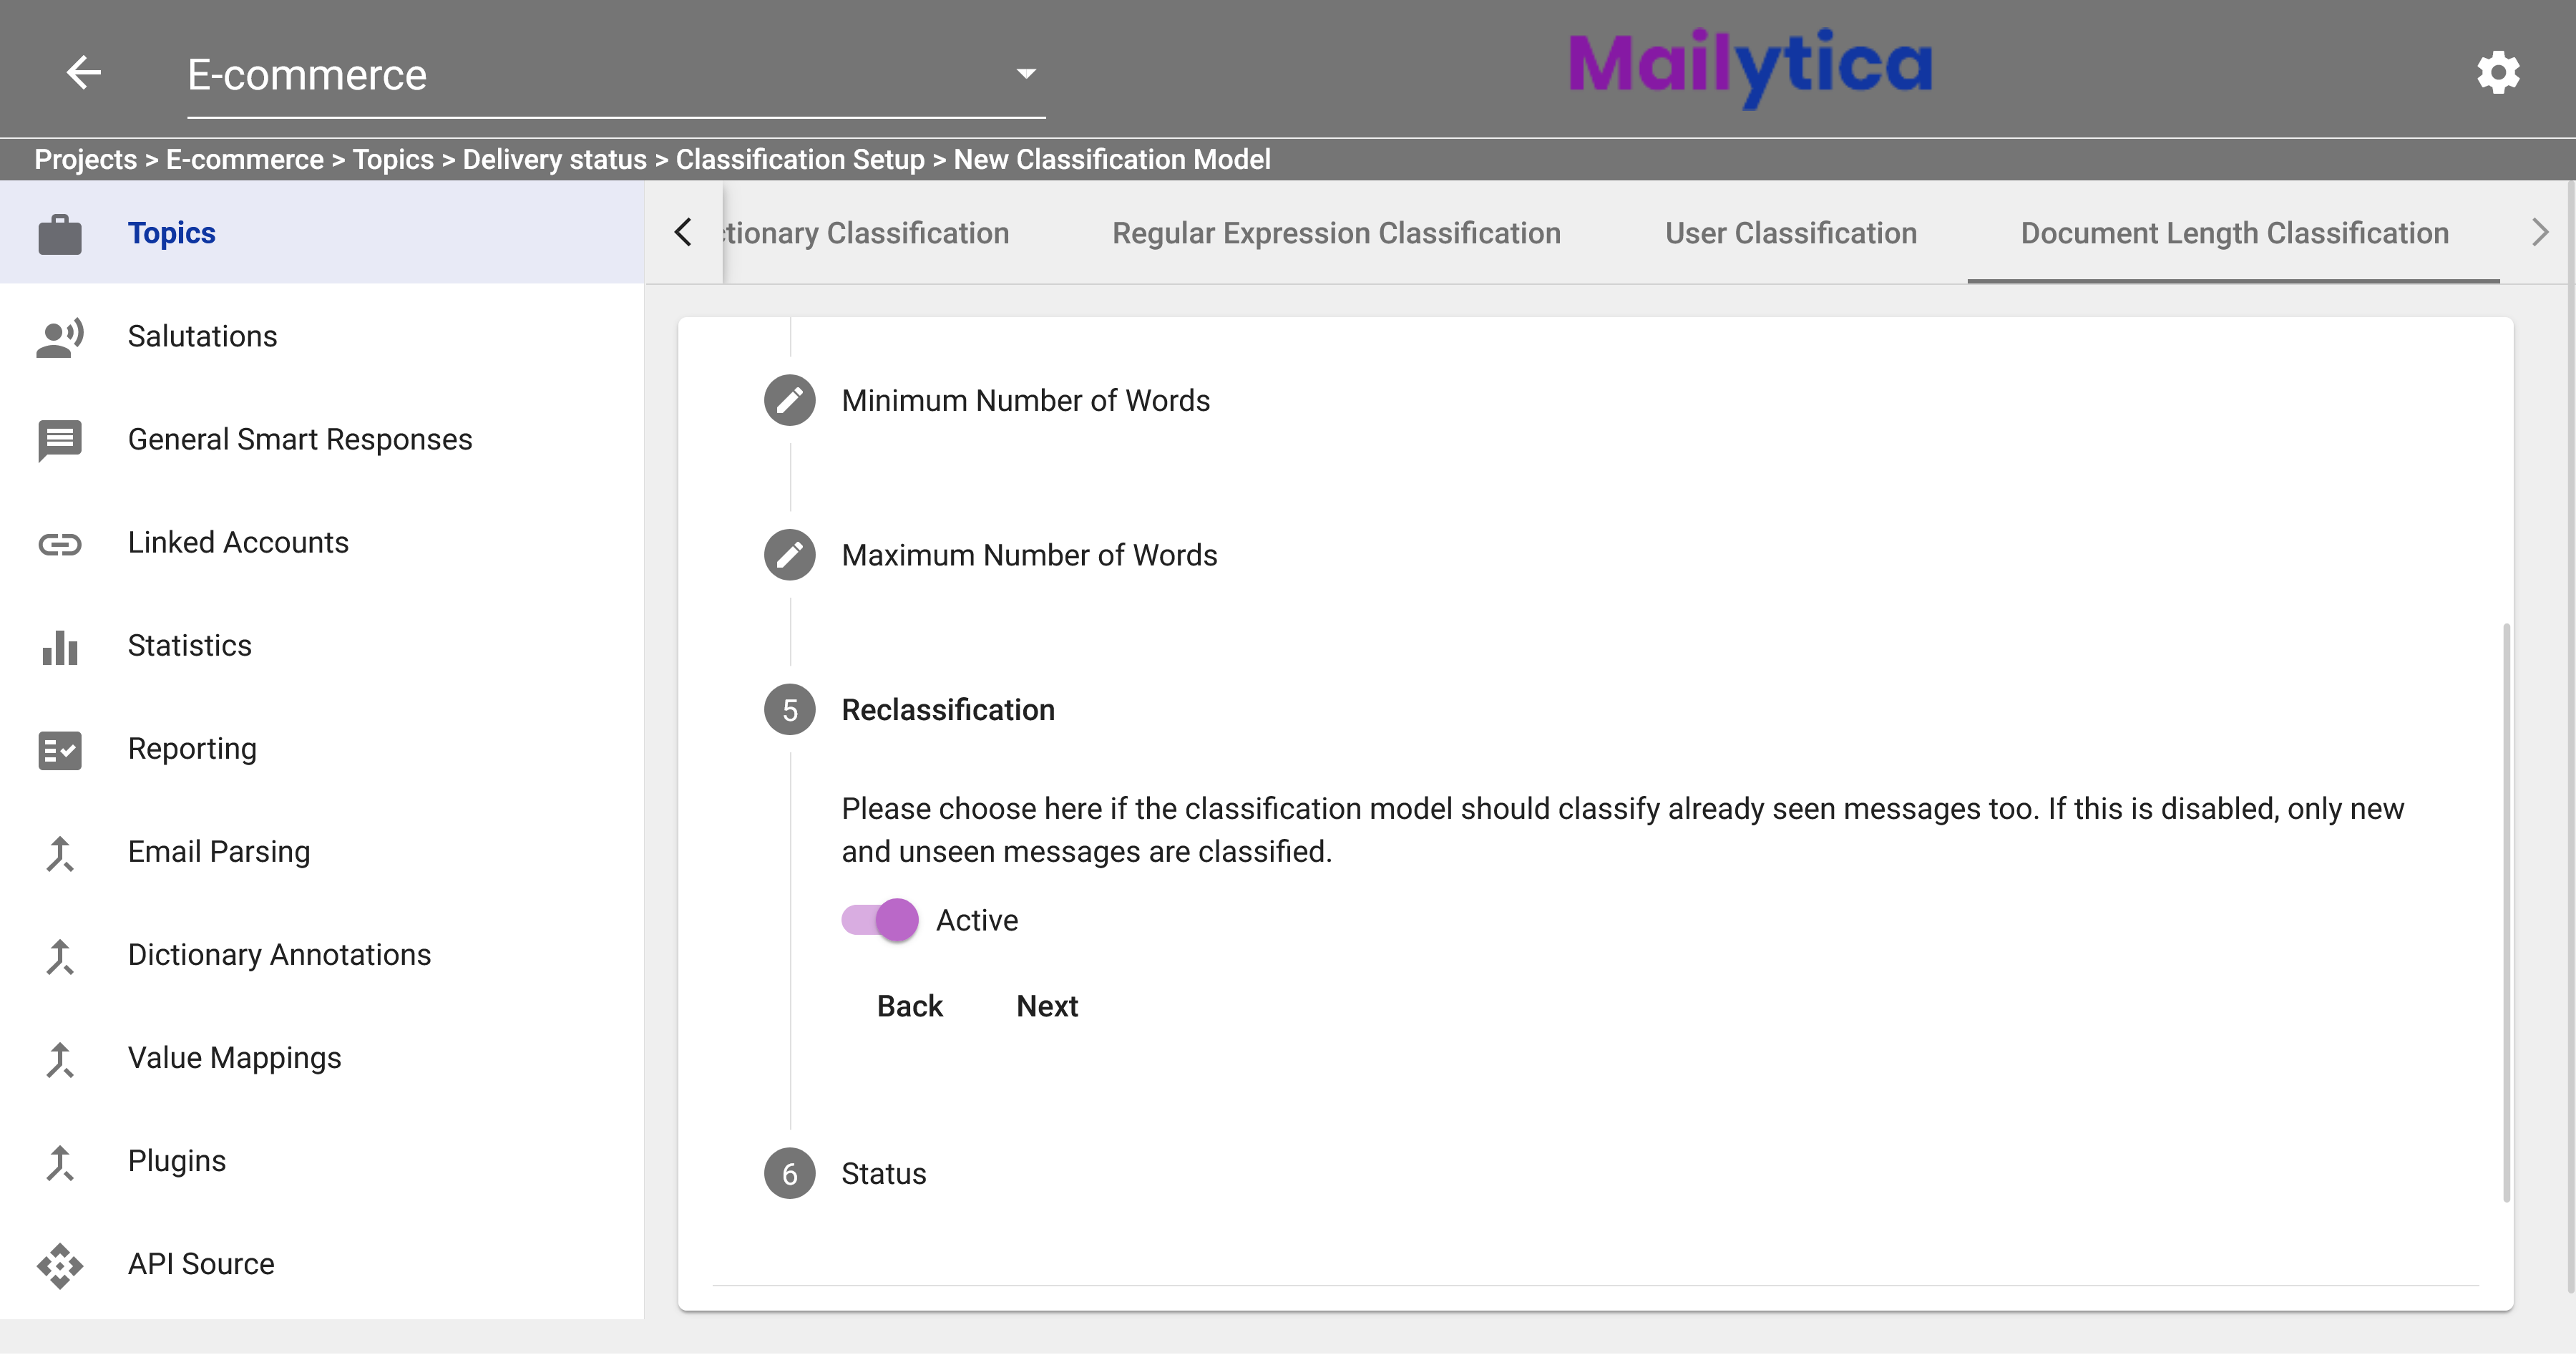
Then, the Reclassification feature allows you to choose whether Mailytica also classifies past messages that you have already received. If this feature is disabled, only new messages are classified. Therefore, the recommended value is Active.
To finish, in Status, toggle the Active button and then click Add. Your Document Length Classification model should now be activated and saved. If you don’t want your model to classify any emails, you can set the Status option to Inactive.