Fields / Variables#
In Mailytica, fields (or variables) can be used to incorporate multiple data sources into your messages.
Fields act as containers for data, and you can use them in the Mailytica’s Online Platform or in any email message.
You can include fields in your emails, which will be replaced by the field’s value when the email is sent out.
This value can be extracted from any source that you choose, including:
Data in the email itself (e.g., extracted through email parsing rules).
Data in your Mailytica account (e.g., by setting the value manually when creating a field in the Online Platform).
Data in external data sources connected to Mailytica through APIs.
Fields can be used to insert dynamic content like names, dates, and prices into your emails without having to manually edit them each time.
For example, if you were sending an email to a customer about their order and wanted to include their order status in the message, you could use a field.
You would create a field called order_status that contains data extracted from your company’s CRM or ERP system.
When you add this field to a Smart Response, Mailytica would replace order_status with the value was associated with that variable.
Tip
To use the value of a field in your Smart Responses, simply enclose it in curly brackets {}. For example:
Your order is {order_status} Your order is ready for dispatch
For more information, please visit Smart Response Variables.
Fields can be created in a few different ways:
The explicit way is through the Fields / Variables section in the Online Platform. This is the most common and straightforward way to create fields in Mailytica.
The implicit way is when fields are created as a result of API calls, Email Parsing, Dictionary Annotations, Value Mappings, or any other form of data extraction. These fields work like the ones above, but they will not be visible in the Fields / Variables section of the Online Platform.
Finally, there are Mailytica’s predefined fields that will always be available. These are meant as a starting point to help users get started quickly without having to build their own set of custom fields from scratch.
Add a Field#
Explicit Method#
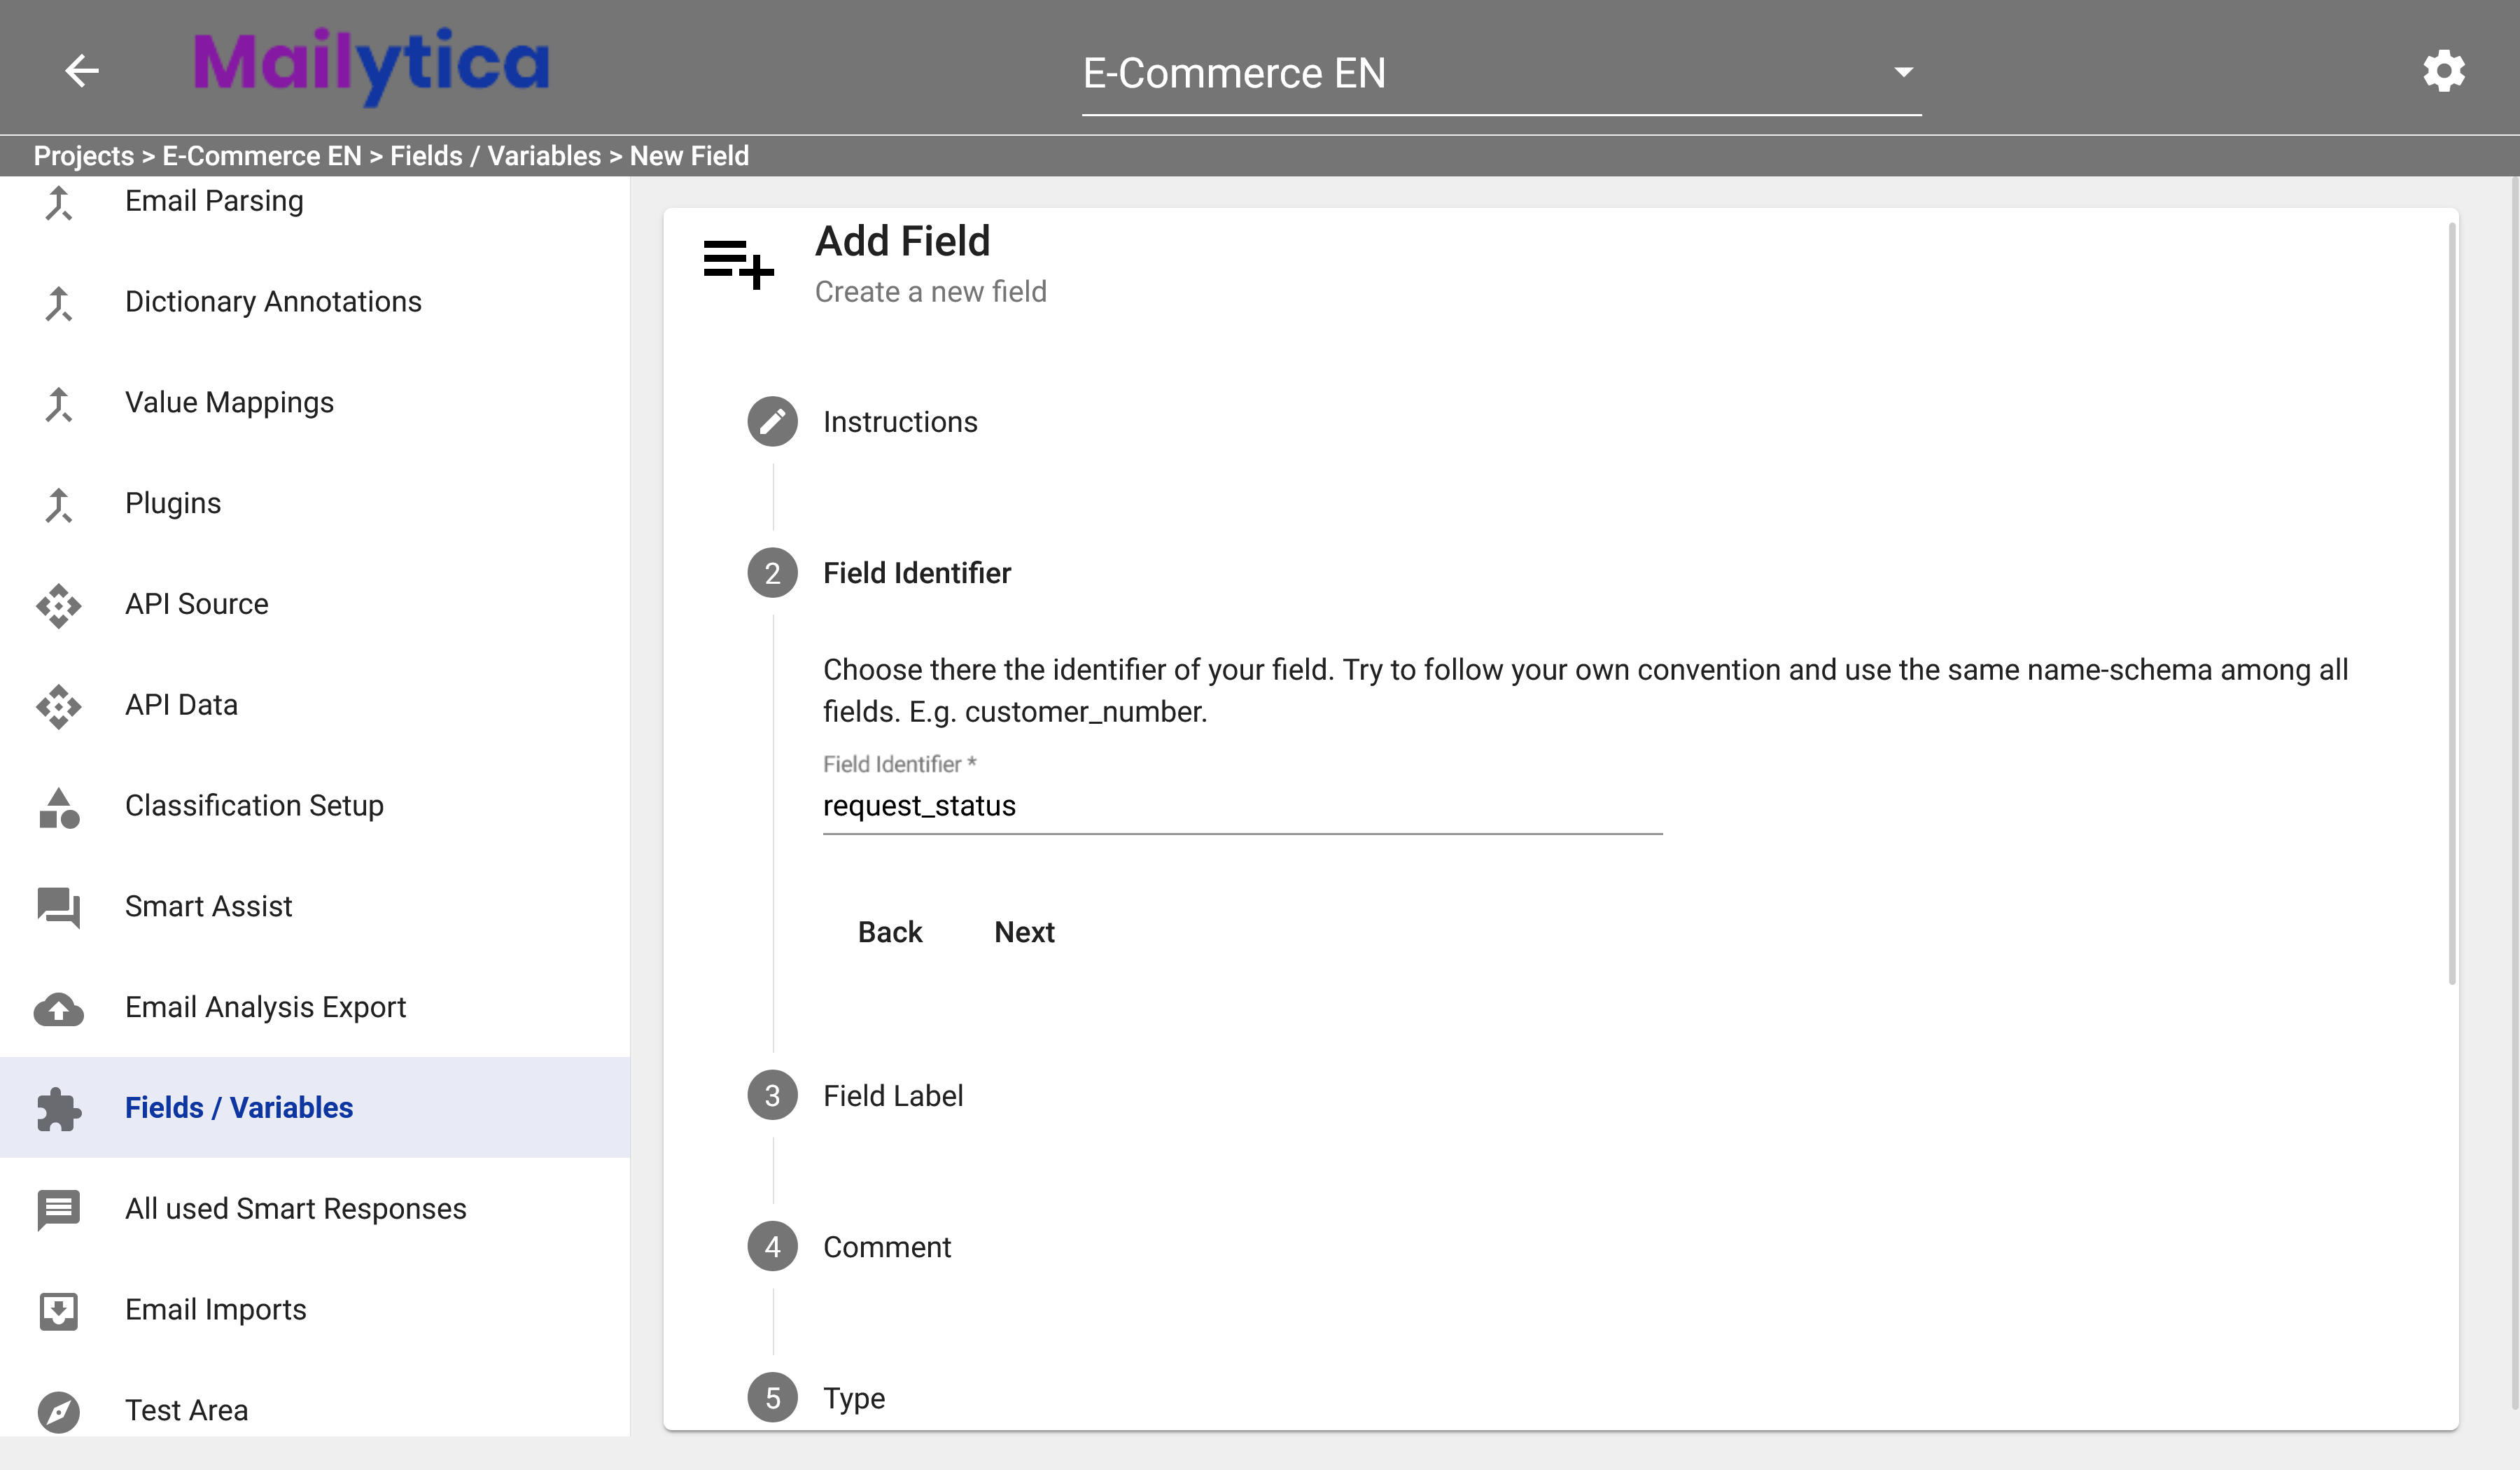
To add a field to a particular topic, go to the Edit section of your topic and select Fields from the top tab bar. Alternatively, if you want your field available for all topics, click on Fields / Variables in the left-side menu. Click on the button in the Add Field card. The Add Field section will show you the instructions on how to create new labels. Click Next.
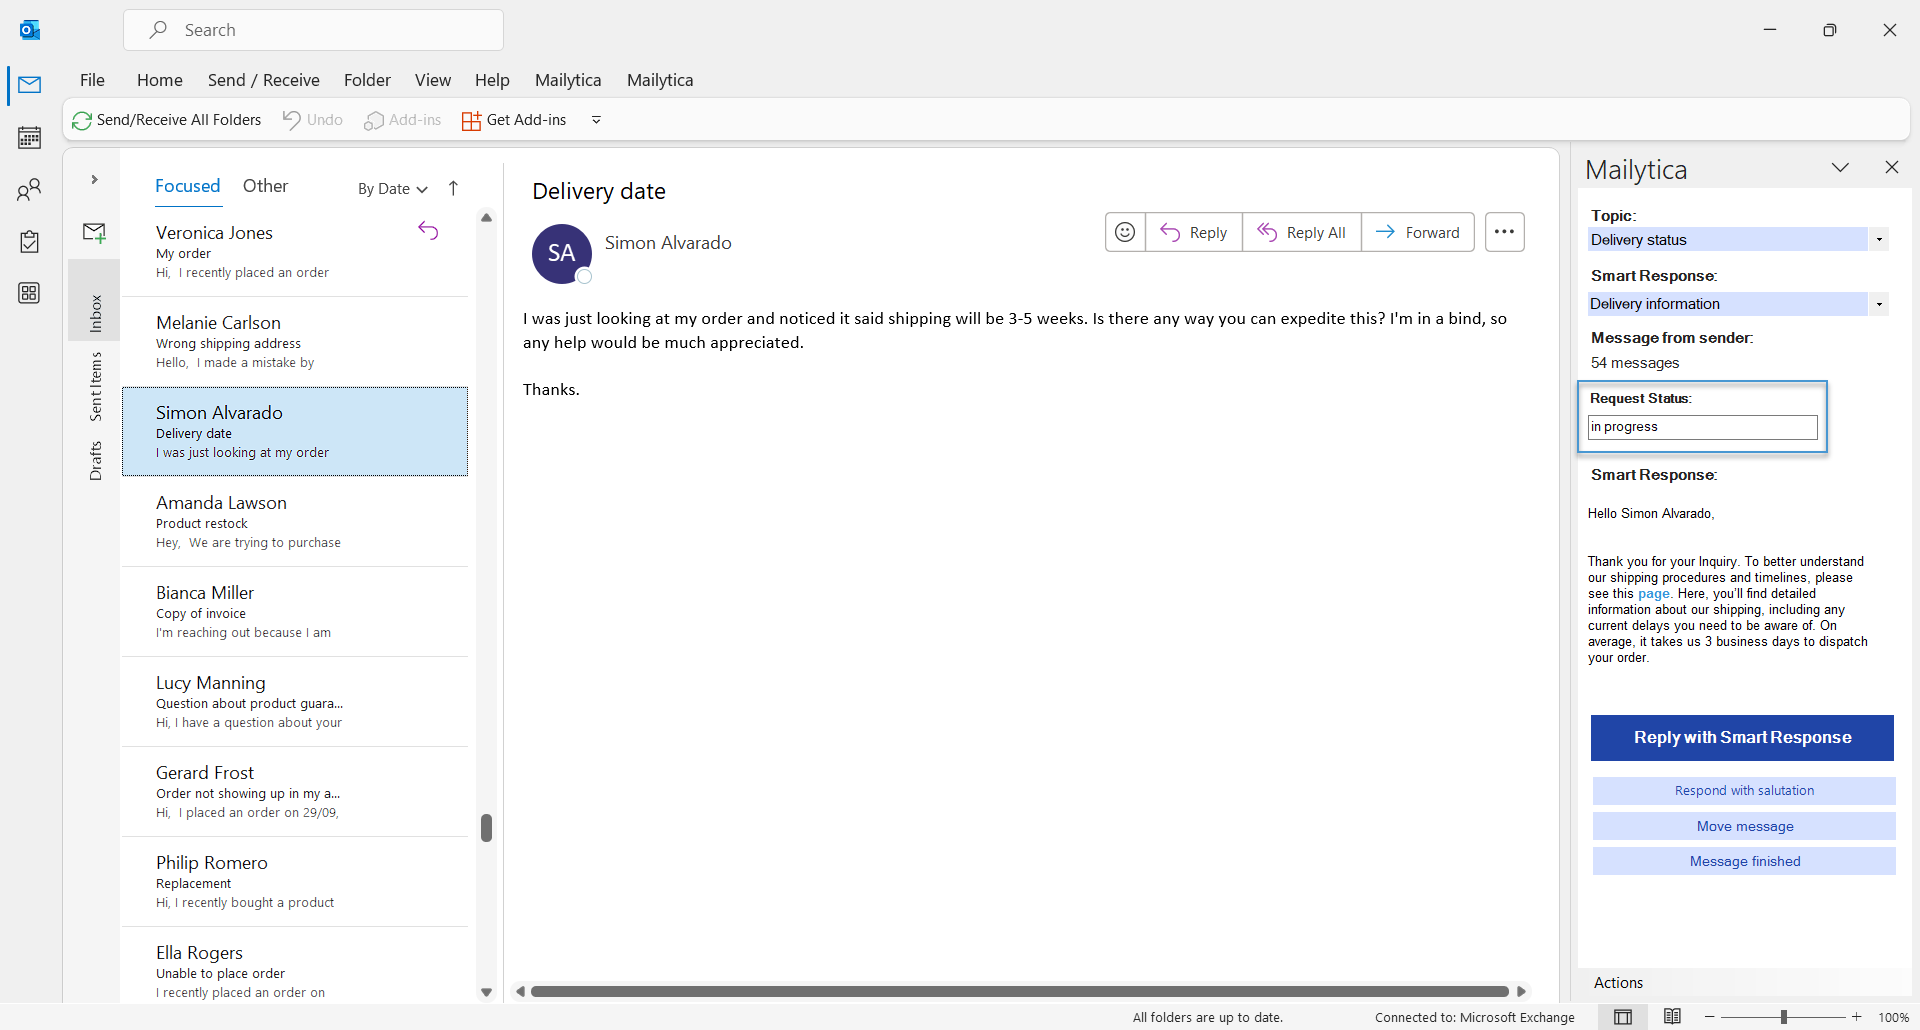
Under Field Identifier enter a name that will help identify your field. Let’s create a field where agents can track the status of customer requests, and we’ll call it request_status. We recommend using consistent naming conventions with all the fields you create, such as always using underscores as separators.
Next, in the Field Label section, enter a label for this field that will appear to end-users when it is shown in any of Mailytica’s integrations (Outlook, Gmail, etc.). The Field Label should be easier to read and understand than the Field Identifier, in this case, we’ll type Request Status.

Then, in the Comment section write an internal note for your team about what the field represents and how to use it—in this case, we’ll type Select how complete the request is.
Following, under Type select the category that best fits your field’s content from the dropdown menu. The most common field type is String. It’s used for things like names, phone numbers, order ids, and so forth. In out example, we’ll use String Array to store multiple string values.
Types of Fields
The available field types are:
String: It can contain any alphanumeric characters, including spaces and special characters.
Link: This is a field that contains hyperlinks to web pages or documents. Users will be able to click on links you create by using Mailytica’s integrations.
String Array: This is a field that can contain multiple strings. It’s useful for fields that might have multiple valid answers.
DateTime: Machine-readable date format
YYYY-MM-DDThh:mm:ssTZD.Date: Machine-readable date format without time data
YYYY-MM-DD.EuropeanDateTime: European date formatted as
DD.MM.YYYY hh:mm:ss.
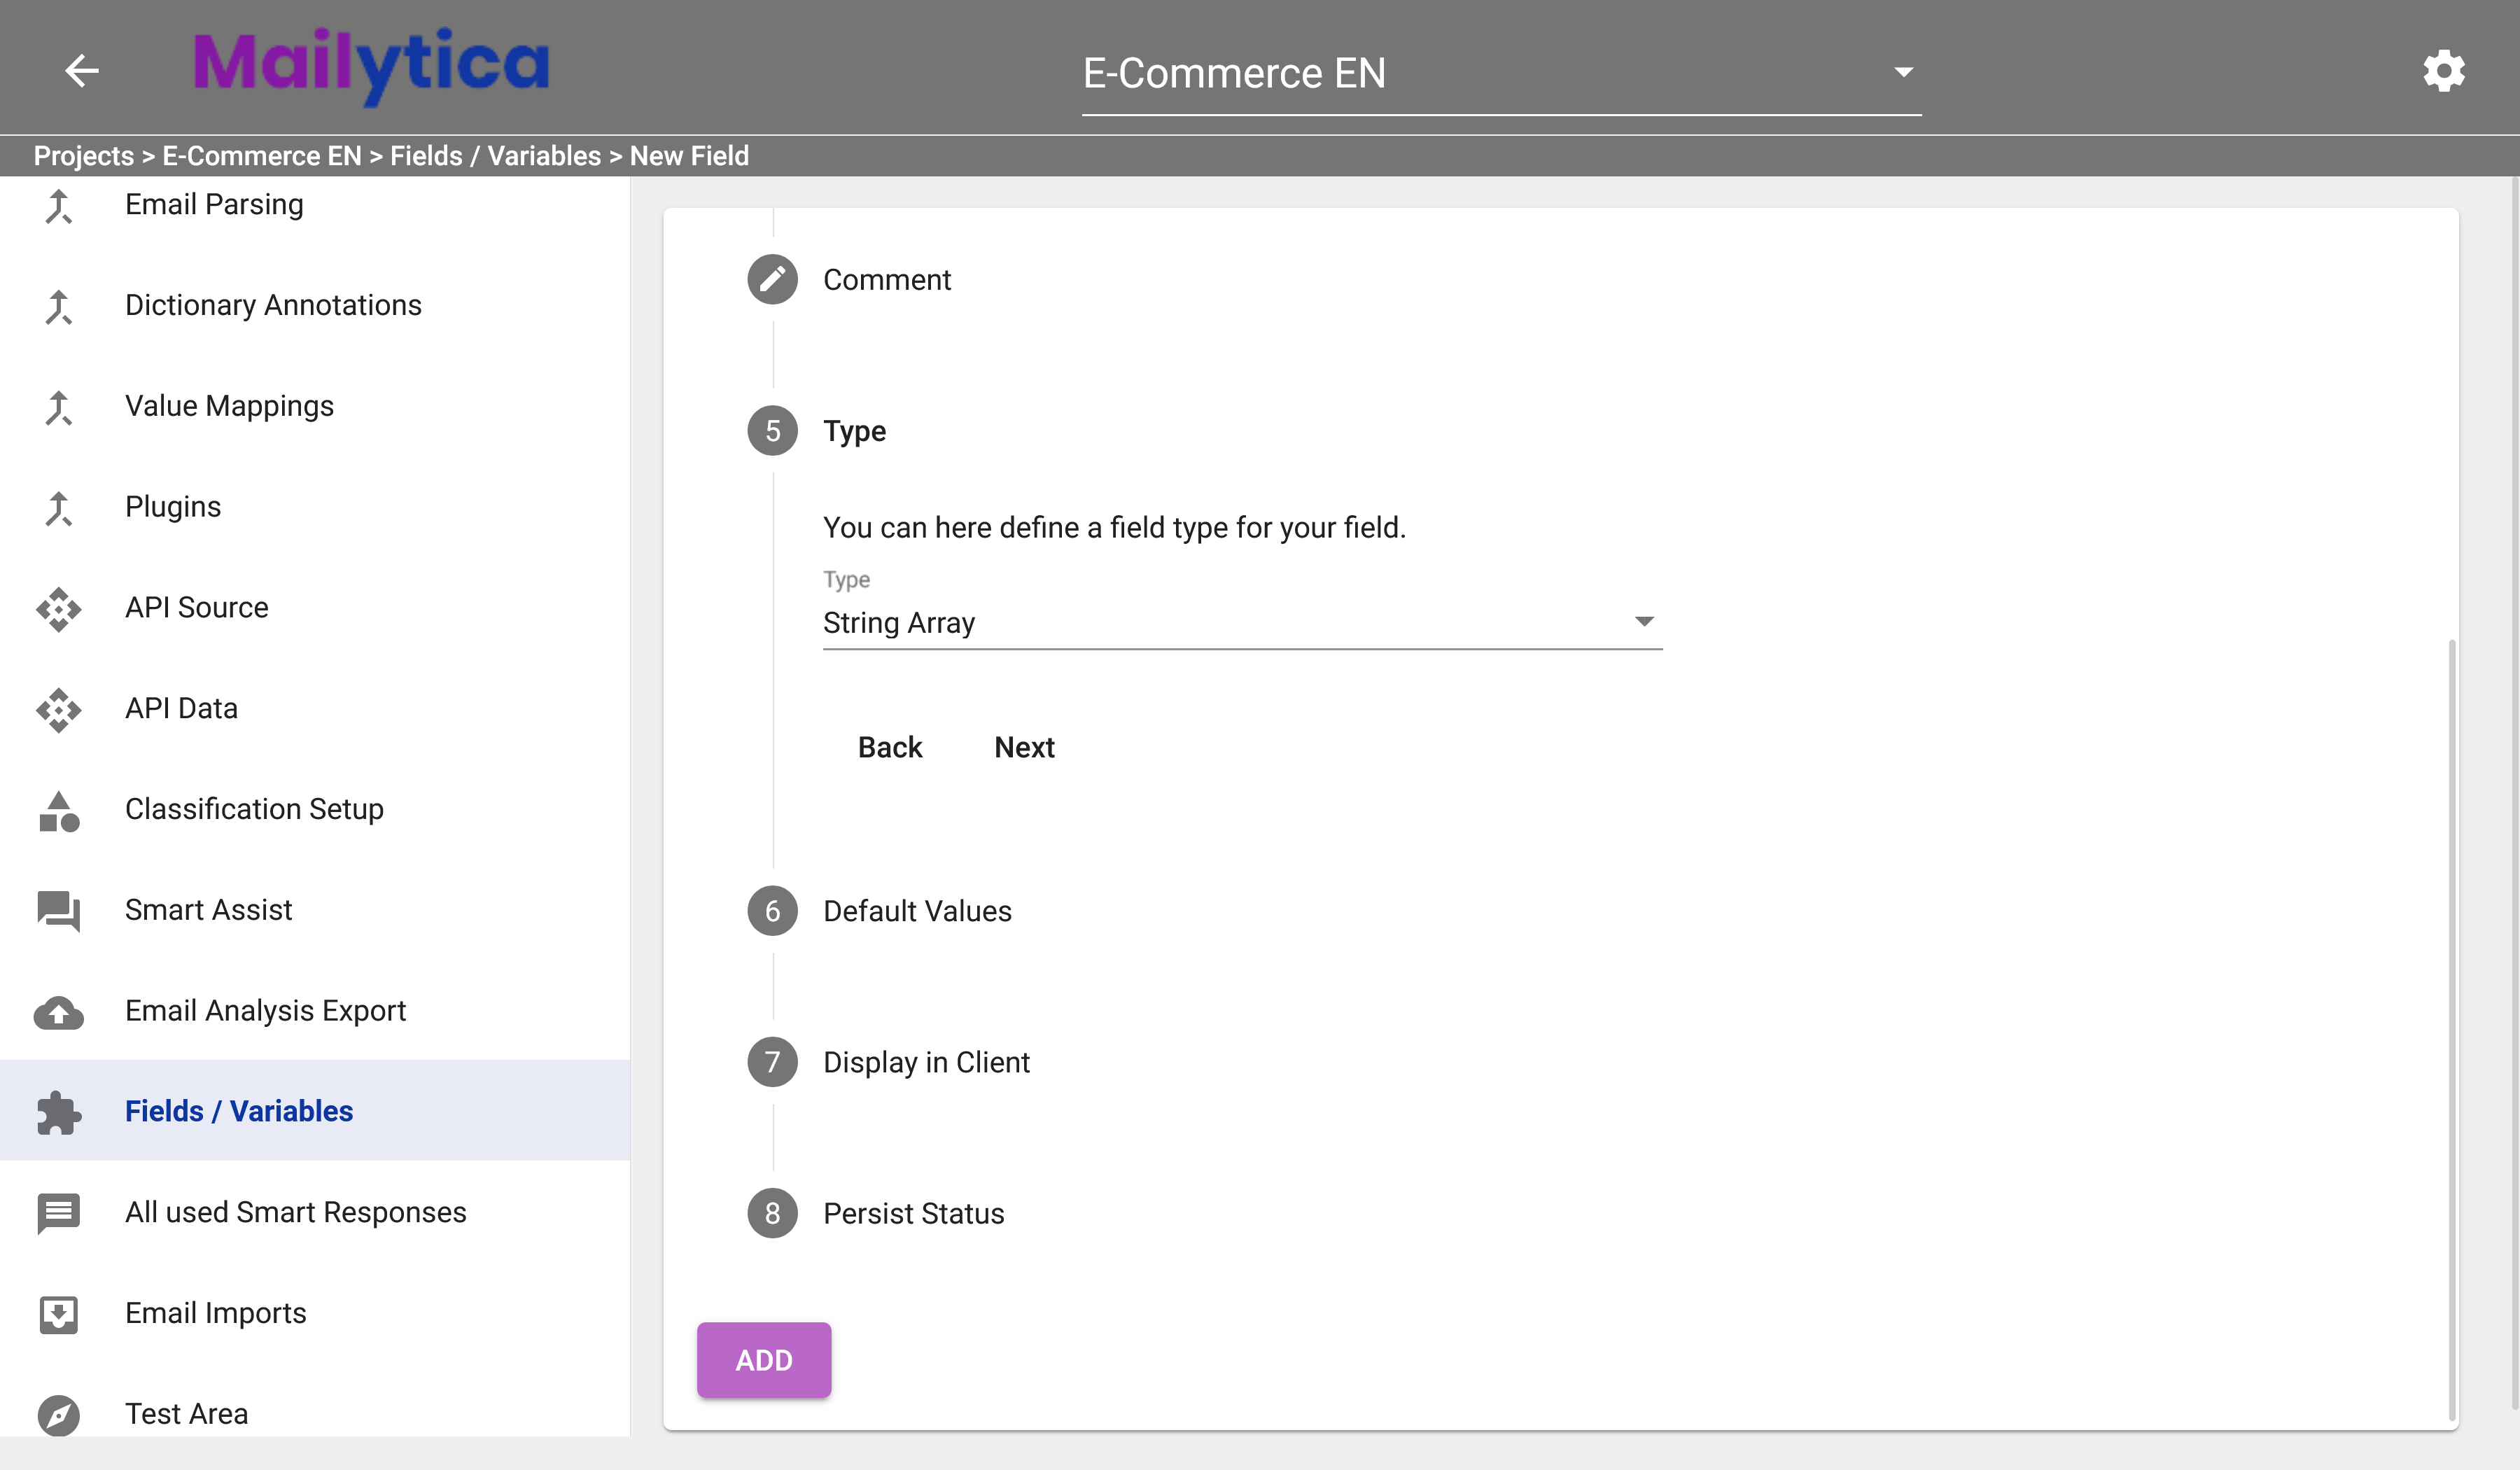
Next, under Default Values you can set the value that will be used as a default for this field. Simply type your desired value and hit enter. This value will be displayed in the field if no other entry is made. For example, for our request_status field we’ll add the default values assigned, in progress, and completed.

Tip
To enter multiple default values, use the String Array field type—otherwise, just enter one.
The Display in Client setting allows you to set how this field will be displayed in Mailytica’s integrations, such as Outlook, for instance. For our example we’ll set it to Display, editable and mandatory. The available options are:
Inactive: The field will not be visible in any of Mailytica’s integrations.
Display, not editable: The field will be visible in Mailytica’s integrations, but it cannot be edited by users.
Display and editable, optional: The field will be visible in Mailytica’s integrations and can be edited by users if they choose to do so.
Display, editable and mandatory: The field will be visible in Mailytica’s integrations and users are required to edit it.
Popup window: The field will be visible in Mailytica’s integrations, but a separate popup window will appear when the user clicks on it, allowing them to edit the data.
Then, the Persist Status setting will determine whether the user’s changes are saved or discarded in Mailytica’s integrations. You can choose between two options:
Inactive: Any information entered by users who use Mailytica’s integrations will not be saved unless a response is sent.
Active: Any information entered by users will be stored in the field. We recommend setting this value to Active especially if you are working in a shared inbox.
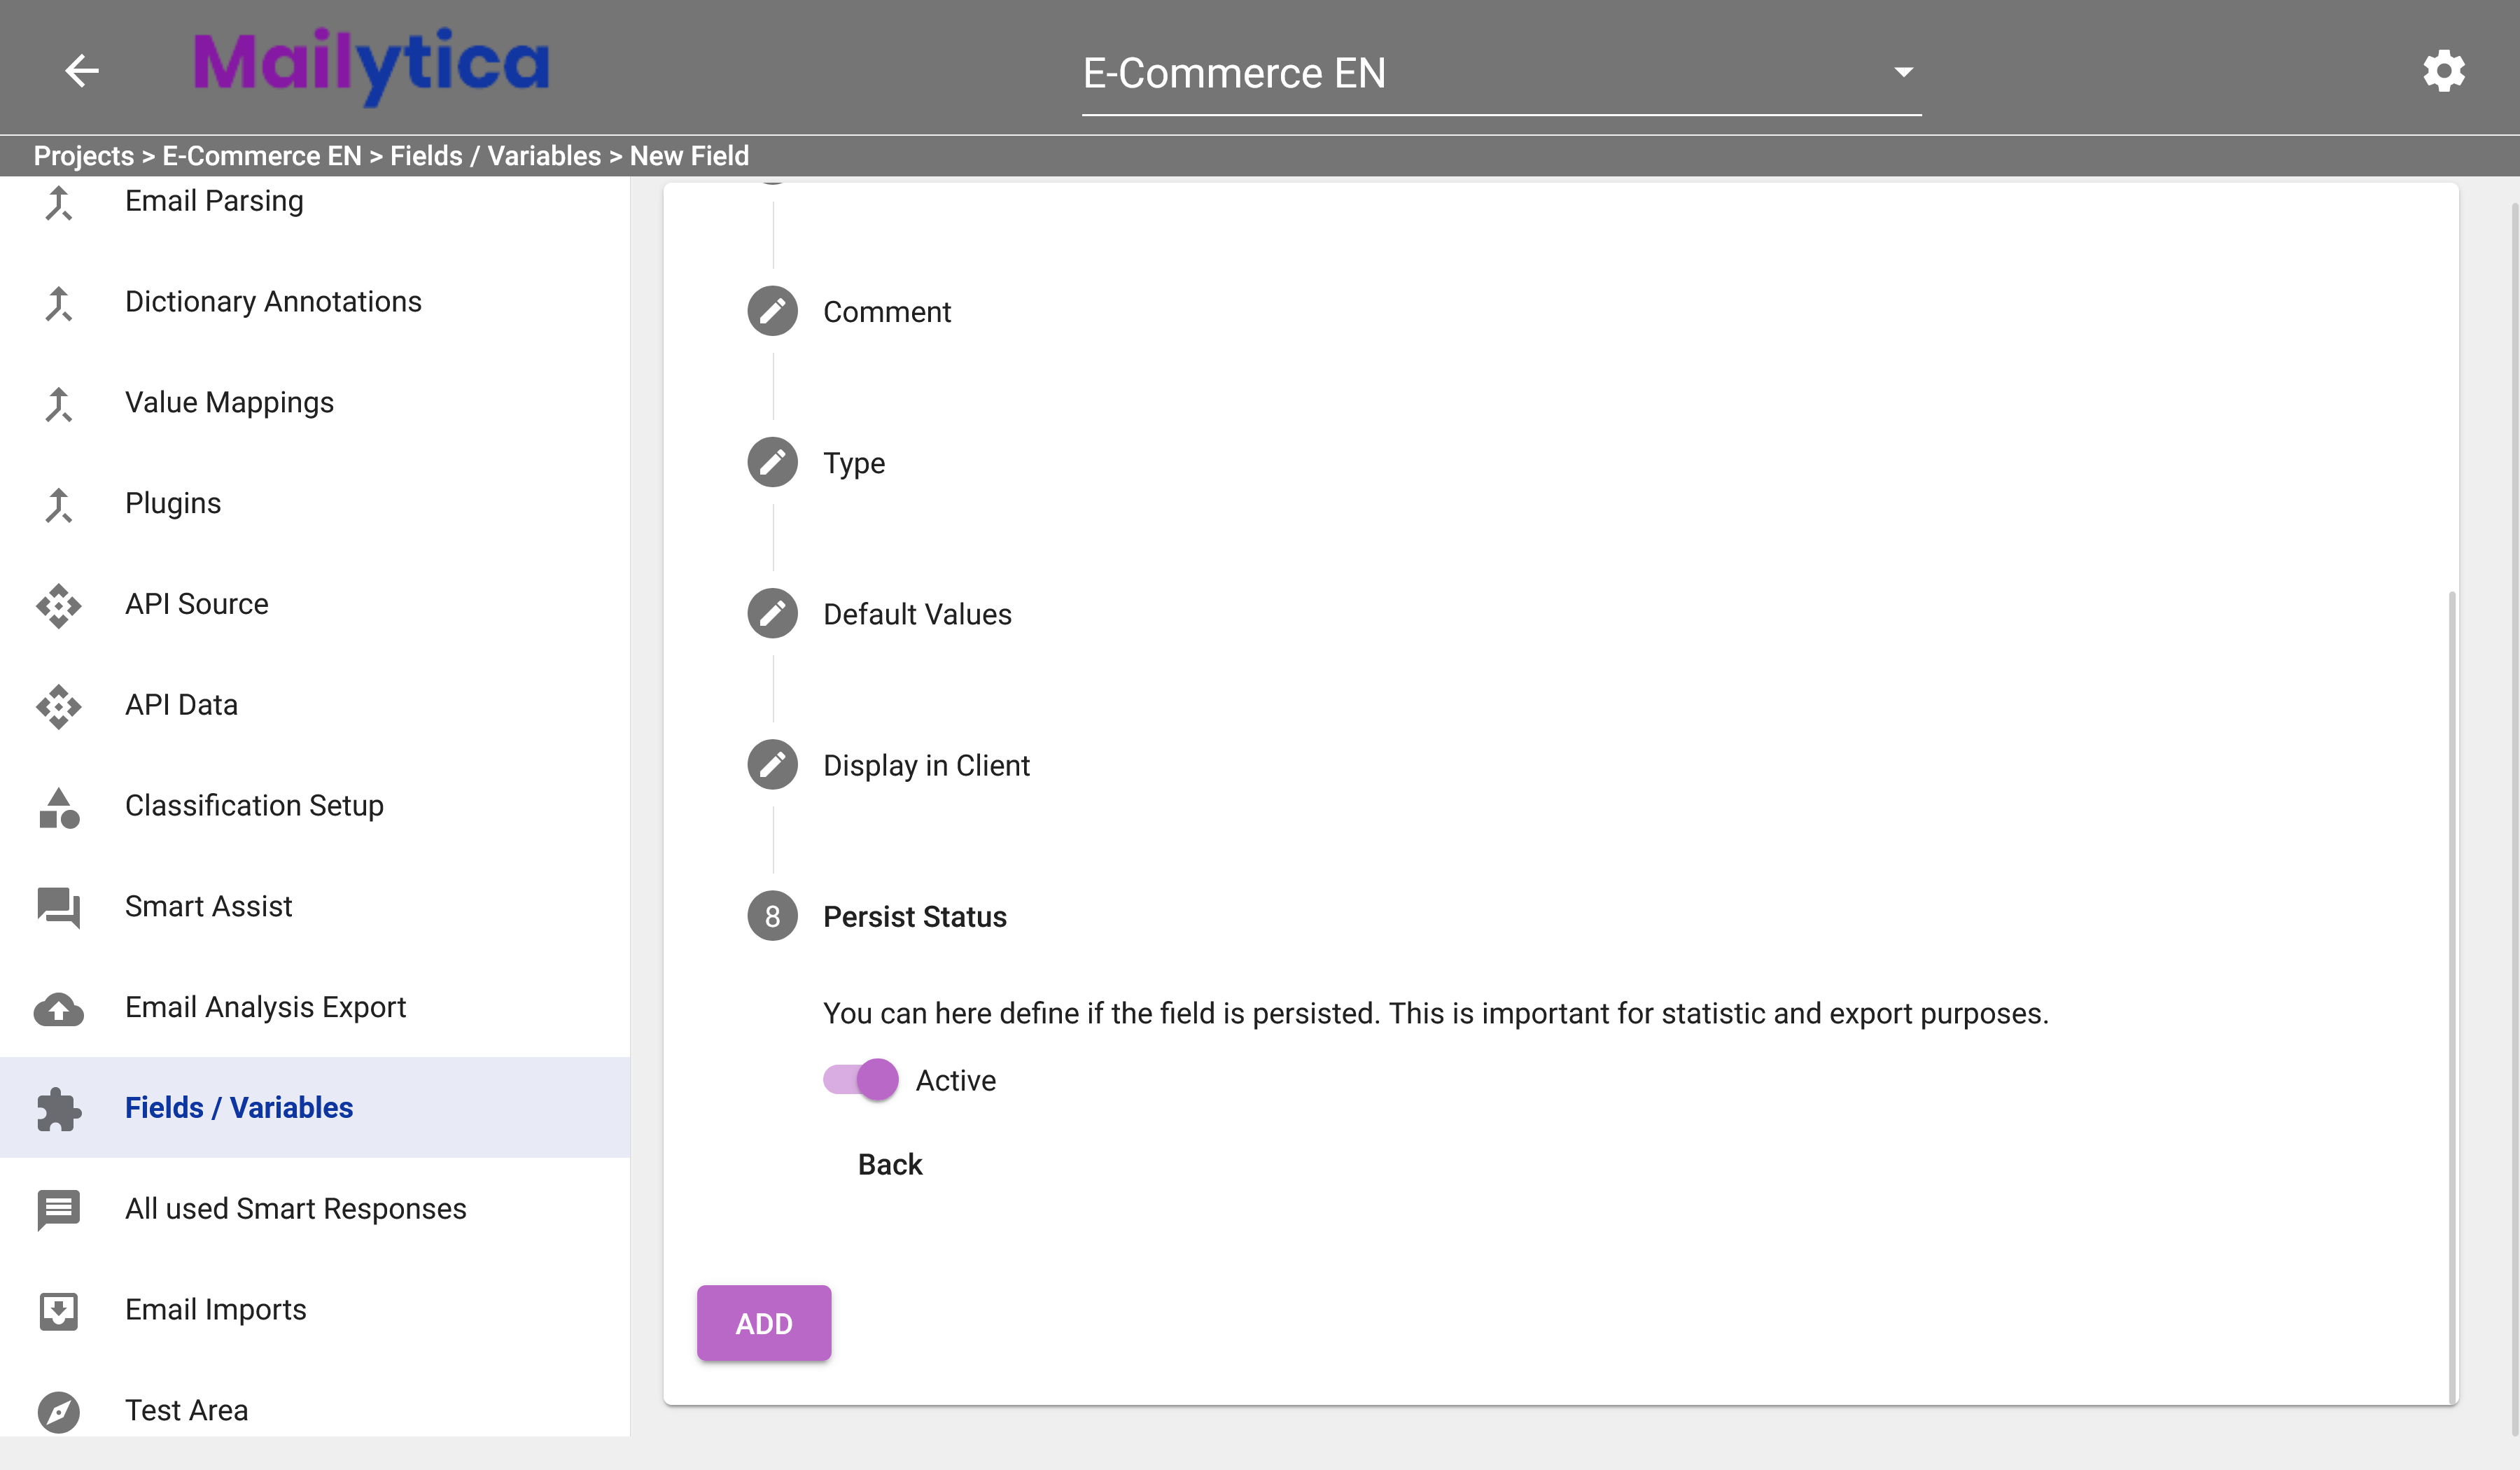
To finish, click the Add button. Your new field has been created and is now ready for use. If you selected that the field should appear in your client, it will now be available for display there as well.
Implicit Method#
Besides directly creating a field in the Fields/Variable section in Mailytica’s Online Platform, you can also create a new field implicitly.
In this case, they will be created as output fields and as a result of Email Parsing Rules, Dictionary Annotations, Value Mappings, or API calls.
Let’s assume that you have created a parsing rule to extract last names from email forms, with the following specifications:
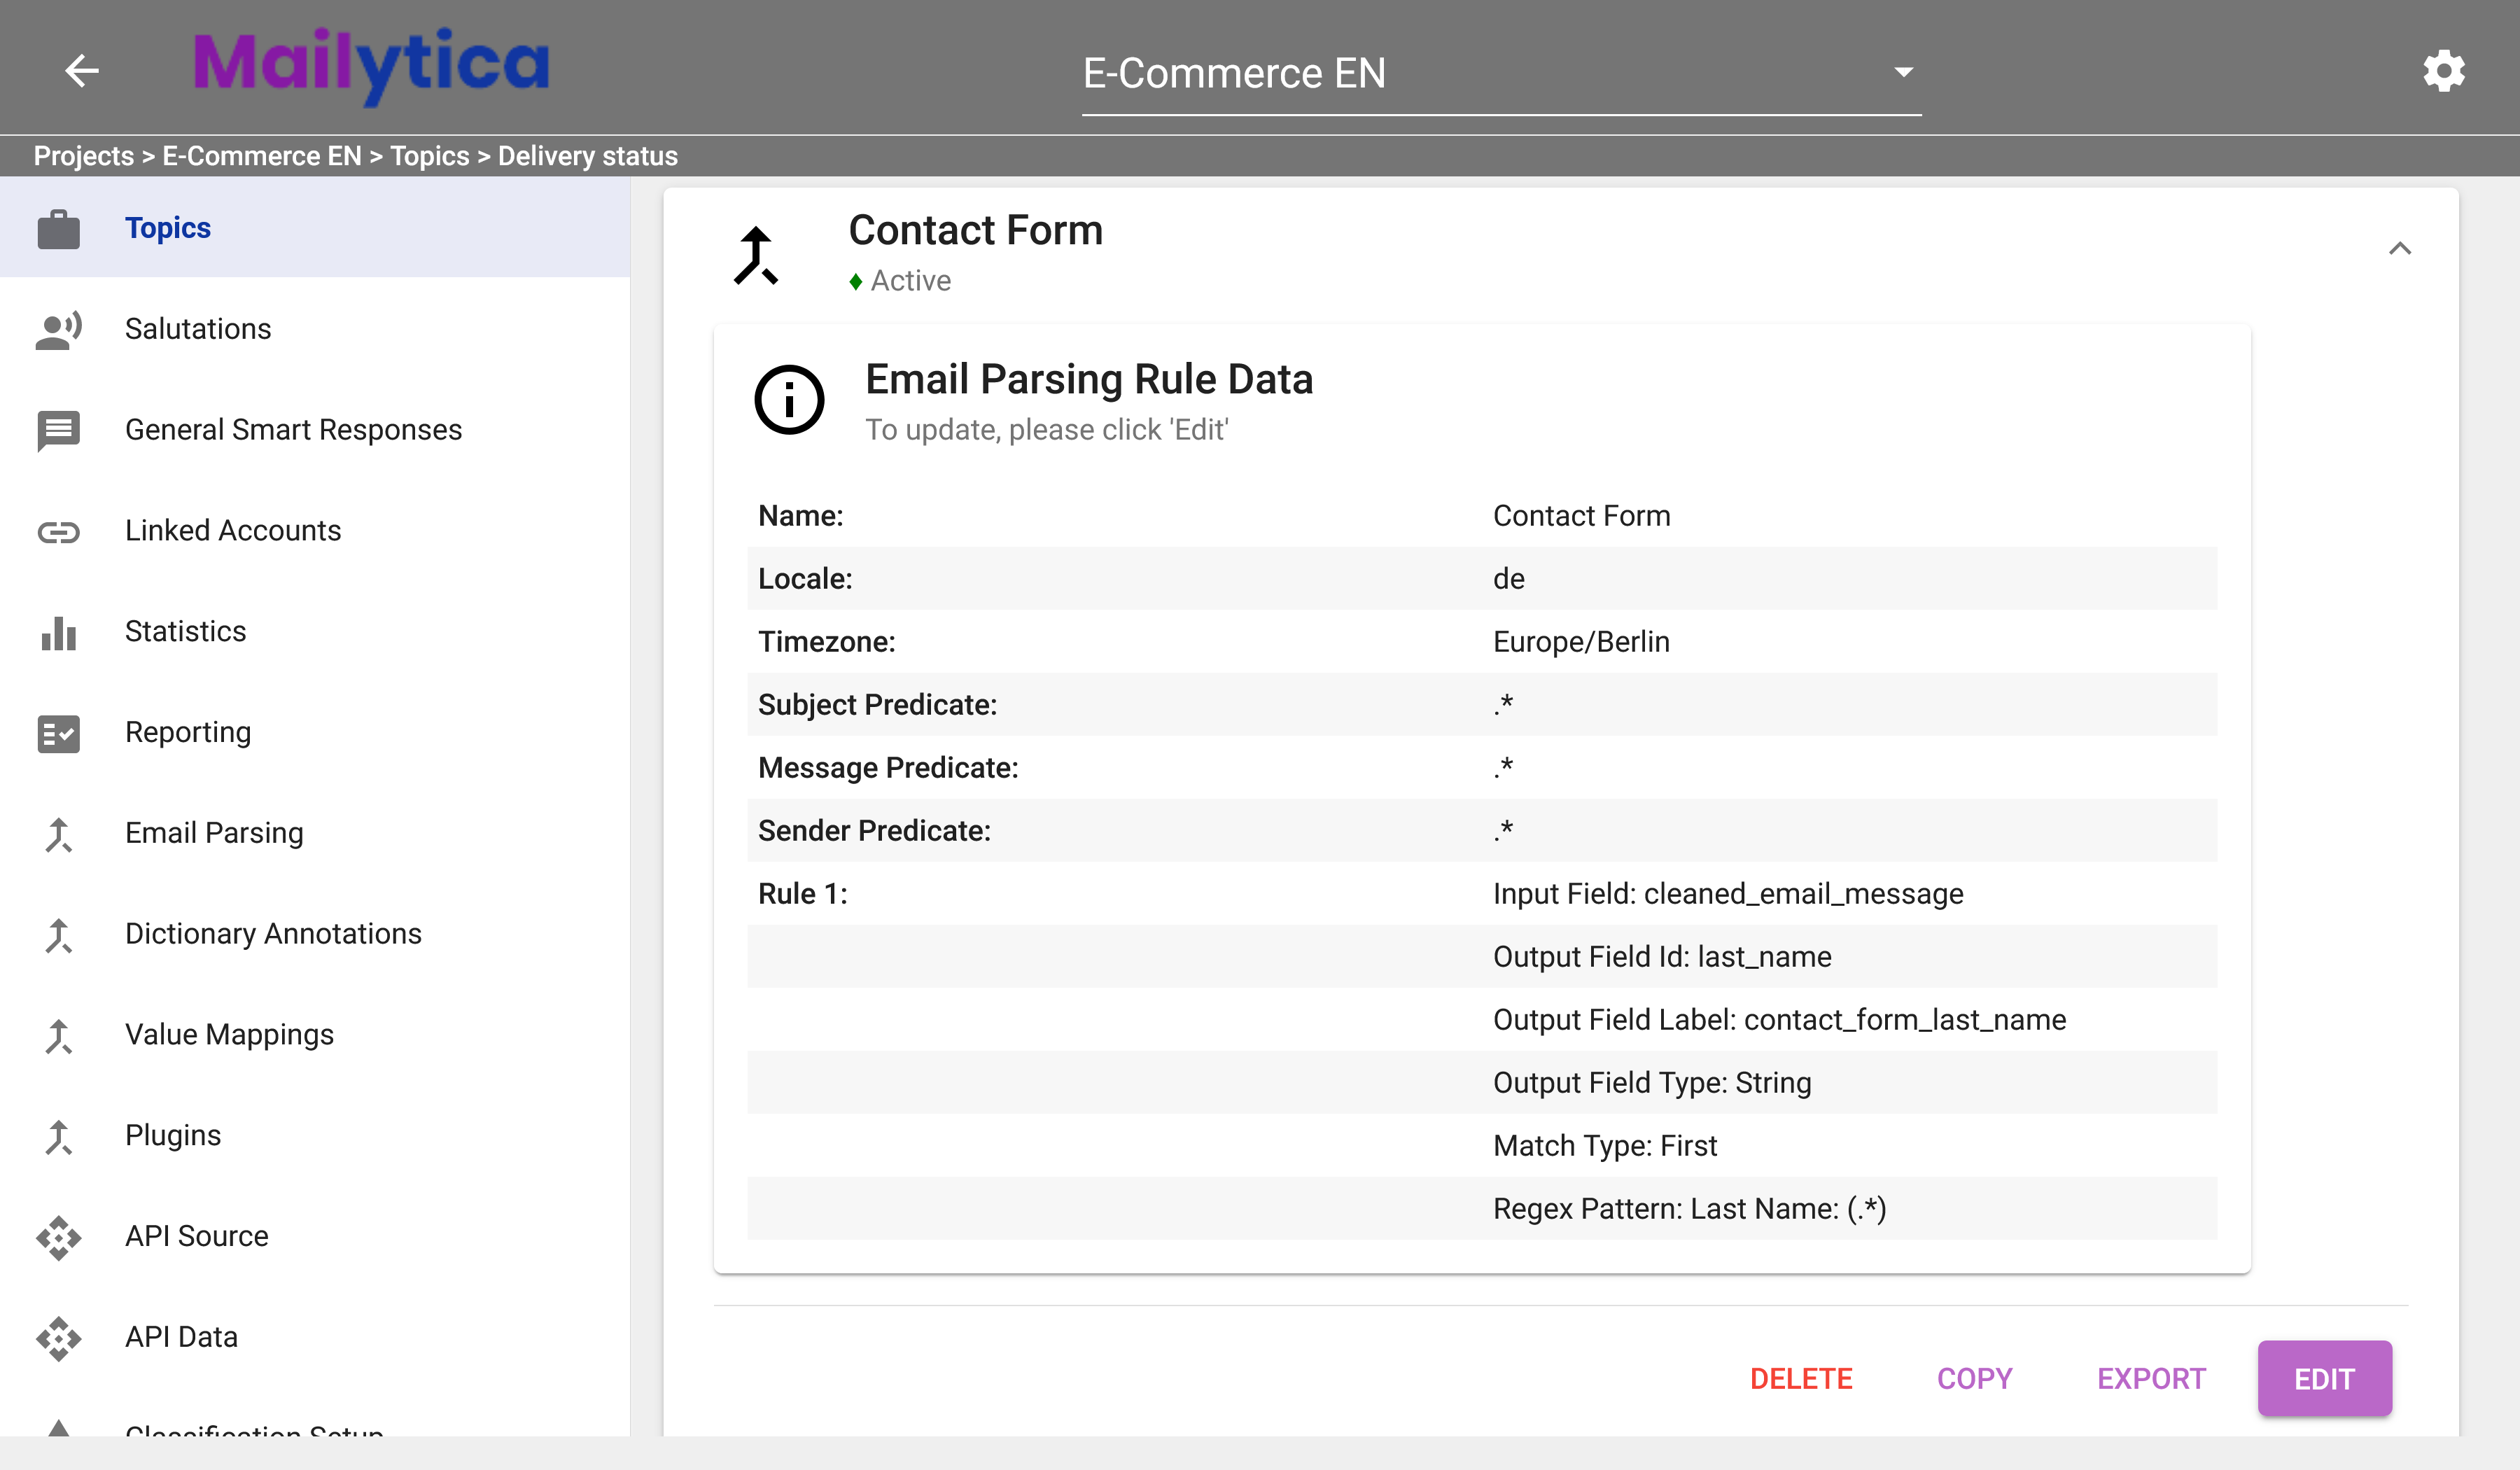
In this case, the output field id last_name would contain the person’s last name. Mailytica will extract this information directly from the email form.
As such, it is possible to use this field and its values in your Smart Responses by simply typing {last_name}, or you can also include it anywhere else in Mailytica’s Online Platform.
Tip
For more information please visit the Email Parsing section.
Using Fields#
Fields can be included in your Smart Responses to replace specific pieces of text. To use a field in your Smart Responses, simply add the name of the field enclosed in curly brackets {} to your message.
For example, if you extracted the client’s last name from an email form and stored the information in a field called {last_name} then in the Message section of your Smart Response you would write:
Example
Hello {last_name},
Thank you for reaching out to us. Please feel free to let us know if there’s anything else we can do for you.
For more information on how to use fields with Smart Responses, please visit Smart Response Variables.
This way, when you send the Smart Response it will automatically include the client’s last name in the greeting.
In addition, you can use fields with any of Mailytica’s data extraction tools—including Email Parsing Rules, Dictionary Annotations, Value Mappings, and APIs.
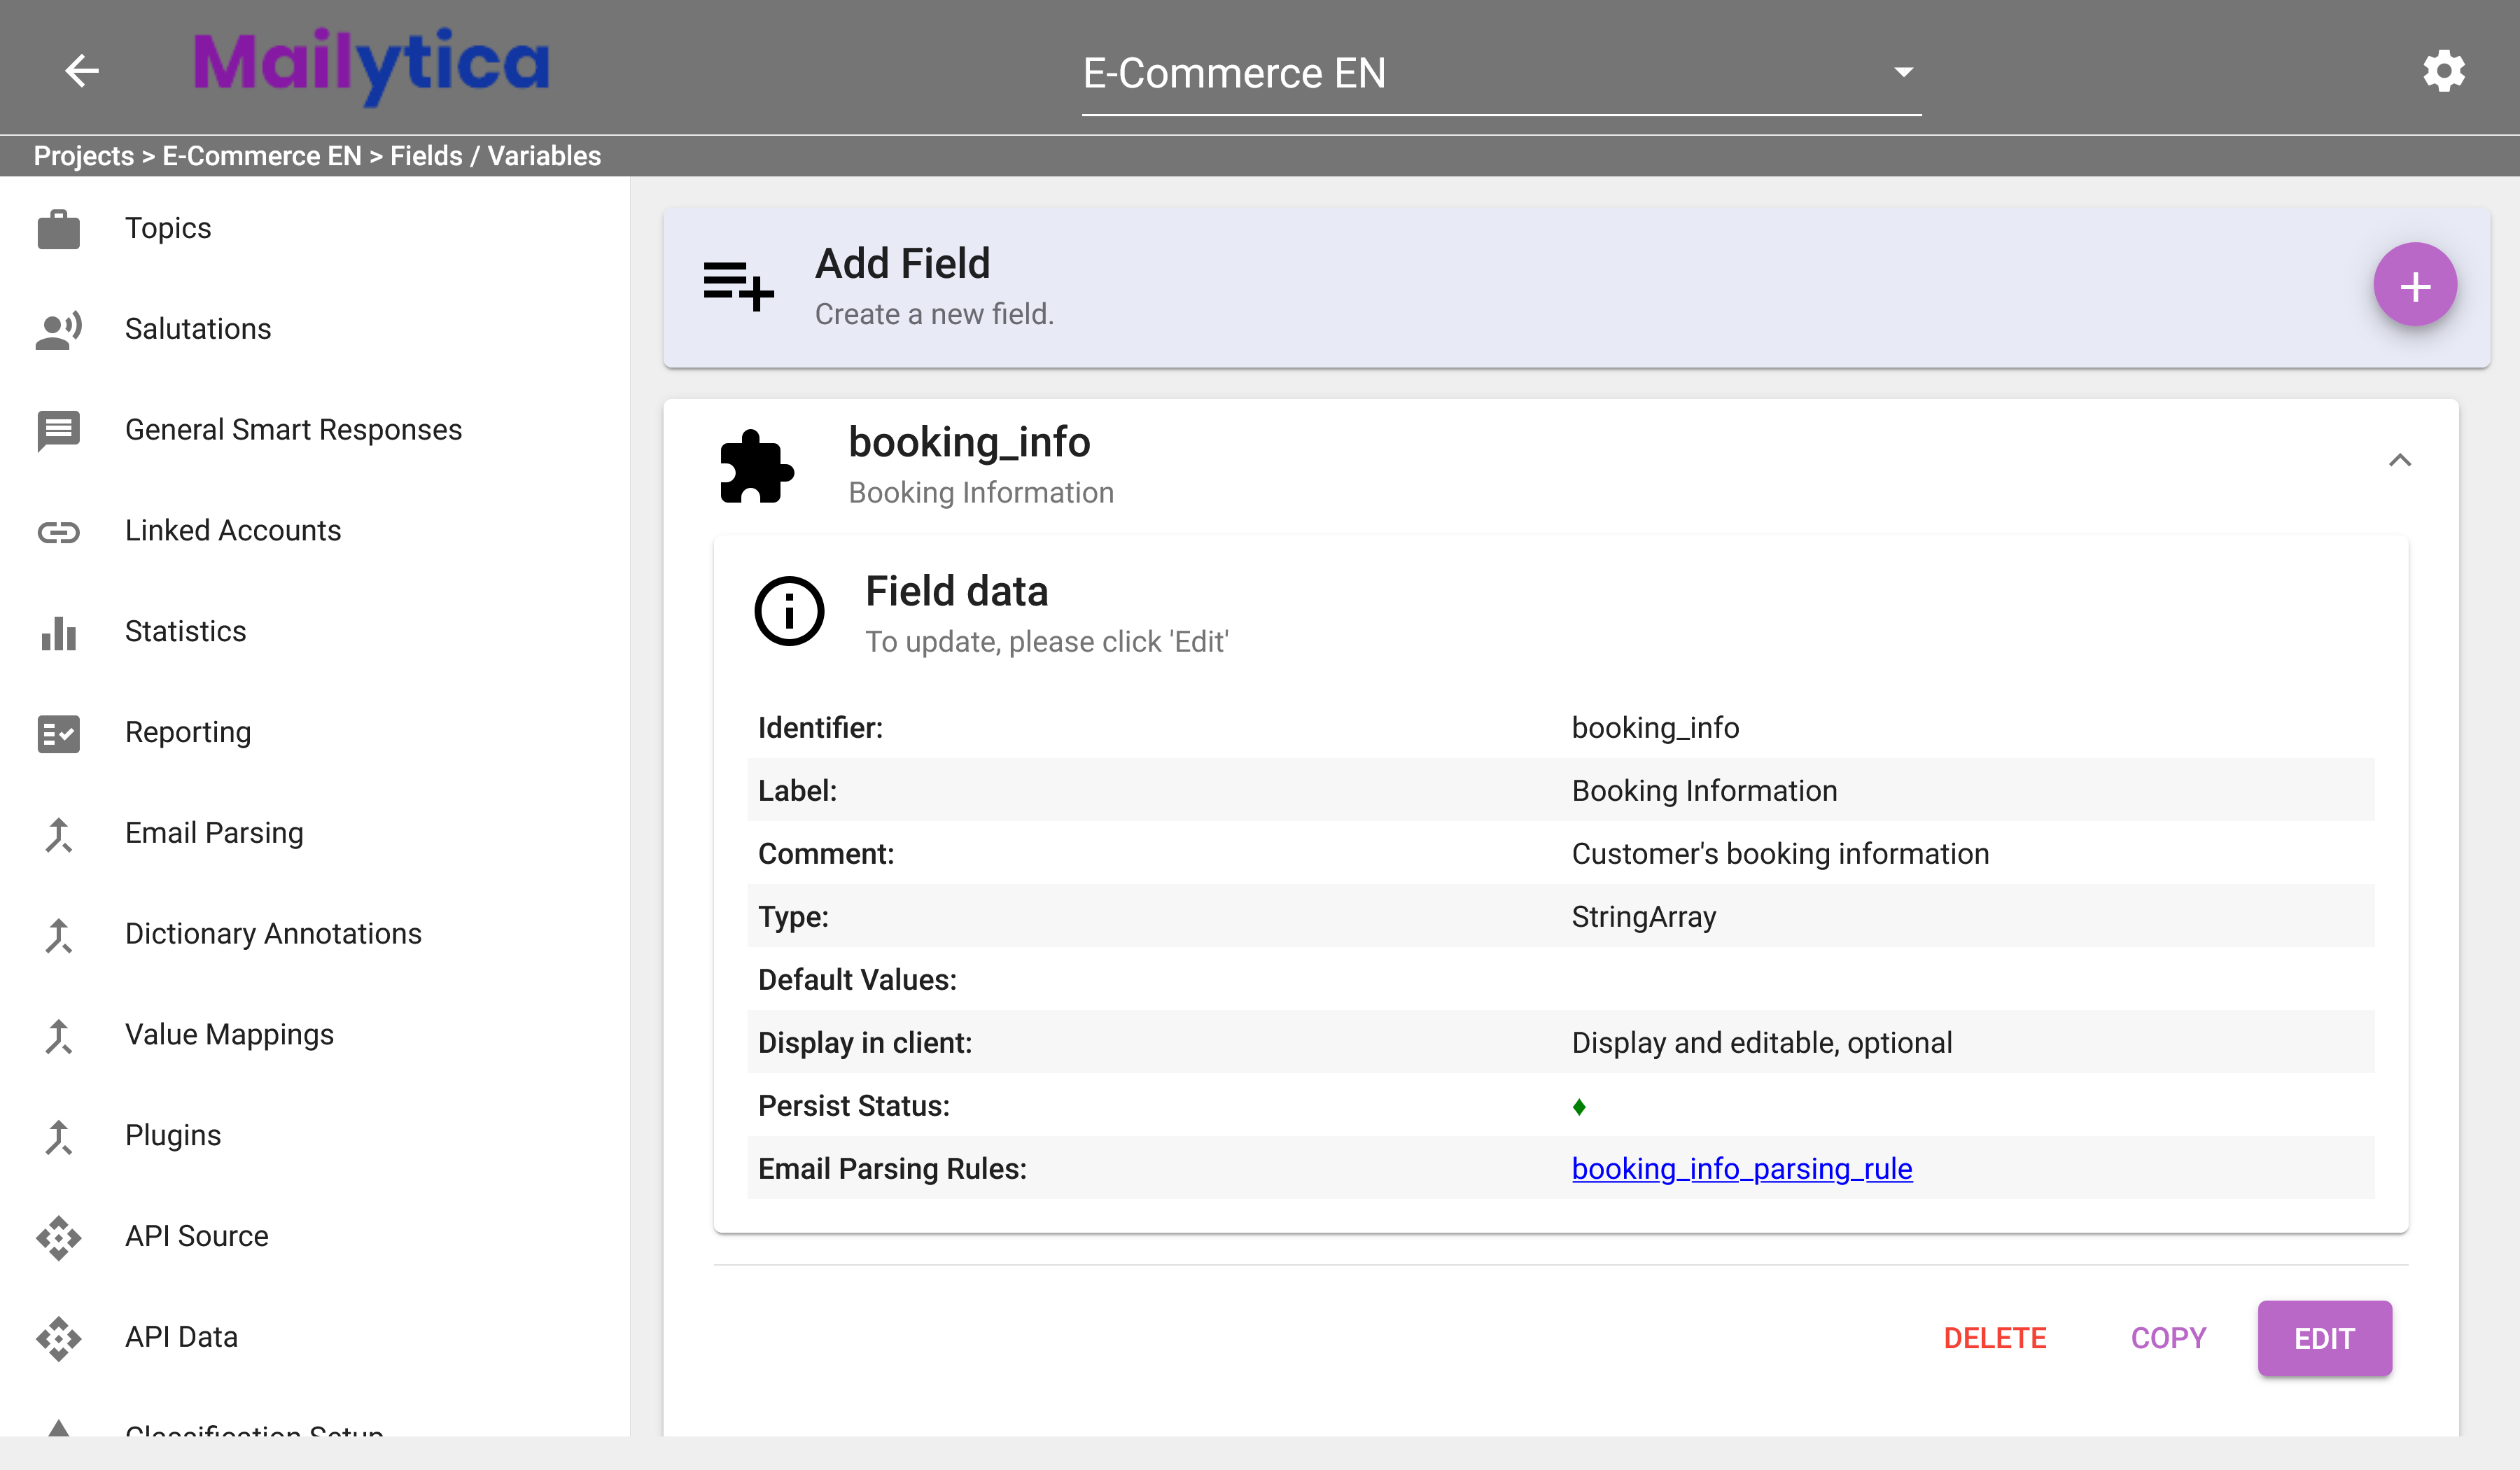
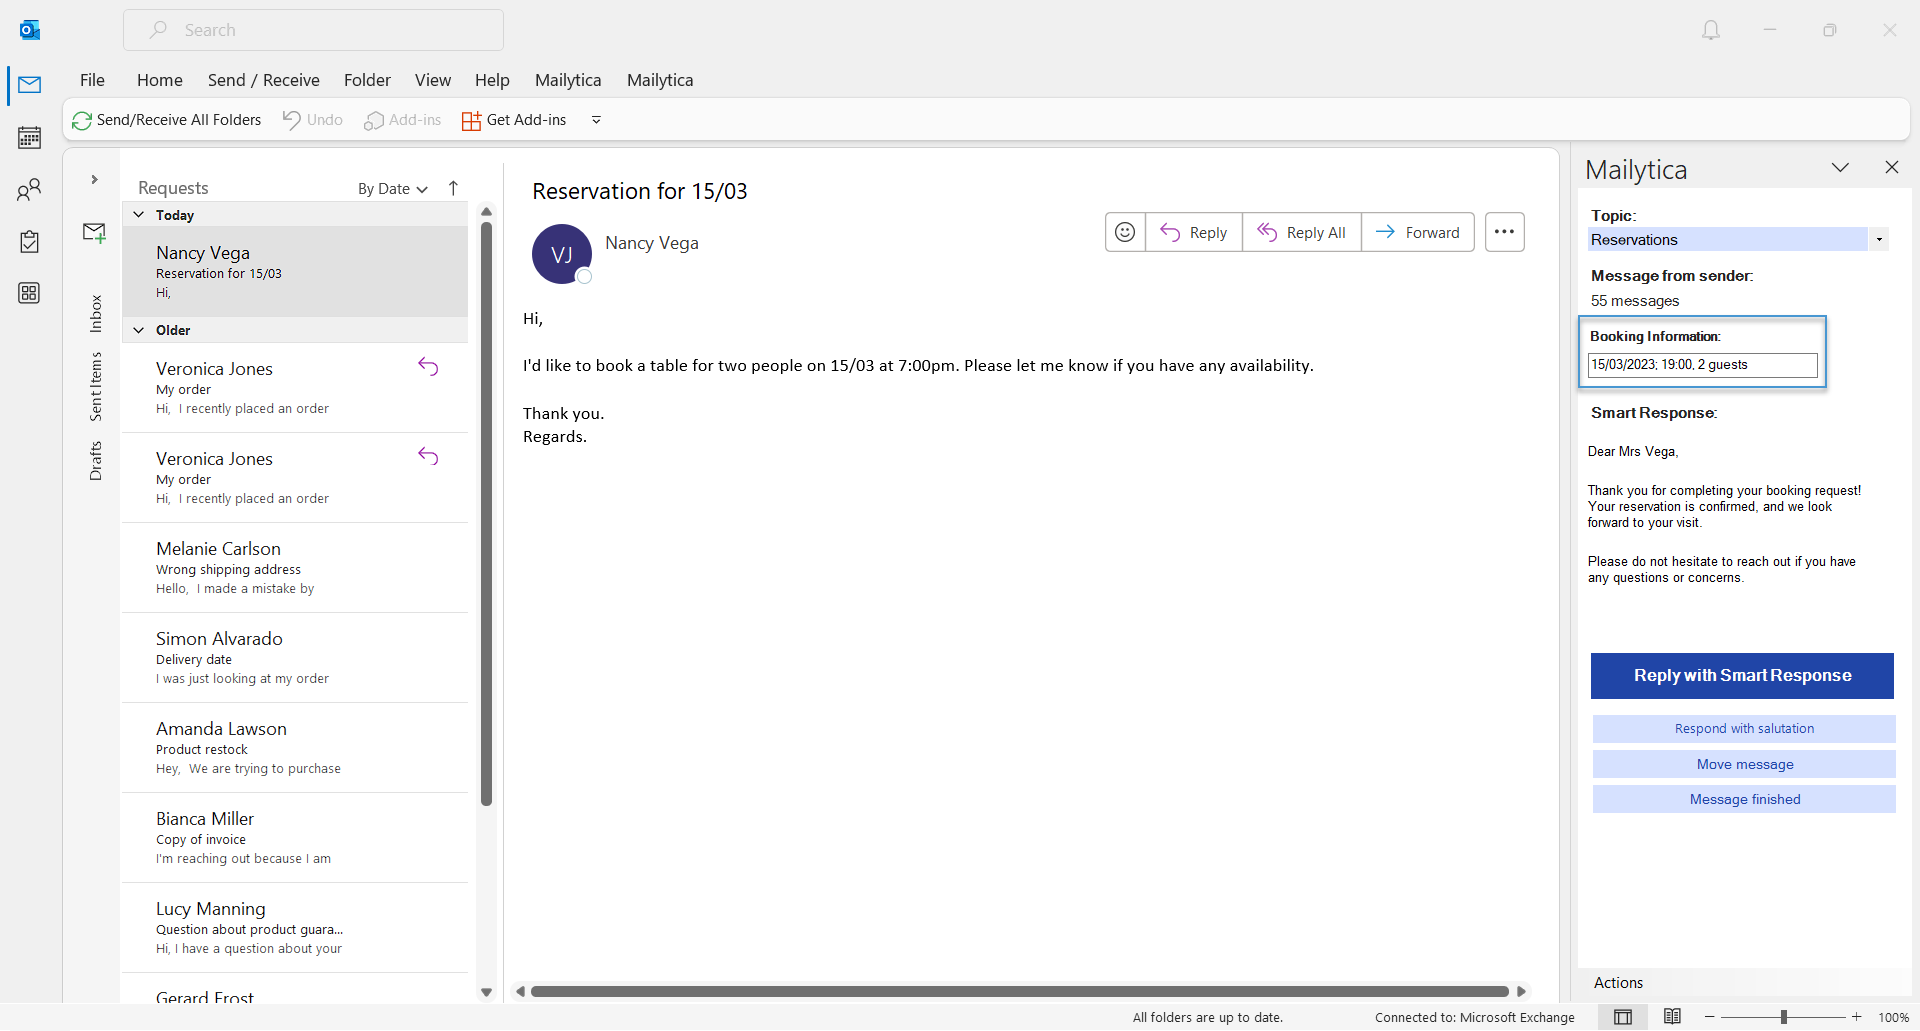
For example, let’s assume we created an editable field called {booking_info} that will appear in our Outlook integration.
If we wanted to use Mailytica’s email parsing rules, we could create a rule that extracts the booking date, booking time, and number of guests from our customers’ emails. Then, we could use that data as the values for our editable field— {booking_info}.
This way, when using the Outlook integration it will automatically show the {booking_info} field with your customer’s booking information.
This can be done by including the name of a pre-existing field in the output field id section when creating an email parsing rule.
To view which of your email parsing rules is using this field, click on Fields/Variables, click on any of the available fields, and then look at the Email Parsing Rules section.
Mailytica’s Fields functionality is a powerful tool that allows you to create and name your own fields, as well as use existing fields on your email data. This can be used for things like creating custom variables or simply organizing your data in the way that makes sense to you.